Friday, September 26, 2014

Drivel - Gentle Night

I realized something tonight....I seldom go outdoors when it's dark. I suppose that's a habit carried over from my childhood. I grew up in a city, so nighttime wasn't all that safe. As a result, I seldom felt comfortable outside when it was dark unless I was with other people. 

Since moving to "the country", I have been losing my fear of the night. But I seldom stray from the area around the house. So tonight I took a walk around the homestead. Well let me tell you, the animals weren't pleased by my odd behavior. The dogs barked at me. The sheep were spooked. The hens muttered on their roosts. Several rabbits thumped their feet in alarm. The piglets woofed and gave me that deer-in-the-headlight stare. The only ones curious were the cats. As I strolled about, in had a retinue of half a dozen cats following me. Guess they were trying to figure out what I was up to. 
(Above, Becca illuminated by the flashlight.)
(Above, the pond as I walked past. No fish in sight. Just pond plants serenely floating on the surface.)

There was no moon tonight so it was really, really dark. Even after my eyes got accustomed to the dark, I couldn't see much without the flashlight. But I discovered that the farm is really lovely at night. Quiet except for a few insects and a cane toad. And home to some nightlife -- a spied a bat, a barn owl, and several night geckos and moths. I checked the garden for slugs and was pleased to see there weren't scads of them. Slugs are one form of nightlife I could do without. I looked into the pond (photo above) but didn't see anything moving. And though I know that rats, mice, and feral pigs prefer the night, they were leery enough to stay hidden from this blundering human. 
After a 30 minute stroll, I still couldn't make out any land features without the flashlight. Checking the sky there wasn't a star to be seen. My personal night vision was zilch. If the flashlight failed, it would have been a challenging situation with me being a novice night navigator. Boy! I would have been in need of a seeing eye cat! The above photo is of the steps leading up my hill. Barely visible until they were in the full flashlight beam. 
By the time I started climbing up home, I realized that I had become relaxed with a lovely aire of peace about me.  I was really getting into the relaxing night thing. This night walking turned out to be quite nice. Carefully climbing the log steps up toward the house, I looked up to see the house lights. They seemed out of place in the darkness that surrounded me......
Almost to the top of the hill stairs I stopped to take a photo of the welcoming house door. Hubby had put the porch light on when he noticed that I was returning. 
Yes, a welcoming sight. "We'll leave a light on for you." 


Wednesday, September 24, 2014

More Pallet Boxes -- or Utilizing Truckloads of Weeds

I'm helping to clean up a local garden area down the road and have been hauling truckloads of weeds away. Rather than dumping the debris at the local trash station, I've been using the windfall to expand my gardening efforts. While I already produce enough food for ourselves (hubby and I), I'm working with the community garden group to produce food for them and our community. So lots of extra grow boxes surely would come in handy. Especially for slug prone crops like various greens. 

The limiting factor for these boxes is the fill. I have access to plenty of pallets. Enough material for lining the boxes. Enough area to erect them. But each takes a cubic yard or more of fill. Believe me, that's a lot! 

A truckload of weeds and trimmings looks like a cubic yard, but don't be fooled. It's mostly air. Once the material is transferred to a pallet box and stomped down, it's a lot less than you'd guess. Then give the material a few weeks to start decomposing, and the volume goes way down again. 
The box pictured above is half filled. I stomped it down but the material is a bit springy, so the box looks fuller than it actually is. To fill the box halfway has taken 9 trashcanfuls so far, plus several buckets of dirt and manure. 

This is how I'm using these old weeds. The stuff is rather woody, which means that it will be slow to decompose, is low in nitrogen, and will need fungi to break it down. Plus it is loaded with weed seed. With all this in mind, I'm loading a foot deep layer of the material into a pallet box. Then I add a 5 gallon bucket of dirt that I spread around over the layer. Next I sprinkle a couple shovelfuls of compost that I had previously inoculated with mushroom spore (I collect mushrooms from the county parks around here), then a 5 gallon bucket of manure (rabbit, chicken, or horse), then wet it with about 5 gallons of water or more. Repeat. Repeat. Climb in and tromp it down real good, then start all over again. 

Using these old weeds means more work in filling the pallet box, but it will make a nice growing media. I've done it before so I know that it will work. This material will heat up. No surprise since its just a boxed compost pile. But that means that I can't plant into it immediately like I can the other "cold" pallet boxes. It will take 3-4 weeks for it to cool down then be topped with 3 inches of good garden soil. 

So how much old weeds is needed to fill one box? I'm going to guess 18 standard full trashcans. Maybe 20. And that's just the first filling. I don't know how much volume it will lose as it goes through it's initial decomposing. The stuff is rather woody, so I'm not sure. Surprised to hear 20? Well so was I the first time I tried filling my first pallet grow box. It surely takes a lot of weeds to make a cubic yard of packed organic compost. And what also surprised me was that within two months the soil level will drop a full foot, and after 6 months the pallet box will only be half full. But the beauty of the system is that I get to utilize weeds, purchase zero fertilizer, get a lush crop, and end up with a half cubic yard of gorgeous "soil" that I can use to make more boxes or apply to garden rows that are rather sparse on soil. 

I plan to grow chard, kale, and lettuce is these new boxes since I've had requests for those crops. 

One more thing.......
I've already related how I line the boxes with something to help keep  moisture in -- old tarp, cut open feed bags, old plastic sheeting. Up until now I use to use a staple gun to attach the liner to the pallets. But the plastic tends to pull through the staple during the filling/stomping process. So I'm trying something different. I'm taking old milk gallon jug tops, making a hole for a nail in the center of the top (with a drill or a soldering iron), then using a roofing nail to hammer the liner to the pallet. 
The bottle cap grabs the plastic liner quite nicely. This way the liner shouldn't pull through. We shall see how well this works. 

Donkeys!

What are donkeys good for? Pets, of course!!! If we'd like to share our farm with donkeys, do I need any other reason? Naw. Pets are totally fine. 

Today I stopped by to see two donkeys that need to be rehomed. Although I've never met these two before, I've often talked with their owner over the years, hoping I suppose that there might be some baby donkeys in the works. No luck. But I've always been fond of the idea of sharing my life with donkeys. I've had ponies in the past and thoroughly loved them. Kept them to the day they died of old age. But never donkeys. While I understand that donkeys are not ponies, I still would like having donkeys. So ...... meet Dink and Donk.........
I was so pleased to see how friendly these two are. One thing I know about donkeys is that they don't forget mistreatment. These two very obviously have never been mistreated. They are mild, friendly, docile for donkeys. They seemed comfortable around me, as I was with them. 
So if all goes well, Dink and Donk will be moving to my homestead. They can help eat the grass and make the place look "homesteady".... is there such a word? I won't ask any work from them, but if they happen to team up with the sheep, then they can be pasture guards. Donkeys intensely dislike dogs, so Dink and Donk can help protect the flock from stray dogs. Fine by me. 

Sunday, September 21, 2014

Lilokoi Harvest Time Again

I haven't gathered lilokoi yet this season, so I figured it was about time I go foraging. I don't need too much since I still have several pints still in the freezer, but lilokoi is a seasonal crop so I had better make sure that I have enough to last until next year. 

I have a favorite spot for collecting lilokoi. Lots of other people also collect from there but there is usually plenty to go around. Sadly some other locations that harbored lilokoi plants have been bulldozed or weedwacked, so there is a lot less opportunities for foraging. But with the rains and warmth this year, what vines still exist are producing loads of fruits. 
Snuffling around my favorite hunting grounds I noticed two things right off. Very few people are collecting lilokoi this year. There were plenty of fruits laying around. And none of the usual annual debris had been cleared away. Second, the fruits were very large. I suppose the weather is the reason for that. These are the biggest lilokoi I've ever gathered. 
I also came upon lots of beautiful fungus. I don't know what it is called but I think it is a type of shelf fungus. Quite colorful. 

I was surprised to find another type of lilokoi growing in this spot. For years I've been collecting the large bright yellow ones. But there is at least one vine producing the reddish type. Bingo! I like these reddish-purplish colored ones. Glad to get some. I'll have to go back again next week to see if there are more of these. These lilokoi have a very slightly different flavor. Perhaps a tad sweeter, or perhaps a bit less of a tart bite. 
Basically they look the same as the yellow ones, except for color that is. And I use them in recipes the same as the yellows. 

A couple of weeks ago at the last canine spay/neuter clinic I worked at I was given a recipe for lilokoi mousse. The stuff was delicious. But alas, I lost the recipe. Well not exactly lost lost. It's now a pulpy wad of ink tinged paper that I found in my shorts pocket after I did the laundry. Oops. Forgot to empty the pockets! I need to get that recipe again. It was so good that I'll post in on the blog for you. 

Saturday, September 20, 2014

Drivel - Active Lava Update

To everyone who has been concerned about the lava over running my farm ..... Thank you for your concern but it's no where near us. It's on the other side of the mountain. Some day lava will erupt on our side, but not this time around.  

Kilauea volcano has been erupting since 1983. Most of the time the lava flows have been in undeveloped areas but from time to time a flow hits some important targets. In the past, Royal Gardens housing subdivision and the Kalapana areas have been wiped out. Now a finger of lava is heading for the historic town of Pahoa. This is the upcoming disaster that will be happening in slow motion. Not exciting enough to stay in the mainland news, not yet. But once it hits the town I'm sure you will be reading sensationalized news about it. 
First, the photo credits. They came from the Honolulu news website- hawaiinewsnow.com. I recognize some as coming from the USGS website. I don't know the photographers names. 

Above is the Kilauea crater, the ultimate source of the lava. No lava is coming out of this crater on its surface.... which by the way is huge and miles across because it is a crater within a crater within a crater. But underground there is a major lava channel leading to a surface eruption site a few miles away, which in its own right looks like a small volcano. It's call Pu'u O'o. Good old Pu'u O'o is spilling lava out its side and being quite sloppy about it. Looks a lot like a baby trying to feed itself a bowl of gloppy rice cereal -- blops and rivers of the stuff every which way. 

Since the end of June, some of the lava has been organized into a nice flow, somewhat river-like. It's been slowly making its way over areas of old lava eventually entering a forest preserve. 
It's been slowly creeping through the forest, burning trees along the way. No one took much notice until it started heading for some houses (in the foreground). Luckily for those homeowners, the lava flow made a turn, heading down hill around the subdivision. But that turn now has the flow heading directly to a small town. 
Suddenly people are taking notice! As best as can be guessed, the lava will flow right through town, across the Pahoa town road, then right over the only feeder highway leading in and out of all Puna district! Yikes! Bad news. 
Daily meetings with county officials plus numerous websites are keeping residents informed. The county is taking steps to create two temporary roadways so that there will be access to Puna. 
Regardless of preparation, it will be disaster for sure. But it occurs agonizingly in slow motion. Every day you can watch it creeping closer. Everyday it's the main topic on everyone's mind. 
In the next week the area will be packed with outsiders coming to see the town get eaten and people's homes get destroyed. Tourists mainly, but also worldwide newspeople. I'm sure the residents are not looking forward to it. 

My heart goes out to those who will lose their homes. People are already moving valuables and livestock. But it's hard to move a home, the landscaping, the memories. But the lava is no surprise. We live on an active volcano. 

Friday, September 19, 2014

Creative Repair

It's not uncommon around a working homestead farm for quick emergency solutions to problems that pop up. I've done dozens so far. It's such commonplace that I don't even think about them. 

Today I moved my horse to a neighbor's pasture. The neighbor lives on the mainland, so the pasture is vacant. In order to keep the pasture from over growing, she allows (actually encourages) people that she knows to use the pasture. Nobody has had livestock there for a few months and with this crazy weather the grass is getting out of control. So I moved my horse there. Yoshi will think she died and went to pasture heaven......belly deep grasses of all sorts. 

I saw right off that the gate that I was familiar with was gone. Most likely rusted away. Someone had improvised a gate. 
Two young trees sacrificed to make suitable poles. Then creatively attached to the fence posts on each end using some old telephone cable. 
Nothing sophisticated, but quite functional. 
Definitely wouldn't hold an escape artist in, but my mare won't bother testing this gate. For the next couple months she'll be content to eat grass. 

A proper gate would cost hundreds of dollars. But since this pasture doesn't have what one would consider to be proper fencing, this gate will do just fine. And it didn't cost a penny.....except somebody's time. 

Homemade Mint Extract

I love the flavor of mint. Hubby's not impressed by it, but I'd say just about everything tastes better with a minty touch. Thus, I grow mint. Spearmint, peppermint, and chocolate mint. I like all three. It grows fairly well here in Hawaii, but I notice that is goes through a rest period. The plant partially dies back, pauses in growth, and generally doesn't look good. And of course, zero harvest. So in order to get my mint fix during that rest period, I need to preserve the mint. 

Drying mint leaves is easy. But in order to preserve the flavor, the dried leaves do best if stored in a sealed container in the freezer. I'll use dried mint for teas. We drink green tea on a daily basis. A bit of mint in it is really refreshing. As long as I don't go overboard with the mint, hubby likes it. 

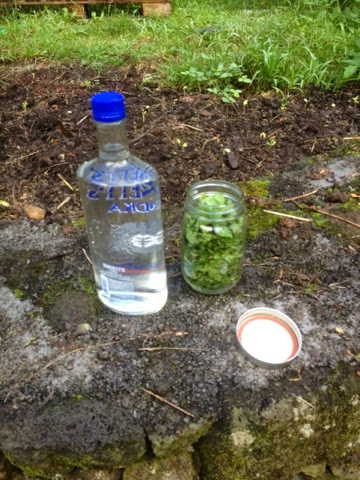
For other recipes, I find that an extract works easier. Being the self sufficient type, I wanted to learn how to make my own using my homegrown mints. Turns out that it's really easy to make mint extract. It won't be entirely home sourced because I don't make my own vodka, but I discovered that one bottle of vodka will last me a long time. That's right, I'm not a drinker. I've read that you can use rum instead of vodka. Hey, I've got plenty of sugar cane around here. I wonder how one makes rum.....? 

Anyway, here's the steps for making mint extract:

1- Remove the leaves from the stems. I just use leaves and the tender stem tips. I choose the nicest looking, perfect leaves. 
(Above, fresh picked sprigs of spearmint.)
2- Wash/rinse the leaves. Spread them out on a towel and let them dry. Or towel dry them to get most of the water off.
3- Bruise the leaves. I use to either crush the with my hands or use a rolling pin. But I soon discovered that if I rolled the washed, wet leaves in a dish towel then crushed away, the leaves got dried and bruised at the same time. The leaves could be chopped instead of bruised, but it just means that the small pieces may be harder to remove from the extract. For most applications, it doesn't matter if there are mint leaf pieces. 
4- Pack a canning jar with leaves but don't overpack it. If overpacked, the leaves will expand over the top of the vodka and rot, ruining the batch. 
5- Fill the jar with vodka, making sure to well cover the leaves. 
6- Put the lid in the jar then store it in a dark area for about a month. Test the liquid. If its not minty enough, then store it for another month. Having said that, I have a new method that I've switched to. I store the leaves for one month then fish out the spent old leaves, discarding them. Then I add a new batch of fresh leaves. Then I'll store that jar for another month. At the end of the two months the extract is nicely minty. I suppose you could keep repeating that step but I usually don't. 

As for the choice of vodka, it doesn't matter, I'm told, as long as its 80 proof or more. The alcohol acts as a solvent and preservative, 

Some tips I've discovered--
...the mint leaves float initially. After a few days they sink. So in the beginning until the leaves sink, I will give the jar a little shake to keep the leaves well coated in vodka. 
...the longer it is steeped, the stronger the mint flavor.
...replacing the old leaves with fresh makes for a mintier extract. But after doing that a couple times the vodka must get saturated with mint oil because it doesn't seem to get all that stronger. So replacing the leaves once or twice is it. After that it isn't worth the effort.....the effect of diminishing return. 

I haven't tried it, but I bet I could make extracts using this same method for vanilla, coconut, orange, ginger, etc. But since I can get those fresh pretty much year around, I haven't experimented. But I have considered trying various citrus extracts. Perhaps someday......


Sunday, September 14, 2014

I Could Have Done Better - Woodstove

There's nothing wrong with the woodstove itself. In fact, I'm quite happy with it and would highly recommend it to anyone looking for something to heat a small space. It's the installation that needs some tweaking. 

I built a plinth for the stove, getting it up off the floor for easier use. I'm past the time in my life that I want to be on my knees stoking and cleaning a woodstove. So the pinth has worked out wonderfully. The problem lies in the amount of overlap I allowed for in front of the stove. It could use another 6 inches at least. 
In the photo you can see the problem. When the stove has been running for a while, the coals and ash build up. Thus when the door is opened, sometimes some will spill out when I go to add more fuel. In my case it's not a fire hazard because neither the pinth or floor is combustible. But it surely is messy. If the plinth extended out another 6 niches, any ash or embers would spill onto the pinth and not the floor. 

When everything else is finished on the house, I plan to go back and build those extra 6 inches. 

Ducks

The homestead is home to 11 Muscovy ducks now. 2 came from the community garden project and were relocated to my place when the garden group changed their location. The others came from a local mini farm who decided the get out of keeping ducks. 
The small flock consists of one very, very happy drake with his band 10 females. The guy couldn't be happier. 

Why go with muscovys? Availability is the number one reason. Right up there with number one is the fact that they are not noisy. For the sake of the neighbors and my own peace, I didn't want noisy ducks. Plus muscovy ducks lay nice eggs, are good mothers, and are a good duck for eating. Another major plus is that they don't require a pond, though they enjoy a small tub for bathing. They are good foragers and are known to do well in Hawaii. 

Initially I had the ducks in the front pasture. But that pasture is gradually being converted to gardens. So the ducks needed to be moved. The garden could handle one duck, but a band of ducks would some eat everything green. So the ducks were rehoused to the middle pasture, a good 700 feet from the garden area. 

All went well for two weeks. Then this morning I found a group of ducks down by their old pen. 
Darn. Breakout! A quick investigation showed that they found some wide gaps in the gate fencing and had simply walked on out. The drake and the biggest female couldn't fit through. A bit of plastic bird mesh attached to the inside of the gate fixed the problem. Now to get the wayward ducks back. 

Herding Muscovy ducks isn't all that difficult. If not spooked, they prefer to walk. And pressuring them just a little bit got they walking back toward their pasture. But I quickly hit a snag. A puddle! 
They walked through the puddle, then circled back. Took baths, drinks and did some splashing. Every time they started walking off, one would decide to hit the puddle one more time causing all of them to make a break for it back to the water. 

Out of the blue, a knight is shiny armor (that is, an elderly, mostly deaf, somewhat crippled Border Collie) arrived to save the day. 
The old Colliewobbles got those ducks rounded up into a tight flock and moved them right away from the puddle. Without one command from me ......which wouldn't have done much go anyway since the dog is deaf.....she pushed them all the way back to the pasture. 
She even held them as a group while I opened the gate, then moved them into the pasture. Wow, what a dog! The old Colliewobbles is 15 years old now and far too crippled to work sheep. But these ducks were right up her alley -- slow and in need of herding. 

Saturday, September 13, 2014

Grass....and More Grass

I swear I can hear the grass growing! And it just won't quit. This summer has been a perfect year for grass. Warm. Lots of rain. Keeping this grass from taking over everything is a serious challenge. I just get one area whipped back into shape and other areas are threatening to become totally unmanageable.

 Plus to make things worse, my riding mower is now out of commission. I decided to change to new blades, and while removing the right side blade, the bolt stripped. No matter what I did to try to prevent ruination, the bolt beat me. So not only is the bolt ruined, but so is the spindle. This means that I need to drop the mower deck, remove the mandrel, replace the spindle, then reassemble. Plus hope that the bolts holding the mandrel don't snap when I remove them. Plus order a replacement bolt to hold the blade on. Geeeez. Luckily I already have a new replacement spindle, and new mandrel bolts if I need them. BUT if those old bolts snap then I need a new mandrel because the chances that I could get the snapped off bolts drilled out successfully are slim. Oh, oh....I see a headache coming on. 

I'm labeling this post "Drivel", but it really should be called "Whining, Moaning, and Groaning". I'm well past the complaining stage when it comes to this dang grass. I'm surely entering the whining-woe-is-me stage. But I suspect no one is feeling sorry for me. And to tell you the truth, next year when I'm in the middle of a severe drought whimpering about no rain, I'm going to look back to now and say that I was crazy to be complaining about the grass. 

I'll take photos as I make the repairs to the mower, then post them. But what I really could use are about 50 sheep for a few weeks. Shame I just couldn't borrow a flock of sheep for a while. 

Tuesday, September 9, 2014

Drivel - Super Moon

Hubby and I picked up our photographer friend, Peter Anderson, yesterday evening. We were in search of a good location to get a photo of the full moon. It was suppose to be one of those so called "super moons", one that appears bigger than normal. The sky didn't look so promising from our homestead, but this being an island, things can change dramatically in just a mile or two. But alas, at Peter's house the sky looked no better. Nevertheless we headed off to Honu'apo. 

Honu'apo isn't a town, it's a location. A spot along the coast that historically hosted a pre-contact Hawaiian settlement, and ended up today as a public park. Sometime in between it was used for processing sugar cane and as a shipping port. It would be a grand location for a photo shoot. But not this time. Clouds. Rain. Squalls out in the ocean. 

After an hour of hoping for improvement, we gave up. Perhaps next month would be better. Last month sucked too, but eventually we should get a clear night......hopefully. 

Peter surprised us today. Sent an email with the moon shot, for real! Just a couple of minutes before midnight the sky over his house cleared enough to show one mighty fine moon. Wow, way to go, Peter! 


Saturday, September 6, 2014

Jackfruit

Jackfruit? Huh? What's that? Ever have Juicy Fruit gum? Then you already know the flavor of jackfruit. It's want gives the flavor to Juicy Fruit. 

Jackfruit is one of those weird tropical fruits you don't find in the supermarket. It ranges in size from something smaller than a soccer ball to a giant 2' long and a foot in diameter. Those big ones are painful to pick up and hold because its rind is so prickly and sharp, and the dang jackfruit is heavy!  A couple of years ago I was given one of those giants. I barely made it to the car with my prize due to the pain it was causing on my tender arms. Besides, it weighed a ton! 
Right now jackfruit is in season. It's a neat fruit but hardly anyone bothers with it. First, it's hard to harvest. This odd buggah grows out the side of the tree's truck and big branches. That's really strange. Looks like some cancerous polyp growing along the poor tree's trunk. It's difficult to pick. You need a ladder for the high ones. And the big ones are really heavy so it's a challenge not to have them crash to the ground.

The interior of the fruit is extremely sticky with latex goo. It makes cutting the sections up rather interesting if you're not wearing gloves. In no time you're sticking to everything -- the fruit, your knife, the tabletop, your clothes, the plate or tray. And don't even dare to try to wipe your hands with a napkin! Big mistake! ........the voice of experience talking here. Plus I suggest avoid cutting it on a nice table top. That latex goo can stick to everything. 
When the fruit is ripe (it softens so that it has some give, plus it starts smelling like jackfruit) the latex almost, but not quite, disappears. Green fruits, which by the way are edible and used for cooking, gush lots of latex sap. But even ripe jackfruits gum up your knife and stick your fingers together. I've found that keeping water available (a hose or bowl of water) helps keep the latex goo-iness down. I also dip the knife in cooking oil which, while it helps, is not a complete solution. I don disposable gloves when cutting jackfruits so that my hands don't become glued to everything for hours and hours. 

The latex characteristic turns off most people. But those willing to learn how to work around it can make some pretty neat dishes with jackfruit. I've only eaten the actual little yellow "fruits" inside, but the stringy internal flesh and even the seeds are edible. I'm told that immature fruits are good for curries and stews. And the seeds are also edible, usually being boiled. I'm told they taste like chestnuts. 
(Above- I've dug out some of the pale yellow fruit segments. Each contains a single large brown seed.)

One of these days I'll explore and try different ways of preparing jackfruit. But for now I dig out the yellow "fruits" (arils) inside for eating. My favorite way of doing that is to remove the seeds and dehydrate the flesh. Once dried, I'll dust them with a little powdered sugar to help control the tackiness. But I've also stored the fleshy arils, sans seeds,  in plastic bags in the freezer, popping a few into a fruit smoothie. Yum. 
In this cross section above, you can see the light yellow arils (fruit) with their brown seeds, the stings that surround the individual arils, and the white latex oozing out. 
With small jackfruits I will cut it in half lengthwise then separate the arils and seeds. But with one like the buggah above that it too big for the knife I'll cut off one end then begin cutting the arils away from the main core. Like a pineapple, there is a firm core running through the center & down the length of the jackfruit. The base of the arils are attached to the core and the other end attached to the rind. 
This is what the core looks like after I've cut away most of the arils. I don't know if the core is used as human food, but when cooked my pigs love it. The pigs will eat anything I discard.....strings, small arils, seeds, rind. 

Drivel - Gifts in Jars

Several times though out the year we enjoy sending some gifts to mainland friends. While hubby hits the stores for most of his gift items, I look closer to home. I'll buy handmade items at our local farmers market plus choose things that I've made myself. So my gift list is composed of handcrafted spoons, small glass sun catchers, sandlewood incense, local handmade granola bars, local crafted soaps, coconut frond baskets, kukui nut leis, carved coconut shells, etc. 

I often send packets of my own processed macnuts, a favorite among my friends. And home dried tropical fruits : rambutan, pineapple, banana, jackfruit. Commonly I'll include jars of my own honey or homemade fruit syrups......lilokoi, mango, guava, etc. 

I like the pretty-up the jars, considering that they are gifts. I especially do this around the winter holidays. It is so easy to do and cost just pennies, sometimes actually zero! Often I am given unwanted or damaged aloha shirts. Sometimes I'll buy one real cheap that catches my eye at a yard sale or at the thrift store. Once I bought for just pennies a piece of cloth left over someone else's craft project. They make a nice decoration with a bit of Hawaiian flavor. 
Of course I first wash and iron the piece of clothing........nothing like sending a box of gifts that reeks of  someone's body sweat! You talk about authentic Hawaiian!!! Then I'll cut out circles. Just place one atop the jar before putting on the ring. Wallah! 


Friday, September 5, 2014

Feeding the Rabbits - Addendum

I'm still investigating what the rabbits will eat. 

Lemons.  I threw some lemons into their pens just out of curiosity, though I didn't expect them to eat any. To my surprise every rabbit ate the rind off each lemon. But only a couple ate any of the pulp. So lemons are a winner, but just the rinds. The lemon trees I have here on the homestead have thick rinds and only a small amount of dry pulp. Not very good for juice, that's for sure. But their thick rinds are now an asset that I never had considered before. Finally a good use for these lemons! 

Loquat leaves. The loquats aren't fruiting yet, but they are sending out new leaves. I've been putting two leaves into each pen and by the end of the day they're gone. 

Blue snakeweed. I've got a lot of this stuff growing here that I'd like to get rid off. I've been pulling it out for years now. It seems that the rabbits like to eat a fistful of it every day. Great. Within a few months perhaps they will have eaten it all. 

Pennywort. I don't have much of this growing here, but I gave it a try anyway. Rabbits munched it right down, stems included. Up till now I've been regularly hauling the excess growth out of the pond and throwing it into the compost. Now I'll feed it to the rabbits instead, turning it into much preferred rabbit manure. Seems that now I have a reason to start growing it in the other ponds too. 

Kikuyu and molasses grass. I have to change my opinion about these grasses. When fed by themselves, the rabbits weren't thrilled by them. But when fed in a mix with lots of variety, they chowed these grasses down. I'm delighted to see that they find them acceptable because I have tons of the stuff growing around here. 

Wednesday, September 3, 2014

Drivel - Can Dirt Make You Happy?

I recently read a news article where the author postulated that working with soil makes a person happy. The author believed that micro organisms in the soil were responsible. While the article wasn't very scientific, it did get my mind a-thinkin'. 

I recall that as I young child I loved to play in the dirt. Not just a kiddy sandbox, but real soil, mud, down on your hands & knees dirt. I'd make roads for toy cars and trucks, dig holes, make mud, create "castles", dig for worms. I disliked being indoors and was far happier being outside, preferably in the woods. I was always happy when I was doing something in the dirt. 

I was raised in a family of five kids. Not all of us liked to play in the dirt. So I wonder if I was some how genetically programmed to be attracted to soil, thus to farming. Perhaps something physically in soil triggered my genetic switch at an early age. Who knows. Perhaps it was some particular micro organism. 

To this day I like working with soil. I enjoy the feeling of good soil flowing through my fingers. I don't mind getting dirty. Walking barefoot through a freshly rototilled garden is a pleasure. Good moist soil even smells good, not just looks good to me. 

I'm often approached by others who wish to return to a simpler life on a small farm. Or maybe if not farming, then at least a nice garden. One of the questions I pose to them is how do they relate to soil. Do they enjoy the feel, smell, a look of garden soil? Would they be willing to lay down on fresh tilled soil and take a nap in the sun? Would the thought be enjoyable? Would they enjoy taking off their shoes and socks to stand or walk in soil? When I think about it now, it would be impossible for me to be a farmer if I didn't like soil. 
("Napping" at the community garden.)

I currently oversee a small community garden. Some of the people who have come there decidedly don't like soil. They dislike getting their clothing getting soiled and try to avoid getting their hands dirty. Guess what. They seldom last more than one day. But on the other hand the garden has several workers who obviously have a connection with soil. Besides getting dirty, I've watched them working with the soil. Some of those people like to dig, some like getting down on their hands and knees to groom the soil surface and plant seedlings, others run their fingers along the surface and gently smooth it before sowing seeds. It's nice to watch others enjoy the soil. They have the hearts of growers. 
(One happy digger!)

If it turns out that we gardeners and farmers are infected with soil micro organisms, well in my opinion, it's a very nice infection to have! 
As adults, some of us still love to play in the soil! 

Tuesday, September 2, 2014

Drivel - Maintenance on a Farm

It's been really busy here just doing maintenance .... grass mowing primarily. Maintenance is  something I've seldom seen addressed on various farm blogs. I guess because it isn't an exciting topic. I agree that there isn't anything exciting about mowing grass, chopping down overgrowth, pulling weeds. But it's one of the many jobs that just needs to be done. 

By far this has been the most aggressive regrowth year for grass and other vegetation since we moved here. This summer has been both warmer and wetter than most. It's teaching me a very good lesson....be sure to factor in maintenance time into my time budget. Plus all that extra gasoline! 

I'm taking advantage of the extra harvested greenery to produce more pallet growing boxes. Accumulating a cubic yard of organic material is quite a task, but all these extra clippings and cuttings are helping. Plus I'm using the abundant mulch to help create beds for growing more sugar cane, sweet potatoes, pipinolas, bananas, and pumpkins. Getting enough mulch has been an problem up until now. 

But now my riding lawnmower is down. Egads! But I kind of expect it to be offline frequently (I had been warned before buying one to expect to have to make frequent repairs of one sort or the other), so it's not a surprise, just an annoyance. I decided to change the blades because they were worn to the point of affecting how well the clippings were entering the catcher system. I had already sharpened them in situ several times. When attempting to remove one of the blades, the bolt stripped. Now I have to drop the mower deck, remove the mandrel, replace the spindle, and get a new bolt. Drats. I hate removing the mandrel because of not only the work, but the bolts tend to break off. 

I'm back to using a self propelled common lawnmower for now until I have the time to repair the rider.