Friday, September 30, 2016

Not Everything Wants to Grow on my Farm

One thing that I've noticed recently is that there's plenty of advice on how to grow various crops that really aren't suited to one's climate or location. 
...How to grow coffee indoors.
...Growing citrus trees in giant pots which are moved indoors during the winter.
...Greenhouse production of tomatoes. 
...Poly tunnels for winter lettuce. 
...Crop production in extreme deserts. 
Even how to keep chickens producing eggs during freezing, dark winters.

I get the feeling that if a crop isn't normally suited to your environment, the advice is to simply throw a lot of money and effort at it. Commercial farming does it at times. Hobby growers are doing it too.

I don't. Well, I don't put a lot of effort and resources into it, although I experiment for fun. 

I don't see the sense to put so much of my resources into trying to produce a crop that doesn't want to be on my farm in the first place. While I may try a few plants here and there of summer squash or cucumbers, I am hard pressed to justify the expense of a large insect proof greenhouse, along with drip irrigation and ventilation fans, just to produce a decent sized crop of whatever doesn't want to thrive here. And just because I used to eat lots of squash and cucumbers in my former life doesn't mean that I must continue to eat them now. No. Just go find some other food to eat, one that actually likes growing on my farm. 

Besides summer squash and cucumbers, what other crops do I tend to opt out of? Soybean. Fava bean. Okra. Brussels sprouts. Tomatoes other than cherry and grape. Sweet peppers. Sweet corn. While I still experiment with a few plants here and there, I don't put extra money or extreme effort into my experiments in trying to grow them. 

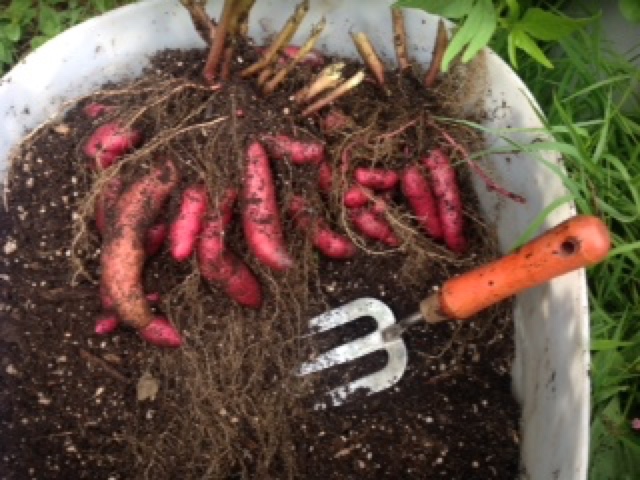
I tend to grow what grows. That ends up being many traditional veggies and a few fruits that I'm used to eating, but it often means learning to grow something new to me. And more importantly, learning to eat it. Like what? Taro. Sweet potato greens. Turmeric. Guava. Lilokoi. Daikon. Okinawan spinach. Breadfruit. Papaya. Soursop. Pipinola. Plantains. I'm planning on trying cassava, but I don't know anything about it yet.  

When it comes to growing those challenging crops that don't really want to grow here, I look at it as a fun experiment....not a serious food growing endeavor. That way I don't get bummed out when that particular crop fails yet another time.....time after time after time. But generally I simply accept the fact that it just doesn't like to grow in my location. 

Thursday, September 29, 2016

Potatoes - Growing Them In The Garden Beds

Potatoes are a crop that I grow year around on my homestead. They always grow well for me. Oh, I have the occasional problem with flea beetles, but so far that's about it. So here's some growing notes on what I do for growing them in my regular garden beds.....

How I start the crop
Everytime I harvest a potato crop, I set aside the nicest looking tubers of my preferred size. These will become my seed potatoes for the next crop. Size depends upon the variety, so I can't say "baseball size" or "large goofball sized" because each potato type varies. But I'm looking for a tuber that has the desired characteristics (color, shape) and is medium large or large for that variety. Plus importantly, the tuber came from a plant that produced other large tubers, was productive, and didn't have any detrimental traits. Even though potatoes are vegetatively reproduced, the plants do indeed vary.
     I also will plant all those under sized, odd shaped, greened tubers that happen with any potato crop.....but only if I happen to have free space that I'm not using for something else. This usually means newly opened ground that I'm getting ready to turn into a garden bed, or some otherwise unused out-of-the-way spot. Sometimes it means the beds along the street where people might steal some of the crop. Why? Growing a crop, any crop, helps improve newly opened soil. And if I'm going to lose veggies to theft, it might as well be something I won't get upset about. (Actually to date I haven't had anything stolen.) And I can use whatever potatoes that happen to grow to feed the livestock.....or ourselves if there happens to be big enough tubers under those plants. But I won't save seed potatoes from these type plants. I don't want to accidently be selecting for small or mishappen tubers. 

Preparing the bed
I will remove the previous crop residue and coarse mulch, but leave the partially decomposed mulch in place. I'll then top dress the bed with a little rabbit manure, an inch layer of compost, a dusting of coral sand, lava sand, burnt bone, and urine (or manure tea) treated biochar if I have it. I'll then lightly till it in, using a cultivator type lightweight tiller that goes down about 6 to 8 inches. For potatoes, I normally don't add wood ashes. 

Planting the seed potatoes
Everybody has different ideas about the best way to plant potatoes. Actually, this crop is quite flexible. My preferred method is to plant the tubers shallow, about 2 inches below the surface of a freshly tilled bed. I'll space them 12" apart in 2 to 3 rows in my 42" wide beds. With fingerlings and small planted varieties, I can do three rows. Most standard potatoes I plant just two rows. I then cover the soil lightly with grass clipping mulch. A few weeks later I'll be able to add more mulch as the plants start to grow. I'll keep adding more light layers of mulch. The goal is to keep any surface tubers from seeing the sun, and thus greening. 
    One interesting tidbit that I do. I cut a notch into the seed potato tuber so to mark it. Usually I simply cut off a slice from one side. If this mother tuber survives to harvest time, I want it to be easily recognized for what it is, the mother tuber. I don't want to accidently mix it in with the harvested fresh tubers. 

Harvesting
When to harvest. Everybody asks me that and they guess wrong about how I do it. Everybody says to wait for the plants to die back. Well, that doesn't happen here. Plus if I try to wait that long, the mice find the potatoes and eat them. I guess they give off a yummy odor once the tubers are mature. In the beginning of my gardening efforts here, I lost plenty of potatoes to mice before I finally figured out when to harvest my crop. 
    I harvest when the plants look "tired" or spent. They tend to lose their glossy, vibrant, lush look. The foliage gets a bit dull and droopy, then gets yellowish or bronze. The plants aren't as perky looking, for many varieties that means after two months. For others, it's three months or a tad more. But the plants will tell me. As I said, waiting until they die back doesn't work here, but that's probably is good way to do it in most of the mainland USA. 
    The first thing I will harvest is any tuber that is exposed to light. I'll go through the bed and remove them and set them aside. These tubers have greening issues and I don't wish to eat the green parts. So these will be eaten first (cutting off the green part) or set aside for using as seed potatoes. Next step, I will pull the plant out and observe if the plant was an exceptional producer and if there are good tubers to use for the next crop. I'll select my seed potatoes and set them aside. Now I'll harvest all the rest of the tubers that are eating size. Finally I'll pick up all the mishappen or undersized tubers, and any "mother tubers" that survived. In some varieties the "mother tuber" rots away, but sometimes it is still there at harvest time. They go into the livestock feed bucket to be cooked along with the extra smalls and odd shaped taters that I don't replant. Any overly green tubers go into the compost bin along with the spent plants. 

Growing Tips 
I like using grass clipping mulch with this crop. It allows me to tuck the mulch around the plants easily. And I can apply it as thickly as needed to prevent tubers from reaching the light, thus turning green. I'm not always successful in getting enough mulch applied, but I try. I don't use the chicken pen litter as a mulch for potatoes. It's too high in nitrogen for this crop. 
     I'm aware that this crop prefers even soil moisture. For me that means irrigating as needed before the soil dries out, not waiting until things are dry then bringing out the water buckets & hoses. 
     By observation I learned that potatoes are a shallow crop. They don't need deep soil. In fact, they don't make tubers down deep. So growing them in a trashcan has no advantage over using a half barrel. The tubers will be up near the soil surface in either container. I find most of the tubers in the top 6 inches, but some can be 8 inches down for some varieties. I've successfully produced potatoes in only 3" of soil. That may sound amazing but it's true. Some of my garden beds are quite shallow, but by planting the seed potatoes as deeply as possible and right on top the pahoehoe lava, then using a thicker than usual mulch, I can get a normal sized crop of spuds. There are a number of crops I can grow in only 2"-3" of soil, and potatoes is one of them. 

Problems 
...overcrowding. If planted too close, there will be less good sized tubers. So I don't space them closer than 12 inches. 
...hollow heart. The only time I've seen hollow heart is during a year that alternated with heavy rains and dry spells. I suspect it has to do with inconsistent soil moisture. 
...scab. I often saw some degree of scab when I first started growing potatoes here, but for the past several years I haven't had a problem. Whatever I'm doing, I'm apparently doing right. And I withhold wood ash, which I think contributes to scab in some way. Plus no chicken pen litter is used on potatoes. 
...ring rot. Again when I first started growing potatoes I saw some tubers with this, but now I'm not seeing it at all. 
...flea beetles. My worst potato problem. These little pests can really damage the plants. To date, I've had problems controlling these insects. If I experience flea beetles, then I will change locations for the next crop, hoping to find a spot where they won't find my potatoes for awhile. Another thing I've done is to plant radishes near by and use them as a catch crop. Flea beetles seem to prefer radishes, various Chinese greens, and beets. And the third thing I can do is to use a good amount of compost when starting out, giving the young plants an good boast for growing rapidly. Aggressively growing plants seem to have more tolerance of the flea beetles. And finally, I've learned that I need to be right in top with it when it comes to flea beetles. Otherwise the infestation gets quickly so far out of control that there is little I can do without resorting to chemical pesticides. 
     Happily I don't have the Colorado potato bug here. I find that amazing, since we seem to get just about every other crop damaging insect that comes along. 

Types of Potatoes I Grow
I like growing all sorts. White, yellow, red, pink, purple. And different sizes and shapes : fingerlings, boilers, bakers, round, blocky, long and skinny. It's fun. The only type that I don't do great with are the russet type bakers. They never get real large, but they do grow ok otherwise. 
     Varieties I like growing best:
La Ratte
Purple Majesty
Caribe
Magic Molly
Red Thumb
Elba
Dark Red Norland
Yukon Gem
      But I grow plenty of other types too. Irish Cobbler does well. Frankly, just about every variety does at least "ok", but some I'd say are more outstanding than others. Plus the weather has a big factor, so by growing it's if different varieties, I'm guaranteed to get a potato crop in spite of the year's growing conditions. 

Wednesday, September 28, 2016

Spay Day Fun

Is it possible to have fun at a spay/neuter clinic, and still be serious? Of course! Today's first "patient" on the surgery table was a bit sparse on flesh and anemic to boot, but happily it didn't use up much anesthesia or oxygen. But no need to get grossed out folks.....it wasn't real. Today was close enough to Halloween to bring out the decorations and have fun with the spooky dog skeleton. And being battery operated, it was able to howl with delight at getting spayed for free. Ah, just a bit of veterinary comic relief.....

Introducing Jessie, my new dog. I recently adopted her and brought her along today to get her spayed. She's pretty zonky still when I took this photo. She turning out to be a good dog on the farm, but more about her later in another post......

This handsome boy (note the blue information label on his ankle...blue for boys 😉) is awake already. The guys are quicker to neuter, thus they wake up a lot faster than the girls.....

This girl (pink anklet, of course) is slowly and quietly recovering under a series of warm baby blankets....

Although the dogs are the center attraction, the volunteers are the real stars of this show. And while we are here for the dogs, that wonderful lunchtime spread surely isn't something to sneeze at. They sure feed us well here......

Ya, I'm still volunteering at the dog and cat clinics. This week it's dogs. Next week, it will be cats. By the way, I'd like to mention that one of the community garden volunteers worked today's clinic. Thanks Missy!!!! 

Tuesday, September 27, 2016

Potatoes in Containers

I received an email from a blog follower living not too far from me. Living on lava with virtually no soil, she has been experimenting with growing things in containers -- old coolers, plastic half barrels, etc. She's been making her own growing medium by filling the containers with compost/soil made from assorted biomass from around her property....primarily weeds mixed with some spent potting soil. And you know something ----- she has been very successful growing beans, peas, gourds, and now, potatoes. 

Here's the photos she sent of her latest potato harvest:  

The foliage turning color. From healthy green to bronze/yellow.......
The plants are signaling that they have matured. Here in Hawaii, that means that it's time to harvest. 

The tops of the plants have been cut off and removed, exposing the top layer of mulch......

With the mulch removed, the tips of the tubers can now been seen. This variety is a long fingerling type, and amazingly it likes to grow its tubers vertically! So just the tips poke up.......

The plants have been pulled up, exposing the long tubers.......

And here is the harvest from her three plants grown for 3 1/2 months in containers......

Quite the beautiful harvest. Way to go, girl!!!! Congratulations. 


Monday, September 26, 2016

Ka'u Plantation Days Festival

Our town just celebrated Plantation Days, which is in memory of the old sugar days. The area's sugar plantation shutdown 20 years ago, so the memories are still fresh in the minds of many still living here. 

The tractor that pulled the last load of cane to the mill was saved, and each year for the past 6, it has been used to lead the parade....

This year's grand marshall was our very own, much loved, retired policeman Bobby Gomes. I'll tell you, if all cops were like him and Dane Shibuyu (another popular local officer), the world would be a better place. 

The parade featured the pa'u riders, a long standing Hawaiian tradition. When horses were introduced to Hawaii, young people took to them like hot rods. Saturday nights saw them cruising...no, I mean galloping, down main streets, to the disapproval and dismay of the local adults and church goers. (Gee, things don't change much, do they.) Decked out in yards of colorful material and leis, pa'u riders were seriously "in". 

No mad galloping in this parade, but lots of dolled up horses and colorful riders.


As far as I know, there's no sugar museum on Big Island, though the Lyman Museum has its & bits on display. But Darlyne Vierra maintains a vast collection of photos and artifacts pertaining to Ka'u history, including the sugar plantation days. 

Most of the mill equipment is gone. Most of the plantation water system was dismantled, though some recently was repaired and put back in service for coffee growers. The sugar railroad is long gone. The sluices...gone. The buildings and shipping port, gone. The cane, almost all gone. Just a few feral plants still struggle to grow along the roadside and no one knows which variety they are. The field system, gone. The camps and camp houses, mostly gone. Some still exist and are in use as personal residences in Pahala and Naalehu. But the other camps are all gone. The plantation stores and support shops, mostly gone. A few buildings still exist but most were moved or torn down. The plantation theater in Pahala was torn down. The one in Naalehu is just about ready for demolition. Yes, evidence of the vast sugar plantation is rapidly disappearing. Except for the photos and papers that Darlyne protects. 

Plantation Days is a way for the old sugar workers to reconnect with the memories. It's a bit of history the hopefully won't be totally forgotten. Not that anyone wants to return to the plantation system, but a lot of people lost jobs when the sugar mill closed down. There's not many jobs available anymore in Ka'u. 


Sunday, September 25, 2016

Meat & Eggs For Free ! 😮

As so often happens, I just received an email from a reader lamenting about how much she has to spend on healthy food while I get all my food for free. How's that? What you say? Free? Hardly! Just because I raise, forage, or trade for my food, that doesn't make it free. Possibly it's cheaper than buying the comparable items at the stores, but it still means cash out of my budget. Let me explain. 

I had thought that I'd list all the cash expenses for raising a pig, or getting a dozen eggs, or harvesting a bushel of potatoes. But I realized that it's a tedious list full of little costs along the way and a few big costs at start up. Yes, lots of little outlays along the path to the final product that often go unnoticed. But if you just visualize it for a minute, you'd see all the bits of equipment needed of a homestead farm for food production -- buckets, clips and wire, rope, fencing, trellises, veterinary medicines, livestock shelters, small hand tools, saws, tillers, mowers, pumps, hoses, gasoline, propane........the list goes in and on. Every egg produced required cash beforehand to buy something or other (the hen, the pen, the nestbox, the feeders, etc). Every porkchop represents cash spent for the piglet, fencing, buckets, feed pans, dewormers, etc. A pot of homemade vegetable soup reflects the seed orders, shovels and tillers, trellises, fertilizer, watering hoses, plus a long list of other expenses needed to grow those veggies. Even foraging has its expenses : the need for some sort of vehicle & gasoline to get to the widely spaced fruit trees. And all this time I haven't even considered my personal time spent producing or acquiring the food. I wonder how much an hour I "earn" by producing my own food? 

Sounds like I'm whining. But really, I'm not. I'm learned a lot about homesteading and don't mind one iota about working for my food. But I have seen others believe that they could have free food by doing what I'm doing, and get really upset that they have to shell out so much cash on seed orders, tools, livestock feed, fencing, etc. I've watched some people get so utterly disgusted when their crops or eggs don't turn out to be free that they abandon all hope of producing their food. 

Many old sayings hold truth......like in, nothing's free in life. Growing my own vegetables isn't free, nor raising my own eggs. But I'm glad to do it anyway. But anyone planning on to be as self reliant as we are needs to know up front that it's going to cost you a bit before you ever get to eat your first stringbean, scrambled egg, or porkchop.

The reason I'm discussing this topic is that I'm seeing more and more posts to gardening/homesteading forums claiming things like ..... I grow all my own food for free......or......10 hours gardening a week makes me totally food independent......or......my eggs and chickens are labor and expense free....or even ......my no work garden! (The only way I can figure he does this is by making someone else do all the work behind the scenes - his wife & kids?) But there is no discussion about initial set up costs, nor costs to maintain livestock during the winter, nor costs of preserving or buying food to get one through a non-growing season. In my own personal experience on this homestead, I'm seeing things a bit differently from those making those wild claims. 

Free food costs me infrastructure, supplies, gasoline, and my labor. (I've harped on this so many times by now that I guess you've got the idea). Oooo, and I can't forget to mention losses. Livestock sometimes dies, crops sometimes fail. So all that input sometimes results in nothing. Not a break even situation, but instead an actual loss. That's when you wish it really was free because it hurts to lose one's investment. 


Saturday, September 24, 2016

Corn Crop - First Attempt

Corn is one of those crops considered to be difficult to grow well in my area. I'm not sure exactly why yet, but most people will tell me that's it's a problem crop. I'm just starting to experiment with corn, so I haven't discovered the problems yet. Just give me time and I'm sure I'll have a long list. 

I'd like to grow enough corn for my livestock to enjoy a bit every week, plus enough for hubby and I to have a couple ears each week too. That means that I'll be growing primarily sweet corn of some type, but perhaps also some field type corn. I use to see corn grown all the time when living back in NJ and I listened to plenty of farmers as they "talked corn", so I have some basic knowledge about this crop. Just don't have personal on hands experience. Nothing like giving it a try! 

Last spring I grew two varieties of heirloom sweet corn. In one case I started with 10 seeds, and the other there were 12 seeds. Both grew, but poorly. Where I planted them, the soil wasn't fertile enough. But I'm learning. I've since upgraded my soil for corn. Nowhere near perfect yet, but this time around the corn should be better. 


Above, I recently planted the corn seed I got from the 10 plants of Golden Bantam (2 of the original 12 seeds didn't sprout.) The seed was sown about every 3 inches, with the intent of thinning the row to every 10"-12". I'm figuring on selecting for the most robust seedlings. 

A week later the seedlings are bigger, so it's time to apply a light layer of mulch. I'm using chicken pen litter since it contains a good nitrogen source. 
Part on the left is lightly mulch. Right side is awaiting mulching. 

Mulching completed. 

Next week I'll start removing the weaker corn seedlings, giving more room for the stronger ones. 

As you may have noticed, I'm intercropping this corn. The variety is a short growing variety that won't interfere with the  surrounding plants, which includes one young apple tree, one young egg fruit tree, and two baby coffee trees. 

In a few weeks I'll update you on the corn progress plus let you know what I've learned about corn thus far. 


Friday, September 23, 2016

Photos - Ka Lae

Images from South Point, Hawaii, locally called  Ka Lae. This is a favorite place of mine not too far from the homestead. Open. Bleak. Windy. And a great place for an evening picnic out in the open. 

A young fisherman fishing from the cliffs. 

Impressive cliffs. 

Canoe hauling platforms along the cliff.  More cliffs in the background. 

Metal ladder down the cliff face. It's a loooooong way down! 

The ocean tide far below, down a blowhole. Not blowing at the moment, but it's real impressive during a strong Kona windstorm. How big's the hole? I'd guess 20' across, at the least. 


Thursday, September 22, 2016

Community - Showing That You Care

Talking about graffiti, spray paint graffiti to be specific. Every once in a while, some individual takes it upon themselves to deface our community. Why, I have no idea. Anger? Frustration? Testosterone poisoning? Peer pressure? Who knows. One person here, out of 6000+ residents, struck the other day, painting the reflective markers on telephone poles, roadside guard rails, and electrical boxes. Ouch! 


Yes, ouch. It hurts to pass by and see the graffiti. It debases our community image and the "feel good" sensation of being here. This area is so incredibly beautiful, but some people don't seem to notice. It just takes one disturbed individual who has little respect for the aina, no respect for others living here, and no sense of community. 

But there are those in our community who care and are action oriented.....

I happened upon one caring individual removing the paint from the reflective markers. An incredible member of our community here. 

As for the power boxes, another person tackled that task. The first coat of paint hid most of the graffiti. Five minutes after this photo was taken, the second coat completed the job. 

I find it's amazing to live in a community where people take the effort to make it a good place to be. Not just those who clean up the graffiti mess, but we have people here who, on their own, clean up roadside litter that others thoughtlessly, uncaringly toss out their car windows. Other folks clean up the old cemetery here. Yet others help out seniors and housebound folks. Groups get organized to clean up trash from the coastlines and ponds. Many home gardeners share food with others, be they friends or strangers. It feel very good to be living among these wonderful people. 

I often wish I could package this sense of community cooperation and spread it around to other communities, because how wonderful would it be if more people could experience this type of community life! 


Wednesday, September 21, 2016

Medical Supplies I Keep On the Farm

Emergencies always seem to happen on the weekends (or holidays) after every human doctor office or veterinary  hospital has closed for the day. Luckily for humans, there is an emergency clinic about 30 minutes from me. But for animals? No such thing within 2 hours. So just when you really need that bottle of penicillin, it's past closing time for every livestock supply store on the island. And no vets available. Life just seems to happen that way. 

I've had several requests to talk about what sort of first aid kit or emergency meds to keep on hand. First of all, am I suppose to be talking about human stuff or animal stuff? Often it's the same stuff, but not always. Second, keep in mind that my previous career was in veterinary medicine. Therefore what I keep around on the farm will be far, far more extensive than the average person. 

Since human stuff tends to overlap animal stuff, I just can't give a list. So I'll speak in generalities, giving specifics  here and there. 

First aid equipment is always handy. Several clean non- lint hand towels. Tape. Gauze sponges. Gauze rolls. Self adhering tape (aka- vet-rap). Sharp scissors. Scapel blades or single edged razor blades. Bandaids. Butterflies. Cold packs. I also keep assorted suture material & suture needles, plus needle holders, hemostats, and forceps. Also bottles of skin adhesive, often called tissue glue. Actually I have veterinary surgical packs, but the average person wouldn't have that. Thus I have a nice assortment of clamps and "tissue grabbers". I also keep a couple of good intense flashlights because I want good lighting during an emergency. I have local anesthetics, plus some general anesthesia for animal use. And endotracheal tubes, which I'm sure non-vet oriented people don't keep around. Some blood clotting stuff and tourniquets. Wound disinfectant. Saline solution/eye wash. Eye anesthetic. Dental anesthetic. Various dental tools, again vet oriented. Also chemical sterilization for my instruments. 

Topical antibiotics. Topical anti-itch. Topical cortisone. Insect bite topical (ammonia or "after-bite"). Antihistamines. Epinephrine. Oxytocin. IV calcium. IV dextrose. IV fluids along with assorted IV equipment. Needles and syringes. Feeding syringes and feeding tubes. Urinary catheters. Splinting equipment. 

Miticides, flea & tick controls, dewormers. Various skin topical medications and treatments for the animals, though many are useable for humans too. Various ear treatments, both human and animal. 

Injectable antibiotics. Oral antibiotics. Other assorted medications, both injectable and oral. With livestock on the farm, good old injectable penicillin lives in my refrigerator at all times. 

Heavy duty nail trimmers. Hair clippers with a very close cutting blade. A pair of good pliers, yes pliers. They come in handy. And wire cutters.They come in real handy too. And a good loupe, which I prefer over a hand held magnifying glass. 

Most stuff can be purchased over the counter at various places. Pharmacies. Feed stores. Online. It's amazing what can be found in Walmart. But some of my medications are perscription only items. 

I almost never need the medical supplies I keep on hand, but there have been times that I've been extremely thankful to have them around. You never know when something will crop up. Ya know, like getting bitten by a donkey! Luckily I had everything on hand that I needed that day. 

I have always encouraged every animal owner to learn basic first aid and medical care. Sadly, I've never seen a short course offered for basic animal home medicine. Learning in person is far preferable to reading it online or in a book. But books are great and I believe that everyone should read about basic first aid and emergency medicine. 

I'm constantly showing other livestock owners how to take care of routine medical care on their animals. Access to local veterinarians in my area is quite limited and often beyond the finances of the little homesteader types. Thus animals here often don't get any medical care unless the owner can provide it. 

Even if a person has access to medical care, it surely can't hurt keeping an assortment of medical supplies on hand in case of an emergency. 

Tuesday, September 20, 2016

Crop Problems That I've Had

"D" asked me to give a rundown on what sort of problems I see with my various crops. 

Every crop has it's problems, so it seems. Only a few escape.  Pipinola and pineapples come to mind. I can't recall having bug or diseases on these, though I'm sure it can happen. A neighbor two properties away has birds eating holes in her pineapples. I've never had that problem. 

Here's some of the pest problems I have seen ......
Leaf roller (banana)
Stink bug (beans, peas, cowpeas limas, tomatoes, peppers, corn, broccoli, turnips) 
Flea beetles (beans, sweet potatoes, potatoes , radish, beets, mustard, cabbage)
Black aphids (onions, leeks, chives)
Other aphids (kale, cowpea, tomatoes, taro)
Scale (taro, papaya)
Mealybug (papaya)
Pickleworm (gourds, pumpkins, squash, cukes)
Thrips (eggplant)
Cutworm (peppers, tomatoes, broccoli, kale, cauliflower , bok choy)
Squash borer (squash, gourds)
Slugs (just about everything)
Feral turkeys (most greens, onions tops, strawberries, beans and peas in the pods) 
Cardinals (tomatoes)
Cabbage worms (broccoli, cauliflower, kale, collards, rutabaga, kohlrabi)
Earworm (corn) 
Chinese Rose Beetle (Apple, beans, taro)
Root knot nematode (susceptible varieties across the board) 
Whitefly (beans)
Sphinx moth (sweet potato)
Fruit fly (tomato, peppers) 
Coffee berry borer (coffee)

There's probably more, but these came to mind right away. And I've listed just the crops that I've had problems with. Other gardeners tell me that they often see problems with other veggies. Funny thing about pests, for example one garden might have serious problems with whitefly on the tomatoes, but down the road one mile, the whitefly might be infesting the beans instead. 

There are plenty of other pests in my region, but to date they haven't found my farm. So I have years to look forward to learning about a new pest each season. What pests? Sweet potato weevil. Turnip root maggot. A maggot that grows inside of green bean pods (not sure what it is). Plus others that other gardeners have spoken about but I don't know their names. Goody, goody, I have a lot to look forward to. 

As for diseases......
Powdery Mildew (beans, squash, gourds, pumpkins, cukes, kale)
Rust (blueberries)
Ancoyta fungus (peas)
Scab (potatoes)
And I don't even know how many diseases attack the summer squash here because every time I've tried growing it, it died from one disease or another. 

There are plenty of other diseases that come & go in my gardens, but I'm not learned enough to identify them. Luckily they aren't running so rampant that I can't get crops.....except for the summer squash that is. 

Disease and pests are a given fact in a tropical garden. The main problem, as I see it, is that I'm trying to grow veggies that are not native to this climate. That wouldn't be a big problem unto itself, but we humans have managed to import devastating pests and diseases too, most of which can thrive year around here without much controls. 

Ah, gardening is not for the faint of heart in the tropics. One needs to be tenacious. 

Monday, September 19, 2016

Bees and My Ponds

Around the farm I have numerous mini ponds used primarily for mosquito control. They're all stocked with fish known to eat mosquito larvae. It didn't take me long to notice that my bees were using the ponds as a water source and sadly, many were drowning. But once pond vegetation was added, the bees had enough footing to prevent them from falling into the water. 

About a year ago I introduced azolla into ponds, mainly because the maintenance was far easier. Much simpler to harvest excess pond vegetation with a dip net, as opposed to hand hauling out mats of tangled plants and hacking them into pieces for removal. 


The azolla covers the pond surface with low growth that the bees seem to prefer. They easily walk over its surface and have simple, safe access to the water below.


My only concern now is that I need to either gently chase the bees away when I plan to net out the excess azolla, or do the netting at night after the bees have gone home to their hives. 

Saturday, September 17, 2016

Screenhouse by a Pond

The pond project is slowly morphing into what we'd like it to eventually become. The deck has been built and is just sitting there, awaiting it's next stage. And since David is currently available (he's waiting for the arrival of the bathroom tiles), it seems like a good project to set him upon. And while I could build most of the screenhouse myself, I knew that the roof was going to be beyond my knowledge and capabilities. 

So here's the deck overlooking the pond.......

The initial framing was easy and went quickly.........

Here's a view looking down on it from the hillside stairs......

Now for the hard part, the roof framing. David makes it seem so easy! Believe me, it's not. 


Now I need to go and and buy the screen material, hardware for the door, the translucent polycarb for the roof, and the roof cap. 

Oh I forgot to point out that we removed the steps leading down to the original deck. You can see them on the first photo. By removing them we could make the screenhouse a nice 10' x10'. David figured out how to make a short path and steps into the screenhouse from the point where the concrete steps meet the wood platform that goes over the pond. The junction worked out very smoothly and looks good. 

Fish Food - Zero Waste

A friend just drove home another idea of zero waste.........using the "dust" from the bottom of the dog food bag for feeding my pond fish. She gave me quite a good supply to other day. Thank you!


Both she and I use a good quality high protein dogfood, so the granules work well for the fish too. In fact, I've been using this idea for years quite successfully. The fish still get other food sources, such as pond vegetation, worms, mosquito larvae, and such. 


All the fish seem to enjoy the dogfood crumbs, immediately coming to the surface to feed. 

If I didn't have pond fish, what else could the crumbs be used for, rather than being tossed into the trashcan? Ideas I can think of:
...chicken food
...moistened and fed back to the dog
...pig food
...worm food
...garden additive

Friday, September 16, 2016

Propagating Pineapples #1- Crowns

Each year that I harvest pineapples, I increase the number of pineapple plants by propagating them off my own plants. For right now, I'm using the crowns, slips, and suckers since I'm interested in getting as many plants started as I have available material. Later on I'll just use the best crowns and suckers for propagation. 

Crowns are easy to use, they are the leaf clusters atop the pineapple fruit itself. I'll just twist them off when I go to use a pineapple. Below is one I just removed from a quite yummy white pineapple that I plan to grill for dinner. 

The next step is to remove the cluster of bottom leaves so that some of the inner stalk is exposed.  I just brutally rip them off and things end up looking like this.....

Roots will grow out from that inner stalk. If I look close up, I will see little white bumps on the stalk. That's where the roots will grow. While the roots will grow even if the tough lower leaves aren't removed, the plant will establish itself far faster and more robustly if those lower leaves aren't there interfering with the growth. 

The next step is where things can get complex. Some people use a rooting hormone. Some will stick the pineapple top in a glass of water until the roots start to form, then plant it out. Others use commercial potting soil in a nursery pot, and transplant the new pineapple plant when it's shows signs of new growth. I'm from the KISS school of thought. I simply shove the top deeply into the soil at the spot I want the new plant. 

At times I don't have places ready to receive the new crowns, slips, or suckers. In this case I'll simply poke them into any bed that has room. In the photo below, I've planted crowns closely in a young ginger bed. In the next couple weeks I'll have the next pineapple bed ready to go, then I'll just move these crowns to their permanent location. In the meantime they will have been starting to push some baby roots. I find that moving them is no problem at all. The plants do fine.