Tuesday, November 26, 2013

Homemade Chicken Feeder

I have a lot of chickens, almost 100! Years ago I started out with 25, but over time they have increased in numbers. I'm comfortable with 50. That's the number that I can feed with just home grown and foraged food. But now that the flock has swelled to twice that, I need to provide some commercial feed. While I still continue to make food for them as I did before, I simply cannot spare enough time to keep the birds strictly on home produced food. Another time factor is that the birds now reside at the community garden and I only spend a limited amount of time there each day. 

I've toyed with various ways to feed the hens. And I've concluded that the best use of my time would mean having some sort of feeder for the dry commercial feed. I searched the Internet intending to buy a feeder....a quick fix, but I was taken back by the cost. Hhuumm. Bet I could make something myself. 

I figured that if I was going to put time and effort into a feeder, then why restrict myself to making it small like the feeders I saw on the Internet. No reason I couldn't make a feeder that would hold enough feed to last a week, or even more. So I got to thinking. Oh, I came up with all sorts of designs. But after sleeping on them, one by one I rejected them for some reason or other. Some of the designs were rather clever, if I do say so myself. Hah, Sue, you're clever! But these dreams often involved complicated designs and expensive materials. And in the shadows of my mind, some little creature kept whispering "KISS" -- keep it simple, stupid. 

Ultimately I caved into the KISS principle. I purchased a trashcan on sale for $9.99 plus tax. Cut a hole along the bottom edge about 8 inches long by 2 inches wide. I then took a cracked, discarded old catbox and cut off one side. Now I set the trashcan in the chicken pen along one wall, propping up the  rear bottom on the 4" high frame of the pen. This nicely tilted the trashcan, allowing the pellets and grain to flow out the hole. So that the trashcan would remain stable I attached it to the pen fencing by running bungee cords from the trashcan handles to the fence. Now I slid the 3 sided catbox under the trashcan in a way that it would catch and confine to chicken feed. I positioned it close to the trashcan so that the hens could not climb into it and scratch the feed out. 
Now with the pieces in place, it was time for the test run. I dumped 50 lbs of feed into the trashcan and put on the lid. The girls investigated immediately. Instantly they began eating, having no problem figuring it out. I watched the girls off and on for about an hour, waiting to see if they would figure out how to muck it up. But the design turned out to be a winner. The only problem I'm anticipating is that the hens might try to roost on the lid. That wouldn't be a disaster, though it could get messy. But it might be too slanted for them to be successful in sleeping there. We shall see. 

I plan to use lightweight chain or rope in place of the bungee cords. That will be more stable and last longer. I might need to anchor the catbox in some fashion, but for now I'll just observe and see how things go. No need to make it complicated. 

So I've come up with a nice, large feeder for a cash outlay of a bit over $10. The bungee cords or rope or chain comes out of my recycle/reuse/repurpose pile. The broken catbox was destined for the dump. Hey, not bad! 

UPDATE: 
It's been 24 hours and the feeder is still working just fine. It turned out that the hens didn't sleep on the lid last night, so let's hope it stays that way. 

Monday, November 25, 2013

Eliminate the Lawn Update

It's now 3 weeks since I started eliminating the lawn and making food gardens in its place. So I took a peek at the veggies today to see what's developing. This is what the bed along the rock wall looked like ....
Now 21 days later it looks like this.....
Green beans are growing in the back while radishes are in the foreground. And there are plenty of radishes ready for eating already! I already ate six of them before I thought to take a picture, so this one that's pictured is smaller than the ones I ate. But in a day or two it will be ready for munching. 
In front of the rock wall I planted taro roots, actually to tops of the corms. When I planted them they had no leaves. But in three weeks they have developed nicely. This variety is very unusual in that it is variegated with dark splashes rather than white ones. Quite ornamental. I have no idea what it's name is or if it will turn out to be suitable for eating. All taro is edible if cooked long enough, though some need a long, long cooking time. Some don't taste very good either and fall into the category of "famine food". I plan to try this one when it is mature, most likely in a year from now, give or take a couple of months.  


Friday, November 22, 2013

Kale Experiment

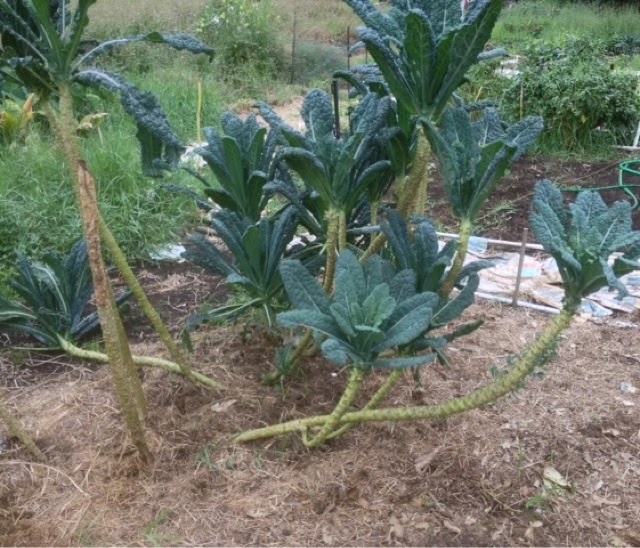
Down at our local community garden, the kale plants have grown into mini trees, some upwards of 5 feet tall. A that height, the plants are being blown over, plus they are getting awkward to harvest from. The community garden is presently growing replacement seedlings, thus the kale trees will soon be removed.
Something inside me wondered if perchance one could propagate new plants from those mightly kale stalks. Since kale does not flower here, purchasing seed from the mainland is the only way to grow it. Not very self sufficient, is it? So, if kale could be vegetatively propagated, it would be another small step towards self reliance.

This week when I harvested some kale for dinner, instead of just taking a few leaves, I chopped the entire top off the plant including a length of stem with it. 
After I took the leaves I wanted to eat, I then set about trimming up what was left, getting ready to try planting them. I removed most of the leaves (they would only wilt and die off anyway, sapping moisture away from the stem) and cut the stem into 6 inch long sections.
Down in the field garden I tilled and prepared a short section of bed, adding compost and removing any weeds. Once I was satisfied, I was ready the plant. I thought about using Rootone, but discovered that the bottle I had was empty. Thus this first planting attempt would be au natural.....no rooting hormone.

I took each piece and pressed it down into the soil, leaving about 2 inches of stem above ground. With the leafless stem pieces, I needed to be sure to plant them the right direction instead of upside down. Luckily the leaf scar is crescent shaped making it easy to tell up from down.

Spacing....my beds are 40 inches wide. Thus I opted to plant four cuttings across the bed about 10 inches apart. Each row of 4 was spaced about 12 inches apart. 
Once planted, the cuttings were watered in to make sure there was good soil contact around the stem pieces.

Now we wait and see what happens.

Sunday, November 17, 2013

Next House Project -Update #2


The project to enclose the lanai is gradually progressing. 

Next major task.....remove the sliding doors between the main room and the newly enclosed lanai before we finish the final wall. Otherwise we wouldn't be able to get the frame out of the house in one piece. We plan on giving these doors to someone who can re-use them. 

The doors are old style, meaning that each glass door doesn't come out all that easily. The stationary panel needed to be removed first, then the slider. But first various brackets needed to be removed and regretfully the screw heads were badly corroded. Because we didn't want to ruin the doors, each corroded screw needed to be gently and carefully removed. That took time and patience. 

Once the glass panels were removed we thought it would be clear sailing. Silly me! Things are never easy. The previous owner was a real believer in using lots of nails and screws in everything. Wow, those doors were super screwed in place, with long screws even going through the sides of the frame where I've never seen people put them before. Even after removing every screw and nail we could find, the frame was still stuck. Closer inspection revealed that the door frame had also been glued in place with lots of caulk! Thankfully it wasn't liquid nails. 
Lesson learned : don't over screw a door into place. Don't glue it down. No need and it makes it very, very difficult to remove it if need be later on.

Second lesson learned : put something over the screw heads to prevent corrosion. I opt to use a small dab of lithium grease, but I suppose one could use silicone caulk. Since I've gotten in the habit of inspecting and treating our metal appliances, exposed hurricane clips, door hinges and knobs each month, no reason I can't add a few more things to the list for quick inspection. But since we're eliminating sliding doors, then no problem here.

After the doors were successfully removed, Bob crawled under the house (no easy task for senior citizens!) and ran the electrical wiring for the receptacle outlets. Luckily we had just enough wiring leftover to complete the run. Got the boxes all wired in, so it's ready for closing in the walls. We already have the cedar for the interior but need one more sheet of exterior siding. Alas, that means another run to Kona. Somehow I figured wrong on the number of sheets I needed. Not totally uncommon for me!

Putting up the exterior siding was simple. We're using 4x8 sheets of T-11. Measure, cut, nail it up, caulk. Zip, done. 

But the door was going to be challenging. It wasn't pre-hung, so the framing needed to be custom made. David to the rescue! In a few hours he not only had the door installed and fully functional, but went around finishing some of the more complicated trim.


I had planned to sand and urethane the cedar planks this week but its been raining every day and the humidity has been close to 100%. Way too damp. So it will have to wait for the sun to return. In the meantime I can spend the time catching up on the paperwork that I tend to put off for a rainy day. But since we seldom get rainy days, the paperwork pile has really gotten tall. It will keep me busy.

Next up - enclose the interior walls. Trim out everything. 

Saturday, November 16, 2013

Lessons From A Mango Tree

I have a rather nice mango tree on the main farm. It's popular with the chickens as a roosting tree. The horse often rests under it, especially on sunny days. At this time of year it is quite lovely, pushing new leaves that are very colorful. But sigh, it never bears mangos. Why? It's at too high an elevation to set fruit. A tree planted in the wrong place. 
I really like this tree and I'm so glad that it is where it is. It's pleasing to look at, provides shade and shelter. But it will never give me even one mango. Instead, it has taught me, and forever reminds me, that a gardener must provide for a plant's needs if you expect it to produce for you. 

Since moving to my little homestead I've tried to grow just about everything. Along the way there have been plenty of failures, often because I have ignored what the mango tree is telling me. 
...soybean failure. They require warmer soil and air temperature than what my farm experiences. 
...okra failure. I  sowed the seed in January. It needs to be started in the early summer here. 
...garlic failure. It needs a drier climate. 
...leek failure. The variety I tried was day length sensitive. 
Oh my,there are more failures, but you get the point. I didn't consider what the plant needed. I only thought about my own desires. 

Now I try to put a bit of research into a new variety I'd like to try. Not that I don't like to experiment. Indeed I do! But it doesn't make much sense to totally ignore a plant's growing requirements. So to be successful at growing food, I need to learn and be attentive. No sense wasting time, effort, money, and garden space on something that simply won't grow here on the farm. Therefore, you will not see breadfruit, rambutans, or lychee on my farm.  Neither will you find plums, pears, cherries, or blueberries. I miss lilacs, daffodils, hyacinths, tulips, bluebells, dogwoods, and more but my location does not give them the chill days that they need. And I'm too busy to try refrigerating bulbs. So I have learned to enjoy the vast array of tropical flowers that thrive in my area. 

The same applies to livestock. For example, wool sheep would not do well on my farm.  I get light rains frequently during the week. Thus a damp wooly sheep would be a prime buffet for flies and maggots. It's difficult enough keeping hair sheep healthy, let alone woollies. Luckily I've been wise enough not to try keeping wool sheep. 

Ignoring the requirements of a plant or livestock means that you're just setting yourself up for failure. Heck, I have enough trouble as it is making things work on my homestead without purposely flirting with disaster. Thus I appreciate gazing at my mango tree. It surely keeps me in line! 

Saturday, November 9, 2013

Life in the Slow Lane

Before starting a homestead farm, I lived a fast lane life. Not the glamorous high profile life. But the life of rushing around, multi tasking, working fast all day long trying to get everything done. Work fast, talk fast, eat fast, drive fast, live fast.

Time saving devices filled my fast paced life : dishwashers, washing machines, food processors, microwaves, clothes dryers, anything to save time. In the garden, use a rototiller instead of a shovel. For chopping wood, use a gasoline woodsplitter instead of a maul. Drive in the car to go even to close destinations instead of riding a bike.The problem with time saving devices was that I didn't use the saved time for leisure or enjoyment. Oh no, the time was used to accomplish more, work more, get more done. 

Life in the Eastcoast always seemed at high speed to me. But ya know, I thought that it was completely normal! I didn't know any other kind of life, other than summertime as a child. But even then, days were spent playing and exploring at high speed. 

So now I find myself in the slow lane. What happened? People say, oh you retired. No, that's not it. I'm more involved in projects now that I'm retired. More things that I'm involved with. But I've definitely slowed down. My old friends back on the Eastcoast even say that I talk slowly now. 

Some how moving to a rural setting, participating in a community, and trying to live more of a homestead lifestyle has slipped my gears. While I work quite a bit on my projects, I have lost the urgency, the need to get things done today, or yesterday! At then end of a day, I tell myself that I'm satisfied with what I accomplished, regardless of a job being completed or not. That's not something I was able to do before. If a job didn't get completed, I use to be on edge, restless, I'd sleep poorly, dream stress-dreams. Ya know, I like the slow lane a whole lot better! 

I've shed many of the time saving devices that I use to have. I've adapted. So now when I add one, such as my riding mower, I allow myself to use the found free time for enjoyment --  exploring the woods, riding my horse, playing with some artwork, brushing my dogs, spending time with my sheep, tinkering in my gardens. Wow, it's like being reborn. I don't have to rush, don't have to tackle another job. Instead I get to enjoy some aspect of being alive. 
A sunset digital art painting that I'm working on. 
As a child I spent a lot of time, especially during summers, exploring, investigating, and learning. Somewhere along in life I stopped making time for that. Now that life isn't as urgent, I've thought about going back to some of my childhood ways. I'm making time to explore. 

Returning to my childhood? No. Adult life is here to stay. No one else is going to provide my food, pay my bills, give me a house, etc. No, I'm an adult living an adult life.....but..... When planting in the garden, why not look under rocks to see what's living there? At the end of a day, sit and watch a sunset for 5 minutes. I make time to go exploring down at South Point, snuffling around the coastal rocks and beach combing. Take time to track down which plant is emitting that lovely floral scent. 

Living a slower life isn't living with boredom, it's just the opposite. It's living a full life. 

Above photo-- a dear friend who showed me the wonderful magic of exploring lava formations. 

Saturday, November 2, 2013

House Insulation

Barry brought up the subject of insulation. I think quite a few people are assuming that we are crazy for not insulating our house. And I think that the new building code now requires insulation, though our permit is governed by the older code.

Insulated windows we can't get away from without spending lots of money on custom windows. All the windows now are double glazed. We don't need double glazed, but it's cheaper to go that route. Our windows are seldom closed. I'll close windows on a chilly winter morning so that the woodstove can heat up the main part of the house, but other than that, they are never closed. We don't get rain in the windows, nor too much wind coming through. No close neighbors, so blocking out noise isn't needed. And no need to lock up the house. Anyway, a person seriously wanting to get in would simply break a window. And the issue of vog.....by the time you notice that the vog is heavy, it's too late. It's already inside the house. On a bad vog day, we'll just leave and do something somewhere else, hoping that the vog has lifted by the time we get home. Maybe some day some catastrophe will happen and we'll be glad for the windows, but I hope that never comes about.

Insulation in walls and ceilings is for noise control and temperature control. We once had installed fluffy fiberglass insulation in the livingroom, but it became a housing area for rats. You talk about a smelly mess! The rats loved it and became extremely difficult to eliminate. Once gone, they left behind smelly urine soaked insulation. We ended up removing the walls and ceiling in order to rip out all the disgusting, wet insulation. Rather than reinstalling the insulation, we thought hard about why insulation was needed in the first place. We concluded that we only needed the roof insulated.
Styrofoam sheeting between metal roof and ceiling. 

Heat -- we only use heat is in the morning in order to take the chill off. We have lived here just fine without it, but it's a nice luxury. A side benefit is that the woodstove also dries the living area out, thus stopping the mold problem. And it is handy for some quick cooking. But we don't want to keep the heat in! By 8 a.m. the house would be too warm if the heat wasn't allowed to escape. So all windows get opened and the heat is aired out. Insulation would make it more difficult to cool the house off. And since I have a virtually unlimited source of fuel for the woodstove, there is no need to conserve on heat. 

Cooling -- we have no need for air conditioning and never will. So we don't try to conserve cooled air. Our house is intentionally kept breezy during the day, encouraging the air to flow through it. It stays cool enough all by itself. The ceilings are high and peaked to allow hot raise to rise and get flushed out by the breeze. 

Noise -- the only noise we need to dampen is that of the rain. Our roof is metal, thus noisy. There is no way to totally control noise on a metal roof, but a bit of insulation takes out the sharpness of the sound. So we opted to use foam insulation boards. Not as easy for a rat to go unnoticed. As for outside noises, we live fairly removed from neighbors. So general noises and generators aren't a problem. In fact, I like to be able to hear any unusual noise, like the horse whinnying or the sheep bleating at night. Our watchdog will woof when something is amiss, so I want to be able the hear that too.