Wednesday, September 30, 2015

Chaya - Update

Sonia, I don't have reliable information on chaya. I've heard a lot of differing opinions. And I see these same varying opinions on the Internet. Some people say that they drop a leaf or two in their smoothies and don't have a problem. Other references warn of toxicity (cyanide compound) with raw chaya. Most references and people I've talked to say that chaya needs to be cooked for safety. Now the cooking times I've heard are all over the ballpark. 5 minutes. 10 minutes. 20 minutes. Most everyone who eats it that I've asked, uses chaya boiled. It's added to soups. But I've talked with one person who routinely uses a few leaves in stir fries. And another who boils the leaves and drinks the broth as a tea.

So things are up in the air. Apparently 3-4 leaves are relatively safe to consume if raw or lightly cooked. But not totally safe. On the other side of the coin, cooking for 20 minutes eliminates the cyanide danger, so consumption is safe. 

One other thing. I was recently told that one should NOT cook chaya in an aluminum pan. 


Tuesday, September 29, 2015

Chaya

Chaya, a.k.a. - tree spinach.


The above plant is just a baby. Only three feet high and a few months old, it will continually grow fast, attaining 6 feet high before Christmas. Chaya will easily grow much taller but I plan on keeping it pruned to about six feet. I've seen it trained into a hedge and that works fairly nice. I also saw one gigantic plant that must have been close to 20' high. I have two bushes at the moment, which will be more than enough for my own needs. The prunings will give me plenty of greens. 

Chaya is very easily propagated from stem cuttings. Mine started out as 18" tip cuttings. I just stuck them into the ground and kept them moist. They both successfully rooted. 

So, what Chaya is good for? As it's alternative name implies (tree spinach), it's edible. The boiled leaves can be used in a variety of dishes. I've been using them as food wrappers in place of grape leaves. 
(Close up of the leaves, sprinkled with an afternoon shower.)

Chaya needs to be cooked to make it safe to eat. 20 minutes at boiling does the trick. This is one veggie that is not for eating raw. 

Monday, September 28, 2015

Cane Toadlets

With all the rain we've been having here, there has been a sudden population explosion of cane toads. We have been finding adult toads in the farm ponds and as quick as we remove them, others appear a few days later. I didn't realize just how many adult cane toads were in this area. 

If it weren't that we have patrolling farm dogs, I would let the cane toads have free run on our acres. They are great at eating various garden beetles, and perhaps more. But a curious dog can easily be killed if they grab or bite one of those toads. I witnessed my neighbor's dog dying after having harassed a cane toad (it must have grabbed or bitten it though we didn't witness that event, but we did see her snooping around the toad). It was horrible to watch and nothing could be done to save the small dog. 

Even with our diligence of eliminating adult toads, we have been finding tadpoles in the main pond. The koi fish apparently have been eating a lot of them, but far too many have been surviving and avoiding the fish. Or perhaps the fish have eaten their daily fill and there have simply been too many tadpoles. I attempt to net any tadpole that comes near the pond edges, but that has left too many the have been developing into toadlets. 

Now what? Toadlets escaping the pond! 


Ducks and chickens to the rescue. I've been encouraging the birds to forage over by the pond. The ducks have been nosing down in the weeds a lot recently but I'm not sure if they are actually eating toadlets. So I devised a scheme to bring the chickens to the pond. 


I enticed the hens to follow me to the pond area, but they started to get nervous and head back to their pen. So next I laid a thin trail of cracked corn over to the pond. Greedy hens followed the trail. I felt like I was some sort of pied piper! 

Next I needed to get the birds to cross the pond bridge and discover the toadlets. Again, cracked corn did the trick. 

Little piles of cracked corn led the hens across the bridge. As soon as one hen discovered the toadlets on the far side, it became a free for all. Everybody started scratching about, stirring up toadlets and gobbling them down. 

Using the chickens as biological toad control sits well with me. No poisons. Free protein for the chickens. As long as I encourage the hens over to the pond once a day, they seem to be eliminating all the developing toadlets. 


Sunday, September 27, 2015

Firewood Drying, Tepee Style

I have a habit on the farm that I never gave a thought about, but it interested a visitor that was recently here. So I'll pass it along. It involves my firewood. 


As I work about the place....weeding, planting, cleaning up, etc.....I have a tendency to pick up wind blown branches. Whatever small twiggy parts that can be hand broken are put into a pile. These eventually go into a biotrash pit or a pallet grow-box. The larger branch pieces get leaned up against a nearby tree so that they have access to air and thus dry out. Even when they get rained on they will dry out quickly because the wind can easily blow through them. 

At some point in time I will find myself in need of firewood, so I'll bring an armload of these small branches over to the chop saw and cut them up into woodstove size. But in the meantime they are simply stored upright against a tree. Around the farm I have numerous of these little tepees, so if you didn't know what they were about, I suppose it looks pretty odd. 

Friday, September 25, 2015

Will Goats Eat Tomato Plants

Yes, will a goat eat tomato plants? That's one of the questions I've recently fielded via email. 

Answer ......yes. 
Above, Nani is ignoring the various grasses and hono hono grass to purposely eat the volunteer tomato plant that she found. 

You would think that a goat would avoid this plant. It's mildly toxic. The leaves are strongly scented. It just doesn't seem to be a thing that animals would want to eat. Wrong. Both my goats and sheep will, and have, eaten entire plants right down to the thick stems. They prefer the young growing tips, but will repeatedly return to the plant until there is almost nothing left. 

Conclusion? Keep the goat away from the garden. 

Ginger

My homestead farm has quite a goodly amount of trees, thus plenty of shaded spots. Most veggies won't grow in shade. I've found that kale and green beans will tolerate some shade, but they aren't real productive as compared to those growing in the sun. The one veggie that does ok in light shade or short sunlight hours is the sweet potato. But even then, some varieties tolerate the shade better than others. Tuber size is far better in full sun, but quality and flavor is just fine in the shade plants. And the sweet potato greens are more tender from the shade plants.  But sweet potatoes still require some amount of sun, not total shade.

Now, I didn't notice this before (most likely because my brain wasn't on "think" mode at the time) but the various gingers do ok in shade. Light or bright shade. And I've got plenty of that. 

What's ginger good for? First of all, I've never tried growing edible ginger. I'm told there are lots of disease problems with growing it. But I do like the flowering types. Their scent is marvelous! 

Above, white ginger. My favorite. 

Yellow ginger. Smells great too. 

Kahili ginger, wonderfully scented. Also known as Himalayan ginger. 

I also have shell ginger but it's not in bloom right now. 

My ginger serves several purposes. 
...It fills in those shady spots with a nice plant. Green, foliage different than the surrounding ferns. 
...Wonderfully scented cut flowers for the house. 
...Colorful flowers that make me smile. 
...My rabbits love to eat the flowers. It gives them some diversity in their diet and something different in their day. 
...The donkeys will eat a bit of it, I guess for a change of pace from their usual pasture pickings. 

The Kahili ginger is a bit controversial here. That's because it can oroduce viable seeds, thus spread. So this ginger variety needs to be watched and controlled. I don't let mine go to seed because I use all the flowers, either for the house or for the rabbits. 

Wednesday, September 23, 2015

The Search - Day Two

Early the next morning we started out again. Still no luck on using the truck, so we hiked. This time we took along a dog, hoping it might smell the other dog or perhaps the abandoned dog would sense this one. We were grasping at straws, hoping for any miracle. Our whistling and calling didn't work yesterday, so another dog might work. At least it was hope. 


Today we met some of the bovine residents. Not many and they didn't hang around. They all got away as quickly as possible. 

Today Bob and I stayed together until we hiked the hour up to the mud patch. Up. Down. Bushwacking ...today we brought the machete. I meant to count the number of gates that we climbed over, but I forgot. 

After 2 1/2 hours into our search, trodding about and searching up there, I was beat! Time out for a rest. Yes, I'm surely not as young as I use the be. Even the dog was willing to take a break. 

Recovering a bit, I climbed atop a gate to look down on the town. What a beautiful vista. 

Bob recovered before me an opted to head for the distant water trough. Taking the dog with him, I watched as he disappeared over the rise in the distance. Once gone from view, I turned to recheck the muddy area, calling and whistling again. An hour later, still no luck. 
(The little reddish dot at the end of the road in the distance was Bob.) 

Regrouping, we started to wind our way back down the hill. I whistled until my whistling lips quit working. Called until my voice no longer could shout "pup, pup, pup" over the sound of the wind. Sadly, we never found the dog. 


4 1/2 hours into this hike we finally caught sight of the cattle pen that's only 1/2 mile above the highway. Boy was I glad to see it come into view. Within a half hour we would be back at the truck. Tired and defeated, but we gave it a try, gave it our best. It just wasn't enough. 


The Search - Day One

Let me take you on a sad journey, the search for an abandoned, abused sweetheart of a dog. This dog had been starved for the past several weeks, eating only the bits of bread, scraps, and dog treats that neighbors threw it. The owner had totally stopped feeding it, even though one of the neighbors had given him a 50 bag of dog kibble. The poor skeletonized animal was led up this path, then on through rough pastures, struggling for an hour (the owner said) before bring chased away into the tall grass.....to certain death.

I found out about this 6 to 18 hours after the dog had been abandoned. It was impossible to pin down the owner as to exactly when he took the dog into the hills. But he did show us the ranch roads that he started up and gave us descriptions of where he took the dog. Bob and I, being fueled by anger, immediately trekked off in search of the dog. 

Contacting the manager for this section on Naalehu Ranch, we eventually got permission to hike the area. Regretfully the main gate lock would not open, so parking the truck, we started up on foot. This ranch is over 10,000 acres, quite an expanse. We had never been on it before, but with a little help from GPS, we were never in danger of being lost. 


Due to the recent rains, almost all the ranch roads were heavily overgrown....like pictured above. My short legs found them to be challenging, to say the least. It angered me to think that the owner dragged that poor dog up through these roads.....a forced march to death. 

Bob and I took slightly separate paths hoping to increase our chances for success. Luckily the phones and iPad worked well up on these hills because we were able to keep in touch of each other's progress. 

One thing that ranches have a lot of are gates. I climbed over plenty! And each one was different...what the hey? For real.....not one was anything like another. I stopped atop this one to snap a picture looking down.

The cows up here have some fantastic scenic views. Expansive green acres. Gorgeous views looking down on the plain. This is 100% cow country, not a human around. All those nasty humans scuttle about down in the dark areas far, far away. 

I could have taken dozens of scenic photos up here. If it wasn't that I was on a sad mission, I would have loved this hike. Tall grass often over our heads, to be sure, but very pretty. 

Bob and I struggled up hills, across pastures, over gates looking for the locations that the owner described. I never came upon them on my route, but a Bob did. After three difficult hours he located a muddy section with dog prints and the water trough mentioned by the owner. But sadly, no dog. By this time it was getting late and raining lightly. We both decided to turn down the hill in order to get back to the truck before dusk. With a lack of flashlights, that was imperative. 

Soaked, very tired, hungry, and thirsty we retreated. Tomorrow morning we would return to try again. 


Sunday, September 20, 2015

Chinese Rose Beetle

I recently had the "pleasure" of being visited by some Chinese rose beetles. Well not me personally since I'm neither green enough nor sit still long enough, but my poor apple trees. One week I happened to give the young apple saplings a glance and was dismayed to see their foliage peppered with holes. With not any leaves extra to spare, I felt that I had to do something ASAP to rectify the situation. 

Plan of attack :

...Go out one hour after sunset armed with a flashlight. Inspect each leaf, especially the bottom, for Chinese rose beetles. Pick off each one and squish it. (For the squeamish, the beetle could be drooped into a jar of soapy water.) 
...After eliminating beetles for three nights and still seeing no reduction in their numbers, mix up a spray bottle of Sevin. Spray tops and bottoms of all leaves. Make a tripod to hold an umbrella over each sapling so that the rain does not wash the Sevin off. 
...Three days later, with the beetle population still high, bring out the big guns....Bayers insecticide, the controversial imidacloprid. Spray the bottoms of all leaves. 


Once the beetles were pretty much gone, I backed off to spraying the undersides of the leaves once a week with Sevin. Within a couple weeks new leaves were emerging. Success! 


Most likely I could have stuck with just the Sevin and done ok. I seldom resort to Bayers insecticide.....but frankly I don't apologize for using it at times. In my entire lifetime I will be using less total than one commercial farmer uses in just five minutes. Plus I do not spray it near flowers that attract bees. So if you have a bee in your bonnet about pesticide use go talk to Green Giant, DelMonte, ConAgra, etc. 

Now that I know that apples are a preferred target of the Chinese rose beetle, I plan to do something more benign to control them. I've been told that they are repelled by bright light. That really won't help me for two reasons.....one, the apples are located a good distance from my home and thus the electrical source, and two, being on a small solar system I am not willing to run light bulbs all night long. Running a generator beside the apple trees is not acceptable to either me nor my neighbors. Besides, it's been raining here every night so any electrical set up would have to be sheltered from the wet, be it wiring, generator, battery, etc. So this option is out. 

Next, these beetles are attracted to low light, such as one of those solar lights people stick along their driveways or walking paths. Thus I could fashion a trap where the beetles are attracted to the light, hit it and are knocked into a bowl of soapy water below the light. This is one idea I plan to pursue. 

Next, I could get in the habit of checking for and killing any beetles I see on the apple leaves right after dusk. That way I could nip the problem in the bud before the beetles get well established. And if needed, could spray an insecticide if the soap bowl doesn't work well enough. 

I will be monitoring my Chinese rose beetle problem and keep you informed how things develop. 

Saturday, September 19, 2015

Rain, rain, go away. Come again some other day.

If hindsight were 20/20 I would have built hoop tunnels over the garden beds and covered them in clear plastic sheeting that could be pulled back for when it's not raining. It would have helped keep the excess rain off the growing beds and prevented many of the difficulties I've had. 

Too much rain has caused all sorts of problems in the garden......

...weeds. They are outgrowing my efforts to control them. Basically it's the tropical grasses that are the prime headache. These spread via stolons and rhizomes, making control a real pain in the neck during rainy times. 

...rot. So many of the veggies are rotting before they mature. The slightest bit of damage to them opens the door to bacteria, moods, viruses, etc. I'm seeing rot problems with the potatoes, beans, peas, tomatoes, chard. I suppose I'd see other veggies rotting but I haven't replanted them in weeks because of the constant wet conditions.

...diseases. Once the diseases start in the area, they quickly spread throughout the gardens. How? Via the body or legs of every cat, dog, turkey, pheasant, or human passing through. While I can keep people and dogs out of the gardens, I don't have any control on the others.

...splitting. The excess water has resulted in veggies splitting before they are ready for harvest -- tomatoes, potatoes, carrots, radishes, daikon to name a few.

..pests. The bugs are undergoing a population explosion. Aphids. Grasshopper types. Flea beetles. Stink bugs. You name it, there are scads of them now. 

For months I've been hoping that the rains will go back to something that I could call normal. So far no luck. I guess I'll just have to take the time to build those rain shelter hopp tunnels ...... ya know..... just to make it stop raining. The gods are like that, eh? 

Sunday, September 13, 2015

Piggie Tilling Update

My two piglets aren't all that big, but boy can they do a job on the soil and sod! In the foreground of the photo below it's easy to see how they've reduced thick, tall pasture grass into a grassless, rooted up patch of mud. Yes mud, because it's been raining some amount here just about every day for weeks. 


But I don't force the piggies to stay in mud. I've been moving the pen 3-4 feet every day so that they have half the pen mud-free. Of course it doesn't stay that way for too long. They chow down the grass then start rooting for worms. Below.....one piggie snorkels in mom's slop & glop while they other prefers eating grass for lunch. Every time I feed the pigs, the banty hens come a'runnin. Chow time! 


Here's a better view on the pen. Half muddy grass stems, half fresh green grass. By tomorrow morning the muddy side will be rooted up and the green side will be reduced to muddy stems. Plus just to let you know, these two little four-footed rototillers get time to come out of their pen each afternoon for a running game of tag with Crusty. It's quite comical to see them playing with the farm dog. Hey, pigs are suppose to be afraid of dogs, but nobody told these two fellas about that. 

With all this rain, the pigs have been turning the ground to slick, pasty mud. Not ideal for gardening, to be sure. In fact, it's a disaster. 


Having the pigs root and trample the soil in the prolonged rain is causing compaction. It is resulting in soil that has similar properties to gley. The water fails to drain through it and just lies in puddles. With my particular soil, I know how to fix this. 


I will be planting taro into this wet gooy stuff, adding a layer of compost/horse manure, them covering it with a couple inches of mulch. I'll keep the mulch layer at about 2" deep by adding more grass clippings as needed. And when the taro is about 6 months along I'll give it a good dressing of rabbit manure. After the taro is harvested, I'll add some coral sand, biochar, and volcanic cinder and rototill that in. The soil will then be ready for veggie growing. No more waterlogging. 


Saturday, September 12, 2015

Papayas

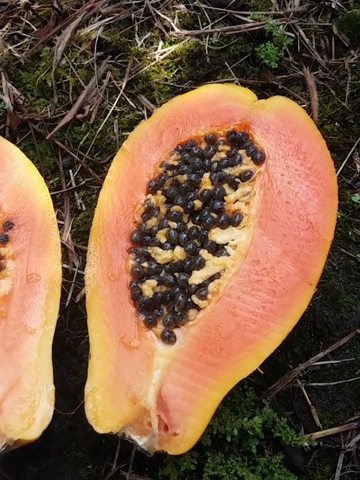
I've decided to grow plenty of papayas for livestock feed. They are really easy to grow here. And since me or my friends eat a papaya every day, I have access to scads of seeds. 
Each papaya contains dozens if not hundreds of seeds. The seeds are those round little black things.

By the way, papayas come in a variety of shapes, sizes, and colors. I have the yellow-orange and the pinkish ones growing in my area. The animals like both equally. 

Which livestock animals eat papayas? Every one that I have. Chickens. Rabbits. Pigs. Goats. Sheep. Horse. Donkeys. Only our dogs and cats don't. And quite honestly, I haven't tried it with the dogs. 

I was surprised to find out that the entire plant is edible. Our goat and horse educated me on this score. Leaves, stems, fruits, flowers. They devour them all. The only thing left behind is the woody truck. Of course I wasn't intending to feed my trees to them when they were giving me my papaya lessons. Those scoundrels escaped the pasture and wiped me out, and not just the papayas. The four footed destructo-team also cycloned through a banana patch. That's how I found out that the entire banana tree was edible too, at least as livestock fodder.

So now I grow papaya seedlings for the rabbits and as a treat for the others. And I always leave a few of the most robust seedlings to grow into trees. The fruits are welcomed not only by my animals, but they also make for a good breakfast for me and my friends. 

The little tree above I saved from pulling out because it happened to come up next to a baby coffee tree. It will provide a little intermittent shade while the coffee seedling is taking hold. When the coffee seedling starts growing I will harvest the papaya tree. That will be in a month or two, before the papaya interferes with the little coffee tree. 

Sowing the seeds is easy. I use the seeds fresh out of the papaya. I don't bother to clean them, nor dry them. I'll use a handpick or a trowel to open up the soil, I'll spread in some seeds, then cover them lightly with soil. I don't mind sowing them fairly thick because I have plenty of seeds and not all they seeds germinate. They can be crowded since they get harvested for livestock feed while small. Depending upon when I need them, I'll pull them out or chop them as the soil level when they are anywhere from a foot tall and up.

At times I have too many fresh seeds to deal with planting them my usual way. When I'm busy, I'll just fling them here and there. Any that happen to germinate and survive, so be it. Surprisingly I get quite a lot of young trees that way, but they don't come in thickly like they do when planted in a bed and covered with a tad of soil. But the labor effort is zilch, so that's a  plus. 

Occasionally I find papaya seedlings scattered about the homestead nowhere near where I planted them. I can only assume that the seeds got there via wildlife or via the livestock manure. Either way, it's fine with me. No labor animal fodder! But sometimes I'll allow a volunteer papaya to stay, like the one now growing in the community garden. By the way, it's doing great because of the enhanced soil fertility. 

It's leaves are large and glossy green. The truck thick. It's loves that spot. I hope it turns out to be a good tasting one! 


Wednesday, September 9, 2015

Wire Fence Gate

Around here, plenty of us make gates through our pasture or property fencing the cheap and quick way -- wire fence pass-through gates. They are simple, quick to make, and cheap. I find that this sort of gateway is fine when I'm not having to move livestock through it on a regular basis. But with livestock I prefer a rigid swinging gate because it's easier to prevent animals escaping past me. I have better control. But having said that, I do indeed use these cheap wire fence gates in my pastures. Ha, go figure. But where security is highly important, such as gates which provide exit from my property (that us, the driveway gates), I have rigid gates. Escaping livestock does not make for a happy farmer. 

Anyway, back to the wire fence gate. Below is my first attempt at making one. I started cross-fencing my pasture and needed a gate in one corner. So I cut the fence then added a brace to the t-post, and secured the end of the cut fencing to the t-post by wrapping about ten inches of fence around the t-post. Of course the fencing piece going from where I cut it near the t-post (on the left in the photo) going toward the perimeter fence (on the right of the photo) was now too short to be used for the gate. So I just cut it away. I then cut a new longer piece of fencing to make the gate. I secured the end on the right to the perimeter fence. The end in the left you can see that I nailed to a five foot high 3" diameter tree trunk......in this case from an ohia tree which is fairly strong and rot resistant. 


Now how to make this floppy gate stay shut. Hhuumm. I've seen where other landowners make loops to secure the top and bottom of the gate post, in my case, an ohia post. So I used a piece of stout wire from the discarded piece of fencing. Forming a loop, I nailed it to the post using a large fence staple. I made the loop just large enough that it could fit over the top of the t-post snug enough to hold but not too snug that I would have difficulty using the loop. 


To secure the bottom of the ohia post I again used a piece of the discarded wire fencing to make another loop. Not the neatest job, but it was my first try at experimenting. 


With a bit of effort I came up with a loop that did the job. I could slip the butt end of the ohia post into the loop, then flick the top loop over the t-post. The gate was secure. I could readily open and close it, and it held the livestock in. So far none of the animals have put any effort into learning how to flip the loops open and escape. Good. 


The one big problem I've had with this gate arrangement is what to do with the floppy gate while it is open and I need to drive the ATV through. Laying the floppy gate on the ground has caused the fencing to bend and warp. As you can see in the top photo, my gate now has a decided curviness to it. Since the warping was getting worse, I decided I needed to address the problem. 


The answer was sitting right before my eyes. A wood pallet was sitting there that I used to set buckets, water jugs, and other assorted items on. By slipping the butt end of the ohia post into the slat, the fence gate stood upright. No flopping and twisting like when I was setting it onto the ground. Much, much easier to use this way. Again, a cheap and quick solution. Not the prettiest, for sure. But it works.


Tuesday, September 8, 2015

Turkeys

Feral turkeys. Not truely wild ones in Hawaii, but feral. They came from domestic stock, not wild populations. How'd they get to an island in the middle of the pacific? Well...a long, long time ago in a land far, far away......stop. Wrong beginning. Reboot...........

Many years ago domestic turkeys were imported for releasing here. Reason....to provide a food source for locals and as a game bird for hunting businesses. Importation occurred numerous times, starting in the late 1800's, with the most recent large release being in the 1940's (I'm told, but  I wasn't around then) Additional intentional releases took place up until 1960's.  Rio Grandes are the predominate type currently thriving. Those that set up life on Big Island were highly successful. But there were several other turkey breeds introduced over the decades. I would guess the various strains interbred, but what is now running around my area of the islands is of the Rio Grande ilk. They all have the buffy-tan band on their tail feathers, a decidedly Rio Grande trait. 


Regardless of which breed or strain of turkey I have running around here, they are a pain in the neck for gardeners. And while I admire their slug eating capabilities, I wish that they'd leave the veggies alone. Come on guys, why are onion leaves so appealing? And carrot tops? Geez. Did you know that a turkey can peck out each individual pea from a pod whole leaving the pod intact on the plant? When turkeys invade a garden, I don't get even one pea, not one! 

But there's a  plus side to turkeys......good eating. Yes, older birds are tough and stringy. They need to be used to make stock, or else ground up and pressure cooked. But get them young and they can be just as tasty and tender as store bought, but much more flavorful. 

Right now I have five turkeys wanting to set up house keeping in the main garden areas. Two momma hens and three youngsters. 

This morning the group greeted me as I stepped out my front door. Geez Louise, they are begging for grain right along with the young chickens! The word is out that there's a free buffet up at the house. 

Saturday, September 5, 2015

Pig Nest

I've mentioned that the piglets made a nest. So.....

Are pigs related to birds? Do high end restaurants serve pig nest soup? Ah the ultimate question -- can pigs fly? 

Yeah, I'm laughing. Just can't help myself. Life can be fun. 

Yes, pigs make nests. They're for sleeping. Mine will take any loose material available, pile it up, then snuggle down into the middle for snoozing. The piglets line up like little sausages, side by side. Cute. 

These two have saved some of the kikuyu stems for making their nest. I moved their pen over two feet to give them access to fresh grass, and they harvested some of those grass stems to freshen up their bed. 


Eventually they will eat them, so food wins out over comfort. 

Friday, September 4, 2015

Tilling With Pigs -part two

The pigs have been doing a number on their spot. First they ate up all the juicy greenery. Then the chomped down the grass stems. Stems? Yup, this is kikuyu grass. It makes thick long stems. Once the grass was pretty much gone, they began to root. Rooting started on day 5. It took then 48 hours to eat the green grass, another 48 hours to chomp the stems, then they started digging. 

In the photo above, they left the grass stems in the back corner. They use it as their bed. And they have just started digging in two spots. I've circled them below.....


Mark emailed and asked how do I have the wire panels attached to one another. And what does the gate look like. 
...first of all, no gate. I just open one corner of the pen when I need to have an opening. 
...the corners are simply latched together. I use one snap latch top and bottom at each corner. Very quick, easy, flexible, and temporary. It makes moving the pen easier. Plus the pen can quickly be dismantled and stored when needed. The snap latches are strong enough to contain the pigs. And a corner can easily be opened by unsnapping the latches. 


I plan to let the piglets root in the pen until I see that they are rooting up rocks. By then they should have much of the kikuyu roots yanked up and eaten. 

Wednesday, September 2, 2015

Pearl Onions

The person who gave me the bag of shallots also gave me two bags of pearl onions. Again rather than eating them, I opted to plant them. 

Will they grow here? Sure. Will they make bulb onions? Perhaps, but it depends upon what variety they are, or if they are true pearls. But they still will make something edible. With luck, they will be fantastically delicious. 

Pearl onions sold in the supermarket may or may not be the actual types called pearl onions. They very well could be just small onions that are a by product of regular onion production. So possibly these little onions aren't pearls at all. But once they grow, I'll find out. It will be a surprise! 

If they indeed turn put to be real pearl onions that make small bulbs, then I will use them for propagation for future crops. Time will tell. 

A couple of years ago I was given a bag of white onion sets that were purchased at Walmart. They looked very much like these pearl onions. Of course I planted them even though they were white Southports, a long day variety. I was curious about what would happen. They grew into big, thick shanked onion plants that looked somewhat like leeks. Their aroma and flavor was outstanding! Sweet and juicy fresh onion. I now grow Southports on purpose even though they don't bulb for me. Non-bulbing onions are still a great crop. In fact, I like them better than most green onion varieties. 

Tuesday, September 1, 2015

Shallots

Several months ago I was given a few shallots that a person bought then decided not to use. They thought that I could cook them up for the pigs. Instead, I planted them. I hadn't the foggiest idea if shallots would bulb up in Hawaii, so it was an experiment. To my delight, they bulbed! 

I've saved a number of bulbs for replanting. So now I'm starting my learning process about shallots. 
... Will they grow better in sun? 
... How will they preform in partial shade? 
... How will they respond to manures?
... What sorts of diseases and pests attack them?
... Are there better times of the year for growing them than other times? 
... Do they only bulb at certain times of the year? 
... Does spacing make a difference? 

The plan is to plant a few bulbs in different locations and try out a few variables.....the amount of compost, mulch, fertilizer, moisture. Since I know very little about shallots, the learning process should be fun. Boy, I've got a lot to learn about shallots. Oh, I've read up on them already. But experience has shown me that things are often different in the tropics. I'd like to see what sort of tweaking shallots need for good production on my own homestead. 

Well, I've already planted the shallots that I grew myself. But a friend just gave me some that she's not going to use. So I've washed them up and plan to plant them tomorrow to start another patch. ... ->

Cooking with them is simple. Stirfry. Sautéed. Yum, yum, yum.