Showing posts with label Bees. Show all posts

Sunday, November 3, 2019

Bees And the Corn Dust

This morning I was using a bag of cracked corn to help catch some loose chickens, and during the process slung the partial bag atop the trap cage. A few hours later I came back to retrieve the bag, and to my surprise, there were honey bees in it. What the heck were they doing in there? I sat down to watch and observe.

Bees in the bag.

Watching bees work is fascinating. They're quite involved with whatever they're doing and appear to have no objections about being watched. In fact, I could gently brush them aside if I wanted a handful of cracked corn and they wouldn't object. I've learned from keeping bees that as long as I'm slow and deliberate, and gentle, the bees tolerate my presence quite well. 

This bee is diving head first, looking for more corn dust. 

Back to the bees..... So what was up? They were collecting corn dust. I bet there was corn pollen mixed in, which probably started this endeavor. Some scent caught their attention, and now a team was collecting the fine corn dust. I watched for over an hour, seeing one bee after another pack their legs before taking off, presumably returning to their hive with their protein prize. Each bee would initially clean the surface corn bits, then start delving deeper, churning over the bits looking to gather more dust deeper down in the pile of grain. With some individual bees, all that could be seen was their little pointed butts sticking straight up in the air. As I watched, loaded bees left, fresh bees arrived. It was constant activity.

The two whitish "pollen" sacks are quite visible on this bee's back legs. 

Monday, September 19, 2016

Bees and My Ponds

Around the farm I have numerous mini ponds used primarily for mosquito control. They're all stocked with fish known to eat mosquito larvae. It didn't take me long to notice that my bees were using the ponds as a water source and sadly, many were drowning. But once pond vegetation was added, the bees had enough footing to prevent them from falling into the water. 

About a year ago I introduced azolla into ponds, mainly because the maintenance was far easier. Much simpler to harvest excess pond vegetation with a dip net, as opposed to hand hauling out mats of tangled plants and hacking them into pieces for removal. 


The azolla covers the pond surface with low growth that the bees seem to prefer. They easily walk over its surface and have simple, safe access to the water below.


My only concern now is that I need to either gently chase the bees away when I plan to net out the excess azolla, or do the netting at night after the bees have gone home to their hives. 

Sunday, April 5, 2015

Pollinating Bees

While checking some of my gardens today, I was looking for bees or other pollinators. This year the number of honey bees is lower than usual. The days have been on the cool side, so there is less bee activity. But the primary concern is that the population of honey bees has dropped significantly and is still dropping even more. 

Though I saw very few honey bees, I did come upon a number of large black bees. Carpenter bees of some sort? I'm no insect expert, so I'm guessing carpenter bee. 


This one was harvesting nectar from a squash flower. I noticed a number of yellow lumps on its back. Based upon dusty recollections from my college days, I recall that those yellow lumps are pollen laden anthers from some previous flowers this bee had visited. Some flowers have sticky anthers designed to glue themselves to the backs of visiting insects. When the bee visits the next flower of that plant species, those anthers (and the pollen) rub against the pistil (female part) thus pollinating the flower. Pretty cool system Mother Nature devised, eh? 

I'm glad to see that there were several of these big bees around. Sadly for gardeners like me, I know that there are homeowners who poison and kill these bees in the name of protecting their homes. With the severe decline of the honey bee, plus the war against these black bees, food gardens are in serious trouble. 

Sunday, November 23, 2014

Bees - Dead Queen

This past week my mission was to release the new queens. They had been spending time in the hives in queen cages, waiting for the worker bees to get use to her. Hive #1 went without a hitch. Donning only a shower cap (to prevent bees from getting tangled in my long hair) and using a smoker, I was able to open the hive and gently release the queen. She immediately scurried down into the hive. Success! 

Hive #2 went just as smoothly. No objections from the bees. Their queen looked active and beautiful. As soon as she was released, she crawled right down between the frames and into the hive. Success #2. 

Hive #3 started out ok. The bees gave me no trouble. I didn't suspect any problem because as with the other two hives, there were plenty of bees gathering around the queen cage. But when I inspected the cage I could immediately see that the queen was dead. Bummer. What went wrong? I haven't the foggiest. I gave the hive a bit of a check but didn't see any queen cells. So another queen wasn't the cause. 
(Above - dead queen. The green dot on her back is marking paint. Marking the queen makes her easy for a person like me to find her in the hive. The marking paint doesn't hurt her.) 

Now what? I called my mentor for advice, assuming the I would have to call Kona Queen for a replacement. Being a novice, I wanted to make sure that I would be doing things correctly. Since I was going to be out of town for the next two days, my mentor offered to order the queen, pick her up, and install her into my hive. Fabulous! My shining knight to the rescue. Thank you! 

I'll let you know how the second attempt goes. 
The dead queen. The box is what she arrives in. She has several attendants worker bees with her. On the left side of the box is bee candy, which the workers eat. I removed the screen when I attempted to release the queen, but normally it covers the top of the box. 

Friday, November 14, 2014

More Beekeeping Lessons

Before when there were beehives on the farm, I "had" bees rather than myself being a beekeeper. Back then there were no hive problems to deal with, so hives were not managed other than adding supers for honey collection and harvesting said honey. Nowadays that no longer works. People who don't actively tend their hives now will simply lose them. So I'm now learning to be a beekeeper. 

Some more gems that I'm learning.....
....don't over use the smoker
....move slowly and don't be in a hurry
....take care not to deliberately squash workers
....when removing brood frames, protect them from the wind. Hang them in a box and put some protection over them. Chilled brood can die. 
....even if you're opening and working the hive for some other reasons, do a checklist while the hive is open. Visually scan for capped honey, pollen, and brood. Check for uncapped brood...is the queen still actively laying? What's the drone cell situation? Any queen cells? Remove them. Any hive beetle or varroa mite? Any moth, ant, yellowjacket, mice, etc evidence? Any other abnormalities? 
....remove and kill the old queen at least 24 hours before introducing the replacement queen. 2-3 days is fine. 
....set up the hive in such a way to prevent rain water from flooding the oil tray. 

Some that I consider "pearls"....
....requeen with Italians. They are less aggressive and far easier for a beginner to work with. 
....buy queens from a producer with a known reputation for gentle genetics
....have the queen marked. Marked queens are so much easier for beginners to find. 

Thursday, November 13, 2014

Beekeeping Pearls

I plan to post those little tidbits of wisdom (pearls) that I come across as I'm learning about bees. Here's a few I've garnered already. 

Smoker -

#1-
...to light the smoker, fill it with fuel then use a propane torch to light it. 
No fuss trying to light a bit of paper, then tinder, then building up to the fuel. No burnt fingers from matches or lighter. Just light the plumber's torch, shove the nozzle down into the fuel, leave it there for a half minute or so to light the wood chips. 
Then remove the torch, use your hive tool to smash the fuel down inside the smoker, give the smoke some puffs of air using the bellows and you're good to go. 

#2-
...use hickory BBQ smoking chips that can be purchased by the small bag in the stores. They light easily enough, stay smoldering for a long time so that you don't have to keep stopping what you're doing and give the smoker a few puffs of air to keep it lit. Plus they last a long time if you put them out each time when you're done with the smoker. I'm told that the mesquite chips seem to agitate the bees, so I stick with using hickory. 
     To start, dump the used charred chips from the smoker onto some paper, in this case, old wrapping paper. 
Add a few more fresh chips to the pile if needed. 
Wrap it up making a bundle that will fit inside the smoker. 
Stuff it into the smoker with the loose paper at the top. 
Now it's ready for lighting. 

3- 
...cork the smoker when you're done. By putting a cork plug into the smoker's hole, you'll starve the fuel of oxygen. Thus it will go out rather than keep on smoldering down to ashes. That way I get a lot of mileage out of my hickory wood chips. And the charred chips relight easily. 
Above....smoker in use, emitting smoke. 
Above.....smoker spout is corked. Below....close up of cork plug. The cork is from an empty wine bottle. I had to take a razor blade and trim it down a bit in order for it to fit the hole. 


Monday, November 10, 2014

Bees Be Here!

I've been pretty busy these past few days making pallet grow boxes, gathering debris to fill the boxes with (I got one box filled, another 90% filled and ready for soil capping, two others half filled), planting new taro keikis, starting two small bean beds, and most interesting -- getting ready for the arrival of bees. 
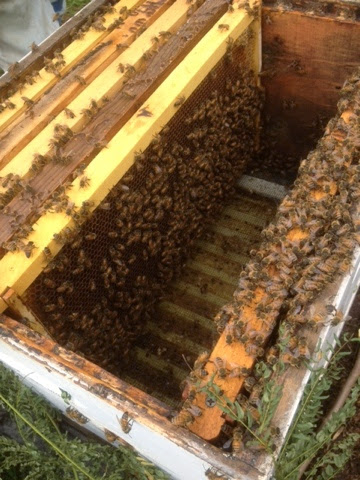
(Looking down inside an opened beehive with some of the frames removed. You can see lots of bees crawling around. Most of these guys are newly hatched babies and caretakers.)

The homestead is finally home to bees. It took a little prep to get things ready. First we needed to decide where to place the hives. 
1- within sight of the farm watchdog to deter theft
2- where they would get morning sun and afternoon shade
3- protected spot from the tradewinds
4- open flight pathway
5- protected from the livestock
6- away from the neighbor's house
7- not too close to the garden so as not to interfere with the volunteers
8- not too close to the driveway
(Above hive has the tree branch in front if he openings. This triggers the bees o relearn their area.)

Once we decided upon the location we needed to make a level spot and place two cinder blocks for each hive to set on. The reason it needs to be really level is that the bottom of the hive houses an oil tray which is used to capture hive beetles and varroa mites. A bit of work with a shovel, a level, and a few handfuls of gravel and a couple small rocks and the flat pad is ready for the cinder blocks. 

With the help of David and the beekeeper, we moved three hives onto the farm a couple nights ago. The move went smoothly. We waited until just before sunset so that most of the foraging bees had returned to the hive. The beekeeper plugged the entrance holes, David and I picked up each hive and gently placed them into the truck bed. Then it was a slow, careful drive to the farm where we off loaded each hive to its level platform. The plugs were then removed. Leaving them plugged is not an option in the tropics because the hives would quickly overheat. We placed a few tree branches over the front of the hives in order to let the bees know that something had significantly changed with their hive. That causes them to reorientate, thus remapping their area. 

Today the beekeeper came by and we completely opened and cleaned out the biggest hive. Reason? Small hive beetle. Just prior to being moved, hive beetles moved in. So the hive needed to be cleaned or else the bees would leave. 
Above, the beekeeper is checking each frame in the lowest box. We had already cleaned each frame one by one in the upper boxes, removing any that were infested with hive beetles and killing all beetles that we saw. The queen is currently in a cage so that she can't move about. Her presence should keep the bee colony in the hive. Our intent is to replace her with a young, new queen in a few days. She is an older queen and no longer vigorous. 
Once everything was cleared of beetles, the lower box was repacked. The beekeeper replaced two infested frames with two frames full of honey to provide food for the bees while they recover from this trauma. 
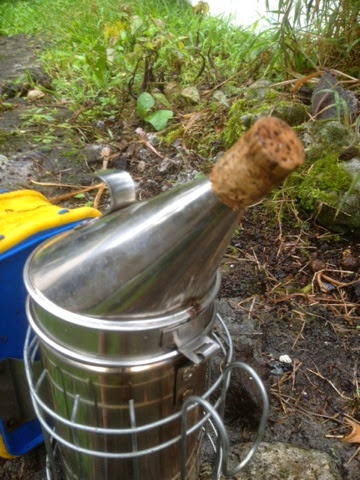
I was truly impressed how gentle these bees are. Above is a picture of the bee smoker. Smoke is used to help calm and control bees. But the keeper needed to use very, very little smoke. Just a few small puffs here and there. And while the keeper used bee jacket, gloves, and vail, I didn't. I was dressed in my normal garden garb -- shirts, t-shirt, baseball cap. Of course I wasn't the one with my hands down inside the boxes. But I was carrying frames back and forth, standing right beside the hive, had bees 360 degrees around me. I didn't get stung once though some returning foragers did ding my head a number of times. If they were trying to sting, they didn't make it through the hat.