Tuesday, July 21, 2015

Soil Sediment Test Interpretation

Soil sediment -now what......

Ok, now that I told you how I do a basic rough soil sediment test, what do I do with the results? 

First of all, this home test just gives a basic rough idea, it doesn't examine the soil particles under a microscope, so I don't know exactly what my soil looks like. But I don't see the need to be that precise. Nothing is all that precise in my gardening anyway. And besides, I'm not an obsessive-compulsive.

Why forego a more precise laboratory test? Foremost, the plants seem to be growing ok. I'm not seeing significant "sick" soil anymore. And since much of my homesteading approach keeps the idea of frugality in mind, why spend the money if I don't have to. 

People often ask me what type of soil I have. Before I learned about soil sediment testing, I had no idea. I was aware that some areas on the farm drained well, some got mucky after a rain, others didn't drain, and yet some soils wouldn't even accept rainwater (hydrophobic soil). I started looking into some beginners soil science and discovered basic soil components......sand, silt, clay, organic material. Im no soil genius. I'm still learning about soil. But I have been introduced to the soil triangle, which I'll try to explain.  

The triangle charts, below, help me interpret my test results. Using a soil triangle chart, I was able to figure out what kinds of soil structures I was dealing with and it gave me a foundation to work from for amending my soil where needed. Here what the triangle chart looks like, you can find all sorts of variations on the web........
So how to use this chart? 
1-  Lets say my soil sediment test showed me that I had 60% sand. So I'll circle the number 60 on the bottom of the triangle. You can see two tan lines going up into the triangle to the left and to the right of the number 60. I will use a marking pen and draw over those two lines, going from the number 60 out to the sides of the triangle, 
2-Now, lets say the soil test showed that I had 30% silt. Now I look for the number 30 on the right side of the triangle, the one labelled "percent SILT". There are two tan lines eminating from the number 30, one horizontal and one going down to the left. Using the marking pen, I will highlight those two lines, again out t the triangle sides. 
3- The last soil component is clay, and my test says 10%. So I circle the number 10 on the left hand side iof the triangle, the side that says "percent CLAY". Using the the marking pen, I will highlight the tan lines  running from the number 10, one going horizontal and one going down to the right.
4- Now I will look to see where all three highlighted lines intersect. In this case of 60% sand, 30% silt, and 10% clay, the lines intersect in the "sandy loam" zone. So that's what my soil would be classified as. 

This next soil triangle has a shaded area which notes the more preferred soil types for veggie gardens, while the yellow area is less desirable. 
This photo was provided by a person explaining how to use the triangle. Regretfully I don't know his real name in order to give him credit for the picture, 

In the actual test I did the other day, my soil sample values were.....
     73% sand
     16% silt
     11% clay
By using the triangle that puts this sample in the "loamy sand" category. But it also shows that the soil composition is outside of the grey "preferred" area. So this garden bed still needs some work. In actual day-to-day use, this bed is productive, but only because I've been working with it. Veggies grow fine but only if I watch the moisture level carefully. The soil drains very readily and dries out quickly. Between crops I will continue to add amendments : compost, manures, biochar, and till in old mulch. Since this garden bed started out as 95% sand, 5% silt, and unmeasurable amount of clay, it's structure is improving. When I started out growing in this soil, the plants were small, starved for moisture and nutrients, and their roots too warm. I had started with beans and they were a pathetic lot. But now beans growing in this soil look good and yield well. 

I've been asked a few times.....why bother with the testing. Why not simply dig in a lot of compost. Well, that's one way to try doing it. But my soil structure varies from location to location. Some areas are very gritty and sandy, while others are mucky. Thus I don't think the approach of one-size-fits-all would give the best overall success. By doing this simple test, I can learn what soil components a particular garden bed needs. By amending the soil, I can come up with a bed that retains moisture at an optimum level while still draining, and holds nutrients so that they don't rapidly leech away. Excessive clay is not one of my problems, I learned via these tests. 

Monday, July 20, 2015

Soil Sediment Home Test

Sediment or tilth test. Why? So that I can evaluate the effect of my garden amendments, Since soil structure has a bearing upon soil moisture & nutrient retention, I am aiming for soil that is desirable for the type of plants I am growing. 

Home test, why? I could always just send a soil sample off to a lab, but why? I don't need super accuracy, nor do I need to give my hard earned cash to a lab several times a year. A low tech home test is just fine for my purposes. Besides, I test each garden bed at least once a year, so that's a lot of tests. 

What I need.....sool sample, straight sided, flat bottomed clear jar, ruler, dish soap, calculator if I'm not up to snuff about using my brain to do the math that day.

Collect sample

First, choose a representative soil sample. Should be from the plant root zone. Since my garden soil is mixed well the top six inches but often has a mulch cover, I will scrap away the mulch and the top 2-3 inches of dirt, then take my soil sample. 

Amount.....enough to full my jar by 1/3. I'll spread the soil sample out onto a flat plate or tray to dry. Once dry, I'll crush and soil clumps and put the soil through a sieve or colinder. I want to remove any pebbles, roots, etc. 

Next I'll put the soil into my large jar. As I said, I'll fill the jar 1/3 of the way. Then if I have it on hand I'll add a heaping teaspoon of dry automatic dishwasher soap. This helps get the soil particles wet and separated, but with my soil type I haven't found it to make much difference. Now I'll fill the jar with water within an inch or so of the top, put the lid in tight, and give it a good shake to get all the soil wet and suspended. I'll take care to make sure nothing is left stuck to the bottom or sides. Then the jar gets set on a flat surface so that things can settle. 

Layers will now develop. Coarse sand settles first and within the first minute. At no more than two minutes I use a marker to note the top of this sand layer. 
The sandy layer will look coarser than the silt and clay layers. 

Silt is the next layer to settle out. This will take about an hour to form. It will be a different colored layer. Most people say that their silt layer is darker than the sand layer, but here my sand comes from dark lavas, so my sand layer is darkly colored. At one hour I will mark the line of the top of the silt layer. 

Clay is the slowest of the soil particles to settle out. Heavy clay layer will settle out in a day, finer clay in two days. Some people say to allow clay to settle for a week but I haven't found that to make a significant difference on my home tests. I suppose it matters if ones soil had lots of fine clay, but mine doesn't. 

I use a tongue depressor to mark my layers, but you don't have to. I just happen to have thousands of the little buggahs in hand, so they are handy. I will then measure the depth of sand, silt, and clay, as well as the total soil depth in the jar. These measurements are used to calculate the percentage of each soil component.

For example, the jar above shows 2 1/4 (2.25) inches of sand, 1/2 (0.5) inch of silt, and 1/3 (0.33) inches of clay, for a total of --------3.08 inches. Divide each particle depth by the total soil depth to get the percentages:

2.25 divided by 3.08 = 0.73 or 73% sand 

0.5 divided by 3.08 = 0.16 or 16% silt

0.33 divided by 3.08 = 0.107 or 11% clay. (I rounded to the nearest whole number)


Sunday, July 19, 2015

Name That Lamb - Done

Ok, the names suggestions have come in. Several people came up with eureka and euphoria, but both of those names have already been used. I only use a name once, so even if they are good ones, the name gets retired. Two folks suggested eugenics, but hubby has a severe revulsion to using that even though the nickname of Genny would be cute. So here's the list this time around: 

You know who
U haul
U turn
Eulampis
Eulayla
Euphemia
Uberty
Ukulele
Ujimyia
Ulema
Eulachon
Eukaryotes 
Yukon Girl
Utahraptor

I've decided upon Utahraptor. Oh yes, I must be crazy. But the reason is that I just happen to have given a utahraptor model toy to a friend recently, thus the suggestion coming from a stranger who didnt know that must be fortuitous. 

So the little lamb gets dubbed the horrifying name ... Utahraptor. We've started calling her Rappy already. 

Friday, July 17, 2015

Snow in Hawaii in a July !

Snow? You betcha !!

We just got snow atop Mauna Kea. Pretty neat, right? It's not the first time it's happened. In fact I've been up there in past Julys when it's snowed lightly. It is so special to be up there in the summertime and dance amid the snowflakes as they swirl around you. Pure magic. 


Wednesday, July 15, 2015

Are You My Momma?

A bummer lamb has come to the homestead needing help. This one came from another flock, not my own, and there was no one to give it the care it needed for survival. So I went and retrieved it from a neighbor who noticed the lamb was in trouble. (By the way, thanks Norman for being this lamb's savior!) While picking up the lamb I could see that there was a dead ewe out in the pasture. Perhaps the lamb's mother? Since no other ewe was paying attention to this lamb, that might be the case. Regardless, this lamb had no ewe feeding it. It was in dire straights. 

Happily the lamb accepted the bottle fairly quickly. It appears to be 36 to 48 hours old, so I'm hoping that it had a chance to nurse off its mom. It's too late to feed it colostrum, so it is going right into lamb milk replacer. We shall hope for the best. 

The lamb is fairly curious. Tonight it discovered our farm dog, Crusty. Crusty has absolutely zero kill instinct and automatically likes everything.....including newborn lambs. He has offered to play with it dog-style, but the lamb hasn't a clue. But little lamb is hoping that Crusty is its mom. 

Crusty is so incredibly patient. He lets the lamb poke about, then it eventually curls up and rests under his belly. Good dog! 

Any suggestions for a name for this lamb? Keep in mind that all my female lambs get names starting with the sound "ewe" , as in a Eureka and Yukon. Yes, this one is a little girl. 

Tuesday, July 14, 2015

New Piglets

I haven't given a pig update lately. Somehow I missed relating the pig sale story. 

As of last mid-May, the farm hosted four pigs. Rocky, the big boar. Hammie, the pregnant sow. And the two youngsters, Mellie and Jimmy Dean. One of my regular blog followers (actually a husband-wife duo, Bob & Sharon) recently bought their own little farm in Puna district and contacted me about my pigs. Since mine were friendly, trained to come when called, played with my farm dog, didn't eat my chickens, weren't escape artists, and could be taken for walks out in the pasture with ho hassles about returning to their pens, the couple were hoping I might be willing to sell them. Bob had recently retired and his dream was to have a little farm, including raising piglets. He had no experience with pigs, but had always been drawn to them. Tame pigs like mine was what he wanted to start with. 

Breaking my own rule about inviting people to my farm, I opened my arms to Bob & Sharon and spent an enjoyable morning "talking farm". Bob really hit it off with the pigs. By lunch, Bob had successfully talked me into selling. We settled on a price and deal. So two weeks later, all four pigs were loaded onto a trailer and headed off to their new home. 

Good news. Every one of the pigs settled in just fine. Sharon has trained Mellie and Jimmy Dean to rollover for belly rubs. Rocky has discovered that he loves Oreo cookies. And Hammie delivered 12 little piglets with no problems. Sharon has learned how to bottle feed piglets, since 12 is more than Hammie can handle. Looks like Bob is well on his way to living his dream. 

But all this meant that my homestead was pigless. At first, that was fine. I was over extended on pigs. Four proved to be too many for the amount of food waste I had available, plus the amount of time I had to devote to pigs. I've learned that two pigs is ideal for my situation. But alas, now I had none. 

No problem. A friend had a litter. Same parents that produced Mellie and Jimmy Dean. So I arranged to buy two piglets from her. 

Introducing.......................... Barbecue (aka- Barbie) and Porky Pigg. Two sisters. 


I've just gotten these two newcomers, so I can't even say yet what my plans are for them. But at least for the next several months I'll have fun playing with them and training them like I did the previous pigs. 

And now all that extra food waste that the chickens couldn't chow down will go to the piglets instead of the compost bins. I'd rather see it go to piglets. 

Monday, July 13, 2015

Creating Pasture, the Hard Way

One of my pastures has never been improved in any way. And 99% of the greenery in it was inedible. So it didn't take the livestock long overgraze it. I've been using this pasture just as a big corral and put the animals in to this "pasture" for basically two reasons only.

 First is to protect the other pastures from getting overgrazed, thus ruined. When the animals (horse, donkeys, goats, sheep) have been rotated through the pastures and it's not yet time to make another rotation, I'll move them to the corral and provide them hay and hay cubes. Second reason is to get all the livestock into the safest and most secure pasture for when I'm away. This corral-type pasture is central, thus surrounded by the other pastures. If perchance the animals managed to break out while I was away, they would still be contained on the farm. That hasn't ever happened (a breakout, that is), but the idea is good insurance, and peace of mind when I'm away.

The land in this pasture has never been bulldozed. Thus it is quite rough with lava rocks and boulders, ups & downs, pukas (big holes), and plenty of trees. There is no way to use large equipment to clear or seed, without it being a grand affair at correspondingly grand expense. So any work I plan to do will be done by hand. 

Since I'd like to see this pasture become a real and productive grazing site, I am going to have to put some work into it. And like most of my projects on this homestead, it's going to be a slowly done, longterm task. By now you most likely know that such projects don't depress me in the least. I'm good at slow, steady, longterm trudging. 

First step - clear away the inedible growth. I've been using the weedwacker for the past few weeks and have about 1/2 acre cleared now of the heavy overgrowth of ferns. Don't picture a 1/2 acre square devoid of tall ferns. No, I cleared out the easy parts first -- the trails, the flatter spots, the more open spots. I worked my way around trees, humps and holes. It is like I created wide walkways. So I'll concentrate on this half acre first. In many areas I was able to hand pull the ferns, leaving bare dirt. I'm focusing on these areas as the first places to plant grass. Why? Because leaving the soil bare damages soil fertility here on my farm. Perhaps it has something to do with the constant heat or heavy rains, but when my soil is left bare, it becomes less fertile. 

Oh I forgot to tell you that I'm cross fencing this "corral" pasture. It's about 3-4 acres in size and I'm cross fencing it into four sections. In the photo below you can see the new fencing that is creating the first cross fence. So I'm now going to work on grassing the first section of about one acre or a little less. The new fence is protecting it from being grazed by the livestock. 
As you can see in the above photo, there are areas that are totally devoid of greenery. Just dirt. I'm going to hand sow some annual ryegrass seed in order to get a quick and relatively cheap grass cover. Since its been raining frequently recently, the seed has a good chance of germinating well. I don't plan to rely upon the annual ryegrass as the sole pasture grass, but it will provide quick cover and protection for some of the other seeds I plan to sow later. I view the annual ryegrass as a pasture bandaid.

I'm also hand transplanting some young grasses. Below is a small section of guinea grass seedlings that I transplanted today. 2-3 times a week I happen to pull this amount of seedlings from my mother's lawn. It is a coarse grass that forms lumpy clumps that are dangerous for a 93 year old lady. They are a serious tripping hazard, thus the reason I pull them out. Since I'm pulling them out anyway, I'm bringing them home and planting them into the pasture. 
The animals willingly grass this grass and do well on it. It transplants very easily, grows strongly, and tolerates drought and poor soil. So I'm using it to fill in the bare areas. 

Another grass that I am transplanting by clumps is kikuyu grass. Just as with guinea grass, it transplants readily and roots quickly. 

So how quickly will this new pasture be usable? If I were just sowing pasture grass seed, it would be months (at least six) before the animals could be allowed to graze it lightly. But by transplanting guinea and kikuyu grass like I am, it will be half the time. Within four weeks the seedlings and clumps will have rooted securely enough that they will not get pulled out by grazing. But I'd like to see 8 weeks go by before the first grazing so that there is enough top growth that the livestock won't try to eat the entire plant. This new pasture should be able to handle a light grazing monthly for the first 6 months before going into the regular pasture rotation schedule. Yes, guinea and kikuyu grass is that quick to establish here, as long as the weather cooperates. 

Sunday, July 12, 2015

Homestead Medical Kit

I'm a big advocate of having a good selection  of medical supplies on hand. I guess that comes from having had a career in a medical field. Around a homestead farm, there are always situations happening that need some sort of medical attention. Sometimes it's the livestock or pets, sometimes it's the people. And how come emergencies often happen at night, on weekends, or holidays? At least with human medical needs, there is always the emergency room to resort to...though it will cost a bundle. But with animals, at least in my area, you're in your own. Any emergency veterinary care is two hours away, that is IF you can convince the vet to be available. Plus it will cost you a bundle. 

I'm finding that most homesteader types learn how to take care of many of their medical problems themselves. They read books, research the internet, watch YouTube, consult with others, attend training classes when they are available, and learn from other people. But regardless of how one learns, one needs the medical supplies to be on hand. At least here where we live fairly remotely, you just cannot run down the block and buy what you need any time of the day. 

So what to keep on hand? Everybody seems to have a different idea of what to keep in their medical kit. But here's what I do, or suggest..........

Tools
...sharp scissors (good for cutting tissue, that means skin, muscle, and such)
...blunt tipped scissor (for cutting clothing, bandages, tape, suture material) 
...scalpel blades (or clean, new single edge razor blades will do)
...surgical needles (or sharp, new, strong sewing needles will do)
...suture material (or clean lightweight fishing line will do. Clean heavy duty polypropylene sewing thread is another good substitute.)
...hand tools for clamping blood vessels, holding sewing needles, holding blades, holding tissue. I have an assortment of actual surgical instruments, but I've seen acceptable clamps, hemostats, and pick up forceps sold at hardware and automotive stores. 
...stethoscope, while not a high priority, it comes in handy
...glucometer and blood pressure machine come in handy. Again, not a high priority. 
...otoscope. Drugstores sell a cheap plastic model that is very useful. 
...a small basin. I also have a quart sized mason glass jar that I use to hold a sterilizing solution (benzalkonium chloride) for needles, suture material, and to soak instruments that I want sterilized.) 
...small powerful flashlight
...rectal thermometer. Oral will do, but the shape of a rectal is safer. 
...safety pins
...needle nose pliers
...wirecutter
...magnifying glass

Medical Supplies
...disposable gloves
...a wide assortment of bandaids, big, small, butterfly, odd shapes
...splints. Some material that could be cut and shaped is handier than keeping a large selection of different shapes and sizes. I've seen moldable material sold in craft stores that would be good for splints. I also keep a couple of finger splints in the kit. 
...adhesive tape (blue painters tape could be a substitute but the cloth tape works so much better.) Plus a roll of duct tape is a good idea.
...stretchy bandage tape/elastic wrap, or at least an ace bandage. A product called vetrap is really handy and easy to buy at feed stores. And I found this (below) at Walmart.....
...gauze sponges, preferably 3x3 or 4x4
...rolled gauze bandaging 
...non-stick sterile bandage pads
...a very large bandage or sterile towel for large or gaping wounds. Or at minimum, a clean new hand towel that is stored in a plastic bag for cleanliness. 
...a tourniquet or at minimum a lightweight rope suitable for use as a tourniquet. 
...alcohol, peroxide, witch hazel, vinegar, honey 
...q-tips or swabs
...tissue glue ("liquid bandage") or at least superglue
...blood clotting solution or powder
...antiseptic, preferably benzalkonium wipes (Clorox disinfecting wipes). At minimum, a bottle of hand sanitizer. 
...betadine soap and solution
...a space blanket or other type of blanket
...instant cold compresses.....

...IV fluids and IV tubing with needle
...salt 
...bottle of white Karo (a glucose source)
...syringes with needles. One large syringe for irrigation use-- or a turkey baster. 
...lubricant jelly

Medicines
...topicals. I have an assortment of prescription topicals, but there are things that can be purchased in a store that are good for a medical kit. Bacitracin. Neosporin. Hydrocortisone. Benadryl. Capacin. Afterbite. Lanicaine. Noxema cream. Tinactin. It doesn't hurt to have other assorted topicals on hand, including lip balm. 
...oral medications-- aspirin, advil, benadryl, imodium, pepto bismol, antacid. Cough medications (expectorants, suppressors, throat lozenges).  I also have several other different prescription medications but they can't be obtained without a doctor's permission. Some could be obtained via large animal supply businesses, such as Jeffers, Valley Vet, Fosters and Smith, etc. 
...eyewash and eye soothing solutions. Eye anesthetic. 
..."toothache oil" 
...epinephrine 
...reserved for livestock use: oxytocin, tranquilizer, sedative

As you may have noticed I didn't include homeopathic items in my own kit. I have not seen good results with most while treating animals. Thus I only include what experience has worked for me in the past. 

Depending upon what livestock I keep, I will keep a few other things on hand. When I had goats I kept certain vitamin injectables and antibiotics on hand. Right now I always keep a bottle of injectable penicillin in the refrigerator. And for the equines, I keep things for treating colic. For the sheep I keep frozen colostrum always available and a tub of lamb milk replacer (with fresh lamb nipples for bottle feeding). A human male urinary catheter makes a handy stomach tube to feeding a weak newborn lamb in an emergency. No....don't shove it up THAT end. It goes down the throat. 


Saturday, July 11, 2015

House - The Bedroom Project

It's about time that I start working on the house again. It's been too long of a break. Lets see, we've gotten done the livingroom, closing in the lanai to expand the livingroom, the kitchen, the little extra room off the entrance, the foyer, and the hallway that is 95% complete. On the outside we've done the siding and trim, several steps and railings, plus the roof. We're not totally happy with the way the roof turned out, so we plan to make changes later on. But that's a future story. 

Still to be completed is the bedroom, enclosing the bedroom side lanais for large storage closets, and the bathroom. Plus a few other tweaks here and there. 

So we're targeting the bedroom as the next project. Currently it's a quite serviceable bedroom with an unfinished interior. We've already wired outlets and lighting, plus put in two ceiling beams.  Next step.....the ceiling. 

Insulation. We've decided to line the ceiling with foam insulation as a sound deadening measure. Not that we are trying to block out all the sound, but just deaden it a bit. Heavy rains can be quite loud on a metal roof. A side benefit will be to reduce the heat generated by full sun on the roof. 
The styrofoam insulation sheets come 4'x8' and are easily cut to size with a box cutter. By cutting them snug, we don't need to glue or tack them into place. The next step will secure them. 

Next step is to install thin nailers to the corners and running along the rafters. These nailers hold the foam panels in position. 

The reason for the nailers is to have something to nail the cedar ceiling to. Using an air powered nailing gun makes putting up the ceiling pieces reasonably fast and easy. 

Next step will be to sheath over the rafters, like the kitchen ceiling. 
We haven't decided what color to paint them, but it won't be white. I'm thinking....pale sky blue. A possibility. 

Record Heat

A tropical depression is passing north of the islands and it has brought along high humidity and temperatures. In fact this is the hottest I've seen since moving here. 

The low for last night was 69° F. It made for some uncomfortable sleeping. 60° is more common, although this summer so far has been seeing plenty of nights at 62°. It's been the warmest summer in the past 14 years. 

The high today is 88°. I'm sure it's well into the 90's along the coast. And yesterday it was 92° inside my mother's house in Naalehu. Hot. Hot. Hot. Yeah go ahead and chuckle. I'm sure it's hotter where you are, but I purposely chose a location where I wouldn't roast. Up until now I haven't needed air conditioning or even a fan here. Of course I have neither in my home. 

Temperature varies here in relation to your elevation. The coastline is the hottest, and the further one goes up the mountains, the cooler it gets. So if you like it hot, you live down near the coast. But people living at the top of Oceanview or in Volcano find it cold enough to routinely wear long pants and don warm coats when going outside when the sun is down. 

Friday, July 10, 2015

Orchard

Lately there have been several inquiries as to what trees I have in my orchard. Unlike what is taught in permaculture courses, I don't have one spot designated as an orchard area. Concentrating all the trees in one area may make sense in certain situations, but I don't find that to be a good idea on my farm. I'm finding that spreading trees around in order to combat pests and disease is working better for me. Concentrating the trees in one spot means that if a problem crops up, the entire orchard could be affected. Sort of like putting one's eggs all in one basket. 

So what are my orchard plans /goals and what has been accomplished to date? I think I'll go down the list in no particular order. 

Bananas
We eat bananas all they time, so this fruit is high in my list to be home-produced. I currently have several different varieties growing up by the house, along the driveway, down in the "valley", and along the dry defunct riverbed. Since my livestock also enjoy eating this plant, I plan to expand the banana beds. I want to have bananas surroundng the "secret garden" plus more along the far property line. As I get keiki, I plant them. So I'll be at this for a couple of years yet. 
Above, a clump of Cuban variety banana. They can be used as a cooking banana, but we like them ripe as an out-of-hand-eating banana. 

Lemons
Currently I have one variegated lemon in the main orchard plus volunteer trees behind the barn, one beside the pond, and one back by the "secret garden". I use quite a bit of lemons when I have them available. So perhaps I'll add some more and try different varieties. 

Limes
None so far. I'd like to add at least one Tahitian lime and one kefir lime. I currently get plenty of surplus limes from friends, but it would be nice to have some right on the homestead. 

Oranges
In the orchard I presently have one unknown variety that is quite juicy, one sour orange, one tangelo. I'd like to add another tangelo or two. And maybe a juicy tangerine variety.

Grapefruit
One pink tree in the orchard. That's enough. 

Pomelo
None so far but I'd like to add one of the juicier seedless varieties. 

Jackfruit
I have two trees but both are young. So I don't know if they will fruit here. 

Macnuts
6 trees that line my driveway. That's probably enough for personal use, but I wouldn't mind a few more for feeding to the livestock. 

Mulberry
Currently one white fruited tree. I'm planning on adding a purple one soon. 

Apple
Two trees so far. I would consider adding more in the future. 

Miscellaneous
One each of cinnamon, allspice, clove, jaboticaba, tree tomato, mountain apple.
Young allspice tree that I harvest a leaf here, a leaf there. Oh it smells so good! 

Clove tree. 

Papaya
I'm keeping around a dozen trees of producing age. But I intend to add at least a dozen more when I've got space ready for them. In the future I'd like to add several dozen more, perhaps along the street side of the property where they would get good sun. The livestock all love papayas, fruits and leaves. 

Still thinking about adding: 
Avocado .. Lisa and Linda , maybe another variety too.
Malabar chestnut
Sweet bay
Figs
Loquat

Failures
Cocoa. Twice I've failed. Not going to try again. I either don't have the right environment or lack the knowledge, 
Avocado. Accidently killed the tree I had. So I need to replant. 
Mango. I found out that they won't fruit at my homestead location. But I have put in two trees down at the seed farm where they should produce fruit. 
Breadfruit. Wrong environment for them. But I might try one down on the seed farm. 

Many others may grow but I haven't looked into them yet because we aren't currently eating them or I don't know anything about growing them yet. 
Lychee
Longon
Rambutan
Mangosteen
Sapote
Cherimoya
Soursop

Rejected because we didn't like them. 
Surinam cherry.
Abiu. 

Thursday, July 9, 2015

Homesteading for Real Food?

I've recently been getting emails in regard to non-natural chemical use in foods. (By chemicals I'm referring to those that are not naturally put there by Mother Nature.) I have to agree that finding non-altered and chemical free foods in stores is close to impossible. Even most fruits and vegetables have been chemically treated one way or another. My own solution to this is to eat locally produced, non-treated fresh foods....mostly my own. Plus some raised by people that I know. Some foraged. 

I'm currently in Waikiki so I'm eating whatever is available via stores and restaurants. Bananas chemically ripened. Apples treated with fungicides for shipping purposes. Pineapple treated on the farm while growing. Meals in restaurants using processed foods. I'm finding it totally impossible to eat totally "clean & natural" foods. They simply aren't available. 

Out of morbid curiosity, I took time to note today how much actually fake food was around me here. I never thought about it before, so it was quite revealing what has happened to our foods. 
Fake......
.....bacon bits on the salad
.....fake blueberries in the breakfast muffin
.....fake lemonade offered at lunch - the label showed zero lemon juice in it!
....."fake" cranberry juice at breakfast - mostly sugar water
.....fake crab salad on the dinner menu
.....fake ribeye on the plate of a diner sitting at a table beside us. The muscle pattern was all wrong so it had been made by meat cuts put together with meat glue.

And how much stuff was fake or close to fake that I wasn't aware of? Was the chocolate milk really just milk and cocoa? I don't think so. How about the honey? Real or flavored sugar water? Was that slice of cheese on the omelet really cheese, or possibly some stuff sold as processed cheese? Were those eggs fresh or out of a carton? They looked to be out of a carton. Way too uniform in color and texture. 

While I'm not a vegan eater, I know of folks that are. Now you talk about fake food! Take a look at vegan offerings in the stores. Vegan cheese. Vegan bacon. Vegan shrimp. Vegan sausage. And on and on. All fake food with long chemical additive lists. 

One of the side benefits of creating a homestead farm is that I have easy access to "real food". Now that I've moved to eating mostly real foods, I discover that I prefer it. Spending the last couple of days in Waikiki has reaffirmed that. Eating here has made my body object. It's gotten use to real foods. It will be much happier when I return home. And quite frankly, so will I. Visiting "the city" from time to time makes me really appreciate living where I do. 

Saturday, July 4, 2015

Happy 4th July !!!

I love the 4th here. My community celebrates it in a number of ways......picnics, parties, home fireworks, town parade, rodeo, kids inflatable play park, senior bingo, food booths and Saturday farmers market. Lots of home gatherings with music and food. Plus many folks spend the weekend camped down at the beach. All in all, a nice way to spend a holiday.

For the past ten years the town has hosted a parade. Yeah, it's hokey but I love it. And I see that lots of us around here love it too. Over the years it's grown from being a line up of the town tow truck, ambulance, park maintenance crew, and local hauling/dump truck to something that passes as a gosh darn for-real parade. Here's a few pictures of this year's parade........groan if you want but there was clapping, cheering, and approving whistles from the spectators (I'd guess 300-400 people lined the street). Perhaps more because I'm lousy at estimating a crowd.) 

One small section of the spectators, wisely positioned close to the coffee truck. 

Yes, the ONLY road through town shuts down to all traffic. Nobody gets through, locals and tourists alike. We take our parade seriously! 

This year's parade was lead by the rangers from Volcanoes National Park. 

 Our town fire truck. Aahh, tradition. The yellow came from the next town 20 minutes away. 

Bagpiper? Sure, why not. Hey, he was good! 

And if a bagpiper can participate, why not a group of Trojans? Sounds good to me. 

This train comes to all the parades. The kids are fascinated with it. 

The town tow truck never fails to attend, wrecked car and all. Many of us know who owned the wreck. It's a small town, afterall. 

Our own homegrown American Idol contestant performed on the "float". Hey, he sings pretty good. I wish him the best of luck.  

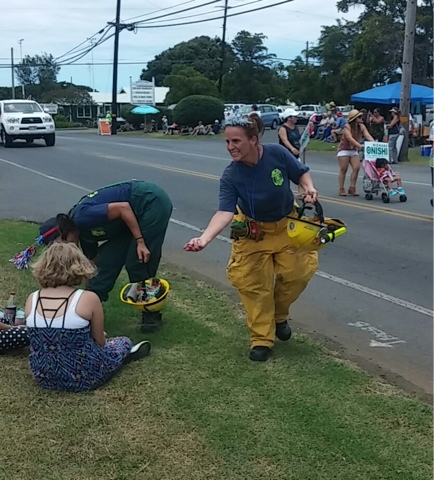
Volunteer firefighters handed out goodies to the children along the parade route. 

Several pa'u riders attended again this year. Everybody cheers them and takes lots of photos. 

Of course we also saw our Ka'u coffee queen and peaberry princess, several local church groups, the girl scouts, several vintage and specialty cars, motorcycles, lots of horses and dogs, the local library group, several of the community interest and help groups, several politicians (of course), .....didn't I say that our parade has grown? Yes, it's the real deal now. 

Staying with our own tradition, we spent the afternoon with friends, skipping the rodeo on the 4th. But Sunday was the second half of the rodeo, which we caught. Lots of fun going on. And lots of good people, beautiful horses, savvy steers.

And one pissed off goat who has to endure little kids (from two years of age and up. Yes, kids start out young in rodeo here) running up behind him to grab the ribbon tied to his tail....called undressing the goat. But this year's goat was rather patient. Perhaps he's been this year's practice goat and has seen this silly stuff before. Last year's goat played catch-me-if-you-can. 

The fun event was the girl-guy team mugging. One rider on horseback ropes a steer, then the other person on foot runs up and grabs said steer to stop it from running. Sounds easy. Then horse rider jumps off horse, runs to steer, removes ribbon from its tail. Rope is then removed from the steer, both people join hands and run back to a barrel in the middle of the arena, bringing the rope and ribbon with them. Simple. Ha. Ready to give it a go? Let's see.....everybody today successfully roped the steer, but some couldn't run up and hand capture the critter and hold it still enough for the partner to help. Dragged through the dirt. Stomped on by the steer. Kicked. Flipped. Stomped on my their partner. Tripped over by their partner....repeatedly! Tangled in the rope. Some got the ribbon but couldn't get the rope off before the steer ran off. Some got dragged right across the arena before finally giving up and letting go of the rope. Steer won. Their clothes would have been great for a laundry soap commercial, ya know, the grounded in dirt ad. These poor people got really, really dirty! And I bet they will be sore tomorrow. And those steers were real savvy, they knew exactly what was going on. As soon as the puny humans gave up, the steers casually trotted in a straight line to the exit gait and calmly waited for it to open before calmly leaving the arena. Some gave playful hops and twisting leaps. 


Friday, July 3, 2015

Onions

We're big eaters of onions, so I grow a lot. Most of what I grow is non-bulbing onions. They grow well here and I can produce them year around. I prefer the bulbing type for much of my cooking style, but I can only get them to bulb in spring and early summer. I haven't figured out yet how to get them to bulb at other times. 

With green onions I can use the entire plant for flavoring. Before moving here I wasn't aware that I could use the green leaves. My mother always threw them away. But I quickly learned about using the greens. 

I pulled some green onions yesterday for a bean dish I was making. I'll be using the entire plant except for the roots. 


The root area I cut off, leaving a bit of the bottom white stem. Why? I will replant them back into the garden. Most will sprout and go on to produce another green onion ready for harvesting far quicker than if I grew it from seed. Replanting the roots is another way to produce onions. Pretty neat trick. 

Rather than pulling out the entire plant when I harvest, I could have just cut it off at the soil surface. In fact, this method works better because all the roots survive and regrow, rather than having some roots die and the rest being shocked into a major setback. But these particular onions that I picked were crowding other onions, so I needed to thin them out anyway. 


Thursday, July 2, 2015

Thimbleberry

We have a rather sticky-ly thorny bush here that grows in patches on my homestead place. I've known it as thimbleberry since moving here. Just recently I had a mainland visitor who informed me that the leaf was quite different from the thimbleberry he was familiar with, so I had to go look it up. And he was right! Turns out that his homeland thimbleberry is a kissin' cousin to mine. His has the scientific name Rufus parviflorus while mine is Rufus rosifolius. The leaf shape is the most apparent difference I first noticed. The Hawaiian thimbleberry leaf looks more like a rose bush. 


Right now the thimbleberries are flowering and creating little red berries the size of raspberries. When ripe, they are red. It's easy to know when they are ripe because they readily come right off the bush and look like little red thimbles. While edible, I find there taste to be insipid. (Hey, how often do you get to use that word!) In plainer words, they're flavorless. But if I wanted, I could surely eat them. The fruit production is sparse, so it would take a massive area of thimbleberry to produce enough fruit to make a cup of jam. But a small handful is do-able and would make a nice decorative statement in salad or atop a cake. 


My rabbits like to eat thimbleberry. They'll eat the entire bush except for the thickest stems, and those they will debark. So I allow thimbleberry to grow so as the be part of my rabbits' diet. 

I find thimbleberry to be an annoyance.......except for the rabbit forage part. It's very thorny. It creates a tangle. It spreads readily via underground shoots. It is difficult to remove by hand and grows back if you leave roots behind. 

For rabbit forage I allow it to grow about 2-3 foot high then snip it off at ground level, using a hand pruning shears  and then cut it into 12-18 inch long lengths.