Saturday, July 28, 2018

Harvesting Macnuts

The farm now has 6 trees producing nuts. That's up one from the last time I mentioned macnuts. The smallest tree is now producing. 
Above, a cluster of nuts hanging from a tree branch. One doesn't pick them. They're not ready yet if they are still on the tree. 

Just about every day I pick up the fallen nuts. As I've said, you don't pick the nuts as you would an apple or peach, but rather, you wait for them to fall naturally. I really haven't noticed but I'd venture to say that nuts fall about 8-9 months of the year. So it's pretty much a slow, year around harvest. Right now I'm gathering about 100 nuts a day. 

Having only a few trees, it's not a big deal to simply handpick the nuts and flick them into a bucket. From there, I wash them by hosing them off. This gets the obvious soil, leaves, and insects off. 


Next, the nuts are placed someplace warm, sunny, and airy to dry. I use the floor of one of the greenhouses. 

Above, freshly picked up nuts, brightly green. 


Above, a few days in the greenhouse (sometimes only 24 hours) and the husks start to split. Once the husks split, I'll immediately attempt to pop it off the nut by using my hands. While the husk is still fresh and pliable I get get the husks off of about 80% of the nuts. The rest require a different approach....either a pliers or a dehusking machine. There are small machines that can dehusk the macnuts, but when I'm only doing a few nuts, I don't bother dragging it out. I have to keep it in storage so that it doesn't get ruined in the acidic air around here, so it's a hassle if I only have a hundred or less nuts to deal with. 


Once the nut is out of the husk, it needs to dry out some before cracking. Why? The nut meat tends to stick to the inside of the shell. Drying the nuts until they loosen from the shell makes shelling easier and more complete. I dry my  nuts in the greenhouse for 4-5 weeks, give or take depending upon the weather. I can tell they are ready for shelling if I pick up a handful, give them a shake, and can hear or feel nuts loose in their shells.

I'll show you how I crack nuts next......

Friday, July 27, 2018

Planting More

First an update on the Maxibel beans. Seeded on July 15, they've germinated and seem to be growing well. Today I added a 2 inch layer of grass mulch. Why not thicker? The plants are only 7" high and they don't respond well to being smothered. So a light mulching will do, and I'll top that off again in about two weeks. The only problem I've had when mulching beans is slugs. So I will have to watch for them and take action when they move into the neighborhood. 


Right next to the Maxibels I prepared more ground for planting. An inch of compost, a dusting of lava sand and wood ash, and a light covering of sheep manure. Till the top three inches. Wallah.....ready to plant. 


Why only till the top three inches? Because it's rocky below that. Every time I till, the tiller kicks out a few more rocks. So over time, the bed gradually gets derocked. Rather than spend all my time digging rocks I'd rather get things growing. Rock removal can get done bit by bit as the years go by. By the way, I only remove rocks bigger than a hen's egg. The smaller rocks stay in the garden. Rocks provide minerals and improve the structure of my soil. As long as my little tiller can deal with the rock, it stays. 

So I've just added 300 sq ft of garden beds. What to plant? Peas and some more beans. I'm going with a couple rows of snap peas, a couple of snow peas, then what space is left will be divided between a purple bush bean and a yellow one. Just adding some variety. 

For the record.....
72 sq ft ---- peas
228 sq ft --- beans 

Thursday, July 26, 2018

Piglets Post Updated

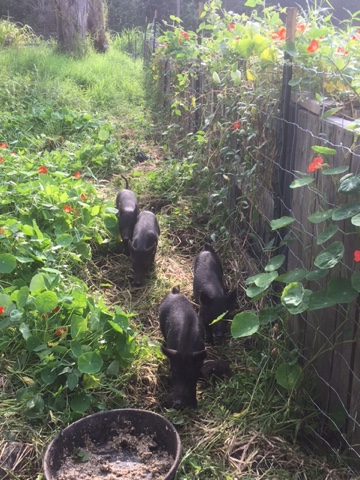
Wow, people say I can't count. Guess they noticed that there weren't 7 piglets in the last photo. Ok, ok, ok. You're right. I didn't include all the baby pigs. So here's a better picture.....


That's Shelly and Lava up front. The new guys are behind. 

Wednesday, July 25, 2018

5 Piglets

Yeah, I know it's crazy. I've taken in 5 new piglets. Stats -- 2 females, 3 males. All blacks. 9 weeks old. Feral bloodlines. 


For the first 24 hours, the two current piglets (Lava and Shelly) were afraid of them. Truthfully, it was funny to see those two 12 week old pigs, obviously larger, run in terror from the little guys. Must have been a numbers thing....5 against 2. But by the next day they were all a happy herd. This is the first time I've introduced strange pigs to one another, so I found the group dynamics to be interesting. I wasn't sure if they would fight or not. Happily, no fights. 

The pigs have a fairly large (about 50' by 100') grass filled pen to run in. They'll gradually munch it down as the weeks go by. But I don't intend the grass to be their sole food source. In fact, I'm hoping they don't eat it down too quickly. I need time to build another pasture or two for them so that I can rotate them between the pens. So I'm feeding them as much Mom's Famous Slop & Glop as they want three times a day. 

So what's in the slop bucket this week? First of all, everything is processed through a grinder and cooked. Cracked corn. Taro leaves and corms. Sweet potato vines. Sweet potatoes. Bananas. Okinawan spinach. Pipinolas. Papayas. Eggs. 

I'm not sure what I'm going to do with all these piglets. One will be going into the freezer early. It's a biter and aggressive with the other piglets. So that's an easy decision. But I'll let it grow a couple of weeks before sending that one to its fate, as long as it doesn't hurt or overly bully the others. I have a person who wants one of the females for breeding purposes, so one of the girls will be leaving shortly. Other than that, time will tell what comes of the others. 

Tuesday, July 24, 2018

More Beds Completed

Ok number counters, here's some more square footages for you. 

Bed ..... 36 sq ft .....taro
Bed ..... 60 sq ft .....taro
Bed ..... 56 sq ft .....taro
Bed ..... 60 sq ft .....taro
Bed ..... 132 sq ft ...taro

Above, a small bed tucked between some fruit trees. Planted and almost completely mulched. 

Yeah, I'm focused on getting the taro replanted. I have quite a few varieties that I'm growing. So it felt good the get five more harvested and then restarted. 

Above, 132 sq ft right outside the rock wall out front by the street. I haven't had a problem with people stealing taro. And I have an agreement with the hunters that they can harvest the taro as they wish in exchange for meat and slaughter waste. It's an arrangement that works out well. 

"I" asked me "Why do you grow so much taro?" Truthfully, I don't eat all this taro. There are a few varieties that grace my table from time to time, but most of it doesn't. I grow most of it for preservation purposes. I like having the Hawaiian varieties here for other people to take home and grow. I donate plenty of starts to various Hawaiian cultural events, specifically for them to be given away to anyone who wishes to grow them. Many years ago Jerry Konanui started my interest in taro. He gave me several taro huli, I think 6 or 8. That kind gesture got me interested in local foods. I now payback that kindness by offering huli to others. 

As I harvest the taro, I prepare the starts for replanting, and direct the rest of the plant to the livestock feed pot. Taro needs to be cooked before feeding it to the pigs and chickens, though I've seen chickens dig up the corms in the garden and eat them raw! Egads. I don't know how they can do that. Taro has a high "itch" factor that bothers most animals, including man. So I cook it. My taro patches yield quite a lot of livestock food. 

Above, a little garden bed along the driveway. I will utilize even small or narrow spaces for growing food. 

Thursday, July 19, 2018

Parsley Surprise

Learning to grow food in the tropics has brought some real surprises, parsley is one of them. 

I started my parsley in the mini greenhouses, then transplanted to teeny seedlings into small pots for growing on until they were big enough to go out into the garden. I didn't even bother to try seeding it directly into the garden bed because I figured the birds or mice would surely eat the sprouting seedlings. This starting strategy worked just fine, giving me plenty of young plants for transplanting. 

I planted 3 small patches of parsley, not knowing if I would run into pests and diseases. It turns out that parsley is very easy to grow here. I really haven't had any problem with it.....(holding my breathe and crossing my fingers), yet. 

The surprises.....,
... It grows year around here. It never stops. So I learned that I planted far too much for my own use and for trading. 
... It never dies back in the winter. It just keeps on going, developing thick stems and looking like miniature trees. 
... It never bolts. This also means that without going to unusual measures, I can't produce parsley seed. 

Above, I just harvested some parsley and now it's easy to see the thick stems.....like mini tree trunks. 


The plants actually look attractive as mini trees. These plants are 3 years old now. The thick stem keeps the leaves well above the soil, thus keeping them clean. That's a nice side benefit, 


Put my finger in there just for comparison. Right after this, I applied a light mulching (1/2" thick) using sifted compost, then covered that with fresh grass clippings. 

Wednesday, July 18, 2018

Square Footage

Plenty of readers have been asking about how much land do I have in growing spaces. Truthfully I can't say exactly. Some of my garden beds are teeny, some large. Trees, such as bananas and edible trees are planted singularly rather than in an organized orchard. So how would I calculate the square footage in them? 

For those of you who are curious, I'll start posting square footage, If you noticed, I'm including the square footage of the garden beds that I'm reclaiming (beds 1 though 5 so far). For those of you who have a need to crunch numbers, you can add them up for me. You can also add some beds that I've already done this year (I won't include anything prior to 1/1/18). 
... Single trees : 4 moringa, 4 bananas, 2 citrus
... 28 pineapples scattered about the farm
... Turmeric : 300 sq ft + 45 sq ft + 30 sq ft + 324 sq ft = 699 sq ft total
... Yacon in grow boxes = 18 sq ft
... Potatoes in grow boxes = 45 sq ft
... Sweet potatoes 174 sq ft
... Cholesterol spinach 30 sq ft
... Pipinolas 66 sq ft
... Chocolate mint 30 sq ft

I'll continue to mention the square footage of what I'm planting just so people can get a better idea of how much I'm growing. Just keep in mind that not all of this stuff goes onto my own dinner table. Yes, some does. But some also goes to Adam and Matt and to other people I know. Some is used for trading. Some gets sold. Much goes to feed the livestock. Some gets donated to senior centers and local food distribution efforts. 

I'm not one for keeping strict records. Through experience I've developed a feeling for how much I need to grow of this or that. And since the excess can always be sold, given away, or fed to the animals, the exact numbers are no big deal. By the way, I don't weigh my harvest either. I know of plenty of people who proudly know how many pounds of this or that comes out of their gardens. Frankly, I don't have the time to weight everything. And to me it doesn't make much difference if I don't weigh it. As long as there is plenty, that's all that matters. Besides, nothing goes to waste! 


ps- 
Bed 1 = 180
Bed 2 =   77
Bed 3 = 192
Bed 4 = 112
Bed 5 = 112

Tuesday, July 17, 2018

Moving on to Beds 4 & 5

Dry conditions are allowing the soil to dry out enough so that I can get back to farming with a vengeance. Hauling compost, digging weeds, tilling, planting, mowing, watering. I think I'm going to be good & tired at the end of the day! Today I've reclaimed two more beds. This means degrassing them, adding compost and a few other soil amendments, tilling it in to create a light, airy soil bed.

Prepared and ready for planting.......

Bed 4&5 are in the same general area I've been working on these past couple days. So at least this one little patch on the farm is looking like someone actually grows something around here. Each bed is 112 square feet, thus adding 224 sq ft more into what I'm working with this year. Each bed is being planted in taro this time around. In the past you would have seen golden beets, green beans, snow peas, cabbage, cauliflower, dill, onions, cilantro, basil, potatoes, or cardoon.

Taro starts ready for planting.......

Between these two beds, I got 7 more taro varieties planted. 


After planting, each plant is well watered in, using about a gallon of water per plant. Then the entire bed is mulched with grass clippings. 


Below is bed 5. Right after lunch I finished up mulching this bed and got all the labels in place. 

Monday, July 16, 2018

Garden Bed #3

(Bed 3 = 192 sq ft)

After finishing beds 1 & 2, I thought about what to plant next. Up at the house garden beds, I have taro that is overdue to be separated and replanted. This seemed to be the highest priority, so I choose the six most overdue varieties. Looking the plants over, I choose the best looking starts, cleaned them up, and planted them. Freshly planted, they look like green or purple sticks lined up in a row. 


As you can see, this garden bed gets shade very early in the morning. By 10, it gets full sun the rest of the day. Most crops have done just fine in this location, so I fully expect the taro to do okay too. 


I'm getting more careful about making garden labels. For short duration crops, a yellow stick & permanent magic marker works fine. But for crops staying in the ground for 5 or more months, I'm resorting to more durable markers. For the taro I'm switching over to repurposed pcv pipe painted yellow and labeled using black paint. 


Last task.......apply mulch. In the taro patch I'm using 3 day old grass clippings laid down 6 inches thick. At 6 inches it's fluffy, but in a couple days it will settle down to be about 1 inch deep. In two weeks I'll reapply the mulch so that I will end up with about 2 inches of mulching material. Then about once a month, as needed, I'll add more mulch to keep the ground well covered and the weeds under control. Taro is a crop that can't compete with weeds and grass, so weed control is important. 


Sunday, July 15, 2018

Refreshed Garden Beds...1&2

Beautiful sunshine yesterday morning...and best yet, no rain! Got the strong urge to go play in the dirt. So without much delay, I was out the door. 

Bed #1 (180 sq ft)
Down on hands and knees (the most comfortable position for this task), I chopped out the invading grass in this small pineapple patch. Dang that bermuda grass! Dumped a couple of wheelbarrows of compost and very lightly tilled it in between the plants, but didn't till up to the plants at all. Didn't want to chop up the plant roots. Then I brought over some of the grass clippings from the other day and laid down a 4-6 inch layer, which will settle down to about 1" thick. 


Bed #2 (77 sq ft)
Using the lawnmower, I scalped the grass down in this section that we had used for gardening before. So I wasn't worried about hitting any rocks with the mower. Attacking the old bed with a garden fork, I worked out the bermuda grass that I could find. Adding two wheelbarrows of compost, I finished up the job with the rototiller. Ah-ha......a ready garden bed! I planted three wide rows of beans, Maxibels, my neighbor's favorite. After all, this particular garden bed is in his backyard (we share the gardening areas), so he deserves his Maxibels. 


In that I'm adverse to leaving soil uncovered, I applied a very light covering of mulch to the seeded bed. As long as the mulch isn't thick, the beans will sprout through it. 

Above, the mulch looks thick but it's not. In fact, it barely covers the soil surface. You can see in the photo below that there's plenty of soil showing through. 


The idea is to lightly shade the soil surface in order to help keep the sun and wind from drying it out and killing the soil microbes. Those microbes, after all, are the things that give me my plant food. 

Saturday, July 14, 2018

Back to Planting Again

Im finally getting some good garden time in....

... Bed #1--- Weeded and mulched one of the pineapple patches. 
... Mowed around several garden beds, collecting 8 trashcanfuls of clippings. 
... Hauled compost over to the garden area I'm working on and tilled it in. 
... Bed #2--- Started planting some bean seeds and a few taro huli before it started to pour rain.

Rain. Happily the rain proved just to be a brief downpour. Got everything soaking wet on the surface, just enough to stop my gardening efforts. But that's ok. I still feel that I got something accomplished. So I switched jobs to preparing garden stakes and cleaning up the mini greenhouses. Also prepared 4 trashcanfuls of compost tea for using tomorrow morning. 


The grass around these garden beds have been mowed down using the lawnmower's closest setting. That won't kill this grass, but will slow down its growth for a couple weeks. I like keeping the grass walkways because they provide better footing and help control the excess moisture that we've been getting. I can get away with scalping the grass this time of year. It grows back with a vengeance. But during the winter months the grass regrows much more slowly, so scalping isn't a good idea at that time. And scalping isn't something I'd do during drought times either, but it's been raining a bit almost every day, which us keeping the soil moist and grass growing. 

Friday, July 13, 2018

Noodles Eats a Rock


The past two weeks have had a full schedule, and our Noodle puppy helped tip us over the edge. For a few days he was not acting his boisterous self, but not acting overly sick either. And at night around 4 a.m. he would wake up and have a dry heave. He was eating but not with his normal enthusiasm. Eating, drinking, no vomiting. Then Friday morning he had some straining when he went to poop. Would only eat a tiny bit for breakfast. Was subdued, but otherwise alert. No vomitting, and though he was drinking water, it wasn't his normal gushing amount. Late Friday afternoon he turned down dinner and water. Late Friday night he vomitted twice, losing all the food he had eaten over the past couple days. I was able to track the time via the type of treats he puked up. 

I suspected he had an intestinal foreign body. Perhaps not a full blockage, but something was going on for sure. His belly wasn't tense, but his eyes told us that he didn't feel right. He had no fever and his gums indicated that he was a bit dehydrated. 

So first thing Saturday morning I called the vet hospital and arranged for an emergency visit. Of course, once I got off the phone Noodles was acting a bit better. He drank water and held it down. But he wasn't interested in going outside for bathroom walks. He actually asked for a dog cookie, but I didn't give him one just in case he would need surgery. Though not his bouncy self, he was willing to go for a car ride. He still had no fever and still was subdued. 

The vet is a 1 1/2 hour drive away. By the time we got there Noodles was acting pretty good. Not boisterous, but alert and comfortable. The vet listened to our tale and suspected that Noodles ate something, being that he's half Labrador retriever. Labs are noted to swallow inappropriate items. An ultrasound indicated intestinal inflammation. No foreign body was seen in the stomach and upper intestinal system. Bloodwork revealed no toxicity although some inflammation of the pancreas was  suspected. The X-ray was the clincher. A radiopaque object was in his colon. Bingo! 

The next morning Noodles pooped out a rock. Once the rock was gone, the pup returned to his normal self. 
That's a big rock to get through some of the tight spaces in a dog's intestinal system! 

Wednesday, July 11, 2018

Soil : Till vs No-Till

The past couple days I've been super enthusiastic about getting the garden going full speed ahead. So after preparing a couple of garden sections for replanting, I decided to lightly till under one of the adjacent macadamia nut trees in order to plant a ground cover there. There's some background......

10 years ago I planted some baby macadamia nut trees. I did nothing the change or improve the soil, I simply planted the trees. Since that time I have done no tilling around the trees at all. But I have kept a constant mulch covering. Sometimes it is grass clippings. At other times it's compost. I'd venture to guess that fresh mulch was added 4 to 6 times a year, as needed to keep the ground covered. About twice a year I watered the trees well with manure tea made from composted manures. I sometimes also used diluted urine solution, but I honestly don't recall how often it was applied. 

So today I raked off the mulch and tilled the top couple inches. I was surprised to see that the soil didn't look much different than when I started 10 years ago. Even with all that applied mulch, the soil was still light red and very cindery. It was granular and did not have visual organic content. Only the top 1/2" right under the mulch was dark and looking like garden soil. 

Above, the lighter colored soil that I'm pointing to is a small handful taken from under the macnut tree. I poured it atop the garden soil, only 2 feet away, then took the photo. The garden soil is obviously darker in color, it is crumbly and full of organic material. It feels and smells like good garden soil. It feels nicely moist. The light reddish soil is gritty, dry, appears to contain no organic material. The color contrast is significant. 

I was under the impression that by not tilling or digging, but rather by using top dressing alone, one would improve their soil via the no-till method. I've seen that claim published in numerous discussions of no-till. Hhmmmmm. That doesn't appear to be the case for my type of soil. Top dressing and the use of manure teas did not enhance the appearance of the soil around the macadamia trees. 

This little observation just reinforces my belief that light tilling combined with mulch and compost applications creates better soil for me than using no-till methods being touted by the latest fad in gardening. No-till very well may work in other situations, but it surely isn't doing the trick for this farm....at least not in this stage of development. I'm sticking with my compost piles and tiller. 

Tuesday, July 10, 2018

Getting Back to Gardening

Even though we're still getting rain here, the ground is actually draining well. I wouldn't call the soil dry, but it's dry enough to work with it a little. Last week I got a couple of mornings where I could mow the weeds and grass down real close in the garden areas. Mower height set on 6.....that weedy stuff is tall! Next pass through, height set at #3. I'm still harvesting trashcanfuls of clippings! Final pass through with the mower, height level 1, as short as it will go. Yes, I had to mow the grass in stages. 

Luck was with me last week because the next day was bright sun for a few hours. Ah-ha. Quick go out and spray my ag vinegar/oil/soap combo to "kill" the stubble. Not all the growth actually gets killed, but it does get burned and turn brown. 

Next, wait a couple days and then till the weeds in. If I till 4"-5" down, just about all the weeds get killed. Only the Bermuda grass survives, and that I will hand dig out once I see it sprouting. 

Above, the brown dead looking stuff is the stumble that I'm tilling over. Since the soil is moist, the stubble tends to bind up on the tiller blades. I have to take a knife and clean off the tiller tines about every three foot width of garden bed. It only takes a minute. 

Now it's time to spread a layer of compost, slightly cultivate it in with the tiller (just the top couple inches is all that is needed) and it's ready for planting. Incredible! I'm actually getting back to growing something again. 


Oh, did you notice the new rototiller? It's actually a mini tiller/cultivator. This one is a Mantis. I've had Mantis gas tillers before and was happy with the results I got using them. Oh, I've used big Troybilt tillers before, but I now find that I do just fine with the mini tiller. Since many of my beds are raised or irregular shaped, the Mantis is easier to use. 

I switched to using an electric tiller for a few reasons. The newer gas models seem harder to keep running. Is it me, or have the engines changed over the years? I find that they are a bear to keep running right and are more difficult to start than they use to years ago. At least it seems that way. I'm no longer interested in fighting with those little engines, so I switched to electric. 


How to run an electric tiller out in the field? I just bring my small generator out. The main thing is to use a short 12 gauge extension cord. If you use the wrong cord, an electric tiller will quit running. They can sense the problem. By the way, the Honda generator surely isn't the cheapest small generator to buy. Yes, it's pricy. But I opted for the Honda because....
...it's easy enough for me to carry
...it's quiet. That's a big consideration. 
...it's reliable. Another big consideration. 
...there's a person here that can work on them if they break, another big consideration. 
I've seen neighbors throw away one small generator after another. Those loud noisy, but cheap,  buggers seem to last one year or two. The Honda is quiet and lasts many years without breaking. For me, it's worth the purchase price. 

Monday, July 9, 2018

Eruption Update

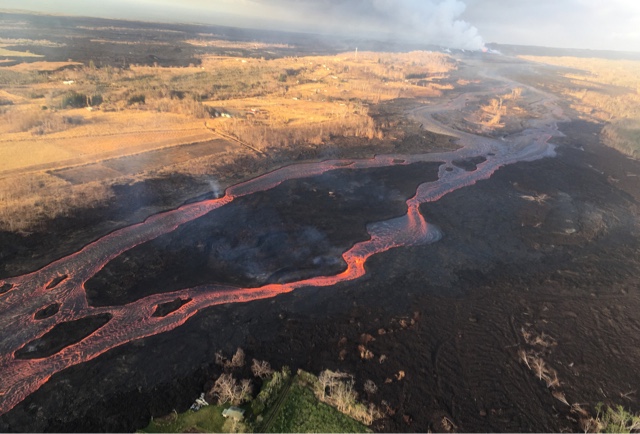
Things keep oozing along here. Fissure 8 hasn't slowed down. An incredible amount of lava gets pumped out each minute, maintaining the large lava river snaking through Puna. More houses have been destroyed, somewhere around 700 total to date. In addition, lots of outbuildings and businesses have bit the dust too. 

Fissure 8, a close up view from a heliocopter ....

Below, a view of the lava river.....

All the brown vegetation is not due to drought. That's right. It's once lush tropical greenery killed by the volcanic gasses. Needless to say. Nobody is living in those houses near the lava flow. 

No one can say how long this eruption will last. Weeks more. Perhaps months. Maybe even years. But until it stops, thousands of people's lives are disrupted. But that's the risk one takes when living in a lava zone on an active volcano.

Meanwhile up at Kilauea summit, the stored lava is apparently still draining out of Kilauea. Thus the summit keeps caving in on itself, resulting in hundreds of small earthquakes every day plus a few larger ones. The ground around the summit is cracking and slumping in. The highway there is experiencing damage ...... cracks, slumps, and recently a significant sinkhole at a location that had a previously slumped and been patched. 


Turns out that the hole was humongous under the 5 foot diameter hole in the asphalt. I captured these photos off of a friend's Facebook page........

The width and length of the underlying hole was the size of a pickup truck. I happened to drive by Volcano today and saw that there were several new repair jobs, several cracks, and many new slumps that I hadn't seen on my last drive by. If this weren't the only road connecting Ka'u to Puna, I suspect that the authorities would close it. There is a high risk of more damage occurring and sinkholes opening up. 

People here live with volcanoes all the time. They deal with the inconveniences. And have to accept the possible damage. People who can't accept that simply move away....to places where they have to deal with other types of problems : tornadoes, hurricanes, flooding, heavy wind, lightning, blizzards, civil unrest, pollution, etc. Personally, I'd rather live with this volcano than be someplace else. To each their own choice.