Wednesday, November 19, 2014

Drivel - Chasing Your Heart

If you've been following this blog, you're aware that I'm fulfilling my lifelong heart's desire to create a farm and live a homestead farmer's life. My tales have generated many an email from others who have taken the leap to chase their dream. Their stories tell of some pretty fantastic changes that are far bolder than what I've done, and I applaud these people. 

Numerous people said how they quit their jobs and started the business they always dreamed about. Others took drastic cuts in pay to take the job they truly wanted. One woman ditched her complete urban lifestyle to become a traveling medical volunteer. One man told me how he tried several times to make it as a farmer and finally achieved success on the fourth try! Wow, what optimistic persistence. Another person made a drastic life change to start growing miniature roses for resale. All their stories fascinate me. These are people who get my utmost respect, 

We recently spent time with a friend from back east who brought us up to date about his children. His son, who has a college degree had made the decision to pursue what his heart really enjoys doing -- blacksmithing.
He's currently learning his trade while working at a historic village re-creation. Not a great paying job but one that is giving him the opportunity to learn his craft. And from people who have come to watch him work, he's starting to get orders to do custom work. Personally I think this is grand and heartwarming. I'm not sure what his parents think. But Owen is following his heart, his life long desire. 

I think I've already mentioned that around my area we have plenty of examples where people have ditched one life's path in order to live the life they really want. We have a cattle rancher here with a Ph.D. in literature. Doctors making handcrafts and selling them at farmers markets. A pharmacist turned coffee grower. Many a college grad now immersed in the life of an artist, woodworker, underwater photographer, fisherman, hunting guide. The couple running the coffee stand down the road both have college degrees and have abandoned their first careers. I never noticed this sort of thing until I moved here but I suspect it happens everywhere. 

Not all their stories are instant success stories. Some tell of failure and of having to change tack. Some of repeated failure until success was achieved. Many are still works in progress. But at least none will have tombstones engraved with "I wish I had....." 

Monday, November 17, 2014

Egg Washing ---- Or Not?

Wanna get a dull homesteaders' get-together roaring? Simple. Casually ask someone if they wash their chicken eggs and just say that you think doing just the opposite might be a better idea. They might say, "I never wash eggs. It's removes the protective bloom." Then reply, "Washed eggs are cleaner thus safer", then sit back and watch the show. It won't take more than a few minutes before everyone at the gathering is voicing their passionate opinion. Ha, ha. I did this once and was amazed. I came away learning a lot, but also learned that there is no perfect answer. 

Before continuing with the topic, let it be known that the "experts" don't agree either. USDA requires graded retail eggs to be washed while the EU requires such eggs to be unwashed. So the USA and Europe are on opposite sides of the debate! 

Info for those of you who don't have chickens....when an egg is being laid, the hen's "butt" slightly everts (turns out) keeping the egg clean. The egg's surface is wet but quickly dries due to the egg being hot. That surface moisture seals the eggshell with what is referred to as the "bloom". This bloom helps keep the egg's innards safe from outside contamination. 

From what I can gather, if the egg does not get dirtied after being laid, then there is no reason to wash it. In fact, even in the USA some various state/local regulations require no egg washing for resale eggs. But other areas require all eggs to be washed, clean or not. How confusing! 

In commercial mass egg production, eggs get filthy. Things are not like a typical homestead situation where the farmer hand gathers then cleans each egg individually. Thus US commercial eggs really need to go through a wash and a disinfecting rinse. In the past few years the industry takes things one step further by treating the shell with a sealant to keep moisture in and contaminants out. That sounds like a good thing but then again, how much of that chemical is leaching into the egg parts that we eat? If bacteria can get into a washed egg through the shell, so could the sealant chemicals. (Side note : people without refrigeration store eggs at room temperature in isinglass or coat the eggshell in vasoline. Sealing the shell works. Thus some homesteaders wipe their eggs with a rag moistened with food grade mineral oil in order to seal the shells of washed eggs.) 

When the bloom is washed off, eggs are more susceptible to going bad quicker. "Bad bugs" can more readily enter a washed egg. While unwashed eggs can be stored on the kitchen counter for many days, washed eggs must be kept refrigerated. 

So lets say that I have decided that I don't want to wash my eggs. What might I do? First off, I would use either sawdust or wood chips in the laying boxes. I've tried plenty of different substrates and have the best luck getting clean eggs using those two. Next I would maintain a deep litter in the chicken pen along with a roof to keep the litter protected from the rain. I just recently experimented with deep litter and found that the eggs are far, far cleaner. I'd also gather eggs frequently, 3-4 times a day if possible. The more frequently I check for eggs, the cleaner I find them. I'd use fine sandpaper to remove a speck of dirt, but any really soiled egg would need to be washed. 

On the other side, what if I decide I prefer to wash my eggs? Well, using sawdust, deep litter, and frequent egg gathering are all still great ideas. But I'd follow some extra guidelines for washing. Generally recommendations that I've seen call for the temperature of the wash water should be 90 degrees F or 20 degrees F warmer than the egg's temperature. The idea is that the contents inside the egg would swell slightly, using internal pressure to keep contaminants from entering through the shell pores. Honestly, I'm not too sure that this is true. Perhaps just a wives tale or urban legend? But it sounds good, right? 

For only slightly dirty eggs, I read that people clean them in a variety of ways. A light rubbing with fine grit sandpaper. A light wiping with a dampened cloth.

For dirtier eggs -- wiping with a wet cloth. Some people opt to wet the cloth with vinegar, peroxide, baking soda solution, or a mild bleach solution. Some people will use a soapy cloth or a dish scrubbing pad. Just about everyone then immediately rinses the egg in fresh running water, then either hand dries or sets them out on a towel to dry. There are commercial egg wash chemicals that can be purchased, too. Most websites say to not submerse eggs in the wash solution and don't soak them. But on the other hand, there are egg cleaning machines that do exactly that. So who is right, who is wrong, or is there no real difference? 

On my homestead I opt for unwashed, clean eggs. I'll just lightly wipe clean eggs with a cloth barely dampened with a mild bleach solution and allow the egg to air dry before refrigerating. But sometimes, especially during rainy times, I do get dirty eggs no matter how much I try to keep nest boxes and substrates dry. And there are those days that I can only collect eggs morning and evening, and those eggs tend to be dirtier. So if I get some dirty eggs, I wash them with some dish detergent/water solution them immediately rinse them well in running water. Each egg gets set aside in a clean towel until all the dirtied eggs are washed. I then wipe each with a clean cloth dampened in a mild bleach solution and allow the eggs to air dry before refrigerating. The eggs are then stored in the coldest section of the refrigerator. And like many other homesteaders that I share info with, I also take the step to wipe the cleaned eggs with a mineral oil rag. Why? Because some of my buyers do not have refrigeration. The mineral oil seal helps keep their eggs fresher for the upcoming week. 

Sunday, November 16, 2014

My Homestead Firewood

Ah, thoughts of winter must be cropping up inside the heads of the mainland readers because I'm getting emails asking about winter firewood. 

Where I'm now living, preparing for winter means changing the angle of the solar panels and closing the house windows at night. How simple! And boy, I surely don't miss those winter preparations that I use to do when living on the Eastcoast. It was a normal way of life back then, so I never gave it much thought. But looking back, I surely don't miss it. 

Since people know that I run two woodstoves, I field lots of questions about firewood. 
...Do you stockpile a winter supply? 
No. Since I use firewood year around, I just store wood when there is more than I need at the moment. Stockpiling some wood has its benefits. That way I would have dry wood to get me through a rainy spell. I recall the time when we had 39 straight days of rain! Stockpiling has provided me with wood to get through an injury recovery period. Yes, I've injured myself occasionally which meant that there were a couple of weeks in a row where I couldn't gather and cut up wood. 

...What tree species do you burn? 
Whatever I have. Around here on the farm ohia and eucalyptus are most common. Wild guava and loquat are plentiful. But there is a variety of trees around, both natives and introduced. No oaks, maples, ash. But still nice burnable wood. 

... Do you use a log splitter? 
No. I don't need to have a long burning fire, such as overnight. So I don't burn big logs. It's a lot of work to hand split logs ...... I've done that in the past so I know about it all too well ......and it's not economically feasible to buy a log splitter for the homestead. Besides, logs are heavy and I'm no spring chicken anymore. Therefore I don't deal with logs for firewood. I have plenty of small stuff to use for firewood. Logs are better utilized for building low retaining walls, built up garden beds, and other projects. 

... If you don't burn log wood, what do you burn? 
Due to the tradewinds, I have plenty of fallen branches and twigs. Branches up to 6" diameter are always being snapped off. On top of that I have plenty of small trees that I am gradually clearing away to expand the pastures. I have the room to pile up the branches and let them sit for a year to dry out. Then I'll cut it up for firewood. Anything 1/2" diameter and larger goes for firewood. The smaller stuff goes into my biotrash piles to fill in holes on the property, or gets run through a chipper and made into mulch. Some gets set aside for kindling. Before a fresh branch goes onto the dry-out pile, I'll take a pruning shears and trim of the majority of the fresh leaves and fine twigs. They go into the garden grow boxes. No waste. 
Above - This pile of small logs runs from 1 1/2" diameter up to 4" for much of the pile. One chunk is over 6" and will get used in some garden project rather than being split for firewood. This wood came from some trees I thinned out from the pastures. Besides using this wood for firewood, I tend to pick out the straight pieces for trellises and other projects. 

.... Where do you buy your firewood?
That's a common question I get. I don't buy it, simple as that. There is plenty of downed wood around free for the taking. The cost of wood is my time, a saw, and something to haul it with (truck, ATV, etc). If I ever should run out of wood on my own property, there are plenty of neighbors who would love having me clear out some of their windfall debris. 

...How many cords of wood do you burn in a year? 
Truthfully, I can't say. Since I don't burn cord wood, I can't even compare and venture a guess. The vast majority of my firewood is stuff that other serious wood burners would pass over -- twigs,  chunks, small branches. Plus I don't do long burns daily. Every second or third day the livestock cookstove gets run for 2-3 hours, cooking up a jumbo pot of assorted food stuffs. The house stove normally runs a short fire in the morning, and during the winter a brief fire at night to take the chill off. 

...What tools do you use? 
I do have a small 14" chainsaw, but it doesn't get a lot of use. It's brought out to cut fallen tree limbs into handable size, and for the occasional small tree to be removed. A good quality loppers gets a good workout on green stuff. I have two of those compound ones that are very easy to use. One handles up to 1 1/4" and the other can go up to 2".  For anything bigger (or not green wood) than a lopper can handle, I use a sawsall (if it's standing) or a chop saw (if it's already down and carry-able). I picked up the chop saw, used, from a person who was moving. Funny to think that a chop saw is my number one firewood cutter, but it surely is easier to use than a circular saw or chainsaw. 
    I don't have any of the usual firewood tools that I had back on the mainland. No ax, hatchet, splitting maul, wedges, sledge hammer, chains. No rented woodsplitter. No big, serious chainsaw. 

...What do you use as kindling? 
Since I have plentiful twigs, I don't bother using a hatchet to chop a log into kindling. A fire gets started using newspaper, cardboard, fine twigs, 1/2" branches, then bigger stuff when it gets going. I use homemade wax/sawdust firestarters, but if I'm out of them I'll use a bit of 90% alcohol to jumpstart the fire. 
Above - this pile of wind fallen twigs is my source of kindling. Small twigs for starting, larger twigs and light branches for getting things going before the 2"-4" wood is added. As needed, I will tramp on this pile then pick up the pieces and transport them in a cardboard box up to the woodstoves. Anything that won't break up by a good tramping will get cut with the chop saw. 

...Do I ever use coal?
No. Coal is not naturally occurring in Hawaii. It would have to be imported. Thus I don't burn coal.
But we do have something here that burns hot somewhat like coal ----- macadamia nuts! I sometimes get several bags of old or spoiled macnuts. They burn great, but I have to use them just like I would coal. If you've ever tended a coal fire in a woodstove, you know what I mean. I'd burn macnuts all the time if I could get them for free. They make a great fire for heating and cooking. 
    This year I've been gathering the kukui nuts that fall in my mother's yard. I'm going to give them a try as a firewood source. They contain oil and historically were used to burn as a torch by the old Hawaiians, but I have no experience burning them myself. So we shall see. I have several 5 gallon buckets of them, so I'm ready to give them a trial run. 

....Have you ever considered collecting driftwood for firewood? 
Although I'm surrounded by ocean on this island, I don't see much driftwood on the beaches. And besides, there's not much beach around here. The coastline is mainly jagged rock.  If there were plentiful driftwood, then I would indeed use it. But alas, there isn't enough to make a driftwood collecting trip worth while. 

....Do you avoid burning certain types of wood? 
If you mean tree species, well, no. We don't have much pine around here, but I would burn that too if it were plentiful. And I've burned Christmasberry with no problem, though some people claim that the smoke causes skin rashes. I haven't seen that yet. But I do avoid burning chemically treated woods such as cabinetmaking waste, exterior pressure treated construction wood, plywood, pressboard, painted wood. That sort of thing. 

....How do you dispose of the ash? 
Dispose isn't the word I use. Utilize. That's more like it. Wood ash goes into the garden via direct application and via the compost. Besides the ash, I also put any charcoal into the gardens too. 


Saturday, November 15, 2014

Big Pigs Spared From The Freezer

Hammie and Chopper are leaving soon but rather than heading directly to a dinner table, they are heading for the breeding pen. 
Pictured above, these two are enjoying a snack of taro sweet bread. They weigh in at between 135 and 150 lbs. They sure grew fast! Yes, they are a bit muddy because they spent a good portion of the early afternoon in their wallow cooling off. Pigs can't sweat to cool off when overheated, so they will lay down in water or cool mud. 

Because hubby dislikes the idea of any animal we own being used as food, I posted an ad for the pigs, letting fate decide what would happen. Last week I had one sold, so I assumed the other would go into our freezer. But when the buyer arrived with gun, knife, and truck, to take away his pig, the buyer's partner decided to take both in order to breed them. She liked the idea of breeding more pigs. With Hammie and Chopper ready to breed (in fact, they might be already bred), in a bit less than 4 months the buyer should end up with a good return on his investment. 

What a turn of events. I went from two weeks ago wondering how I was going to fit two pigs into the freezer, to freezing only one pig, to now zero pigs. Hey, plenty of freezer space now! 

So how did the farm make out financially? Surprisingly well. 

Cash out for ---
....two piglets --- zero
....fence panel --- $105
....purchased feed --- $76

Total cash out came to $181. The fence panels will of course be reused for several years to come. 

Sale price of two pigs, including a partial sack of sweet cob --- $300. 

So the farm ended up $119 in the good. Not bad. Of course that means no fine pork in my own freezer. 

The big savings in raising these pigs were:
1- zero paid to buy the piglets. Around here non-fancy piglets cost $50 each. 
2- inexpensive pen. I used heavy duty pallets for much of the pen. The fence panels made easy access gates. More importantly, they were gates that the pigs couldn't break through. 
3- a lot of their food was home grown or foraged. No cash outlay but it meant a lot of time and effort invested on my part. 
4- no illnesses, parasites, or injuries. Therefore there were no veterinary expenses. 

Friday, November 14, 2014

More Beekeeping Lessons

Before when there were beehives on the farm, I "had" bees rather than myself being a beekeeper. Back then there were no hive problems to deal with, so hives were not managed other than adding supers for honey collection and harvesting said honey. Nowadays that no longer works. People who don't actively tend their hives now will simply lose them. So I'm now learning to be a beekeeper. 

Some more gems that I'm learning.....
....don't over use the smoker
....move slowly and don't be in a hurry
....take care not to deliberately squash workers
....when removing brood frames, protect them from the wind. Hang them in a box and put some protection over them. Chilled brood can die. 
....even if you're opening and working the hive for some other reasons, do a checklist while the hive is open. Visually scan for capped honey, pollen, and brood. Check for uncapped brood...is the queen still actively laying? What's the drone cell situation? Any queen cells? Remove them. Any hive beetle or varroa mite? Any moth, ant, yellowjacket, mice, etc evidence? Any other abnormalities? 
....remove and kill the old queen at least 24 hours before introducing the replacement queen. 2-3 days is fine. 
....set up the hive in such a way to prevent rain water from flooding the oil tray. 

Some that I consider "pearls"....
....requeen with Italians. They are less aggressive and far easier for a beginner to work with. 
....buy queens from a producer with a known reputation for gentle genetics
....have the queen marked. Marked queens are so much easier for beginners to find. 

Thursday, November 13, 2014

Beekeeping Pearls

I plan to post those little tidbits of wisdom (pearls) that I come across as I'm learning about bees. Here's a few I've garnered already. 

Smoker -

#1-
...to light the smoker, fill it with fuel then use a propane torch to light it. 
No fuss trying to light a bit of paper, then tinder, then building up to the fuel. No burnt fingers from matches or lighter. Just light the plumber's torch, shove the nozzle down into the fuel, leave it there for a half minute or so to light the wood chips. 
Then remove the torch, use your hive tool to smash the fuel down inside the smoker, give the smoke some puffs of air using the bellows and you're good to go. 

#2-
...use hickory BBQ smoking chips that can be purchased by the small bag in the stores. They light easily enough, stay smoldering for a long time so that you don't have to keep stopping what you're doing and give the smoker a few puffs of air to keep it lit. Plus they last a long time if you put them out each time when you're done with the smoker. I'm told that the mesquite chips seem to agitate the bees, so I stick with using hickory. 
     To start, dump the used charred chips from the smoker onto some paper, in this case, old wrapping paper. 
Add a few more fresh chips to the pile if needed. 
Wrap it up making a bundle that will fit inside the smoker. 
Stuff it into the smoker with the loose paper at the top. 
Now it's ready for lighting. 

3- 
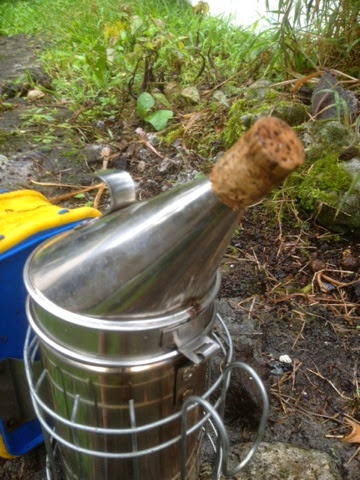
...cork the smoker when you're done. By putting a cork plug into the smoker's hole, you'll starve the fuel of oxygen. Thus it will go out rather than keep on smoldering down to ashes. That way I get a lot of mileage out of my hickory wood chips. And the charred chips relight easily. 
Above....smoker in use, emitting smoke. 
Above.....smoker spout is corked. Below....close up of cork plug. The cork is from an empty wine bottle. I had to take a razor blade and trim it down a bit in order for it to fit the hole. 


House Update - Hallway Floor

The rest of the hallway floor is now installed. 
There is still a bit of trim work for David to do. And the threshold plate for him to manufacture. But I'm almost ready to claim "finished" and tic off another section of the house. Yes, the ceiling outside the bathroom door isn't done, but that can't be worked on until we do the bathroom project since it involves rebuilding the roof. 

The hallway floor has three levels because the main section (livingroom/kitchen, bathroom, etc) is at one level and the bedroom is at a slightly higher level. Rather than having a step between the two levels, we opted for a ramp. 
It's not a steep rise. And it was difficult photographing it so I could give you an idea of it. So this is the best I could come up with. 

Because of the ramp, the top and bottom posed a bit of a problem to join in a pleasing fashion. David came up with using some of the leftover ash wood from the thresholds, making joining pieces. We were pleased how they turned out. 
I placed a cat food can there to give you some perspective. Once the surbase trim is in place, it will look quite nice.