Saturday, October 28, 2017

Turmeric - Reader Comments

Hers a few of the comments generated by my last turmeric post.....

From "S"...
"Thanks for the turmeric post....answered a bunch of question I didn't know I needed to ask.  Do your's flower?"
Some of my plants flowered this year, perhaps about 25%. Last year only one flowered. And the year before that, zero. Don't know the exact reason for this trend but it would either have to do with the improved soil fertility or the weather, or a combo. 

"J" remarked, "that clump of roots is far bigger than I have ever gotten. Should I plant a bigger piece? I was told to break off all the fingers and plant each individually." 
I tried planting individual fingers when I first tried turmeric, and I too found I got very small rhizomes (that's the term for the fleshy root part that we eat) in return. I now plant a larger chunk. The bigger the chunk, the better my return. 

"A" said, "Can turmeric be grown in a pot indoors?" 
I've heard of people doing that, but I've never seen it or tried it myself. I should think that it could easily be grown indoors since it has a low light requirement. The main thing to watch would be soil moisture. Turmeric doesn't like dry conditions. 

"B" emailed... "Should I plant turmeric in the sun?" 
I haven't had much success growing it in full sun, although it surely will survive. It does far better for me in semi or partial shade. 

"T" asked, "I haven't seen turmeric in my the seed catalogs. Can I buy it at the grocery store and plant it?" 
Yes, you could. But I would keep two things in mind. 1- diseases. I would wash the roots in soapy water then rinse in bleach water and air dry before planting. That may not prevent all root borne problems but it would help. 2- I don't know if an anti-sprouting chemical is used in turmeric, like is used in potatoes. So to be on the safe side, I'd buy the turmeric roots from an organic source, like a natural food store. 

Friday, October 27, 2017

Mauna Loa Update

Today the weather was great for gardening -- a bit of sun but not too much, a nice breeze, no rain. But instead I headed to the volcano update over at the Kahuku  section of Volcanoes National Park. Nothing like living on the slope of an active volcano to make one interested in what the volcano is up to. 


The presentation gave a nice, brief overview of the most recent past eruptions, the various map updates, an explanation of the magma movement, the earthquake and deformation trends, and tidbits of important info so that area residents have enough knowledge to make decisions. Decisions about bug out bags, if one would have enough time to get back home from work or errands, evacuation or care plans about children and pets, what to expect "if ....."


Best of all, the volcanologist explained things in language we could really understand. Plus there were plenty of graphics explaining and showing the mountain from perspectives us non-volcanologists never get a chance to explore. 

I felt that most of the audience came away pretty well informed. I know surely did. 

This volcano is really interesting. Because it is increasingly intensely monitored, the scientists are learning more and more about it every year. At this point, they have a good sense what the signs are of a pending eruption, which way the lava would most likely flow depending upon where it breaks out and how it travels, how quickly it would flow down the mountain. It's pretty scary to know that there are times where the lava could travel from the eruption site to the ocean in only 3 hours. Yes, THREE hours. That doesn't give people much time to get out of its way. So good evacuation plans are imperative. Yes, danger exists. Back during the 1868 eruption, seceral Hawaiians got surrounded by the flow and were trapped. Happily they were rescued. And during the latest Mauna Loa eruption, lava came close to Hilo....


The above photo was taken from the Hilo airport, looking up the slope of the volcano. Yes, this volcano needs to be taken seriously! 


Thursday, October 26, 2017

Mamaki Tea

"C" asked how I make mamaki tea. I do it rather simply and don't really have a set recipe. 

First, a hint about drying the leaves. I've discovered that they do better when dried upside down. They end up looking better for resale purposes. 


This time of year I usually use fresh leaves for tea making, saving my dry leaves for when I can't harvest fresh ones. I pick the larger leaves for drying, leaving the smaller ones behind. The large leaves are easier to deal with in the dehydrator, that's all. Just easier to handle.


Once the bigger leaves are removed, there are plenty of small leaves on the branch. I'll strip those off to make fresh tea. 


Yup, I totally denude the branch, only throwing away the bad looking leaves. (The bad leaves plus the denuded branch end up in the compost bin or as mulch.) 


Above, yes that's Noodles under the tree. He's learning to be a good farm dog by following me around. I like to have one of the farm dogs with me as I work about the place. 


I'll take my glass quart cup with me when I'm picking leaves for our own tea, and fill it to the top with leaves. I don't pack the leaves at all, but let them lay naturally and "fluffy". Before I add hot water I'll pick a few sprigs of mint and add it to the mamaki leaves. We both like a hint of mint in this tea. 


Next I'll add boiling water and, using a spoon, press the leaves down into the hot water. Then I'll let it sit until it's cool, though often I'll make this first thing in the morning and don't get back to it until lunchtime. By then to color of the tea is quite dark.


This is a concentrate. We add water to make the preferred taste. I like my tea to be weak while hubby likes his strong. So it's easier for us to store the concentrate in the frig and mix up a glass of tea as needed and to the desired strength. 

Hubby and I like drinking tea once a day. It's a pleasurable habit. But other people drink it for its health effects. While we don't see any difference in ourselves when we drink mamaki tea, I have had people tell me that it effects them in various ways. Hawaiian noticed that mamaki affected certain people in different ways, too. Thus it is one of the many Hawaiian medicinal plants grown in my area. Since it has medicinal properties, it would be wise to be cautious when first trying mamaki. 


Wednesday, October 25, 2017

A Different Kind of Rain

The past 48 hours has seen a nice rain....close to 3 inches total so far. Might see more rain today, but I'm not anticipating much. 

This storm is what we refer to as a Kona storm. It comes from the south and west. And usually we see them in the summer. This one was a bit different in that it actually blew the rain sideways and kept us in a cloud repeatedly for hours at a time. I've never seen a storm like this since I started keeping weather records back in 2004. 


Quite a surprise to come out to a wet porch. This porch is under a roof (not the steps, but just the porch). Normally it stays dry even in heavy rains. Not this time. Everything was wet, including the clothing I had hanging from the ceiling airing out. 


The protected window had rain running down the screen. Never happened before, but a side benefit is that it washed the worst of the volcanic dust off the screens. 


Even the screen door leading into the house had streams of rainwater running down it. And this screen door is 6' back from the edge of the porch roof. This is something I expected while living in NJ, but not here. 

Besides what the rain soaked, even things inside the house were damp. Felt like there was a thin film of moisture over everything. Must be the effects of being in a cloud for hours. There's not a blessed thing in my house that doesn't feel wet. The bed sheets, the clean clothes I put on in the morning....how wonderful ☹️. Putting on damp clothes is not high on my enjoyment list. 

Now please understand I'm not whining. For my records I just want to document this unusual event. This is not the kind of rains we have been seeing here for the past several years. I hope it's not a new trend, otherwise I'm going to have to make some modifications to my house. 


Tuesday, October 24, 2017

Cholesterol Spinach

Recently I picked up a cutting of something labeled Cholesteral Spinach. I didn't know what it was, but I figured I could research it. It looked to me to be similar to okinawan spinach, so I planted it in the semi-shade. Luckily guessing right, my little cutting  rooted and took off. 


The growth habit turns out to be pretty much the same as okinawan spinach. But rather than being bicoloredt, the plant is entirely green. With just a bit of googling, I learned that it's also known as Moluccan spinach. I've heard that name before but never had a plant to associate with it. Searching the internet I discovered that it has lots of other names, depending upon the country it's growing in.  


It's not really a spinach, but it is a nice leafy green that grows easily for me. The young leaves and stem tips are tender and nice tasting. I add them raw into a mixed salad. Recently I tried dropping the tips into boiling seasoned chicken broth and immediately thickening the broth a tad, then pouring it over a chopped (cooked) chicken breast. By not cooking it too long, it doesn't get it's overly slimy feel (much like overlooked okra). But we both agree that we prefer it in a raw salad. 


I noticed that there were websites promoting health benefits of this veggie. But I didn't come upon any research or medical documention to support the claims. So if it really does help control cholesterol levels, it's a nice added benefit. But I wouldn't count on it. So I just plan to use it as another leafy green to add variety and overall nutrition to our diet. Hubby's not one for leafy greens, so this is one way to pop a few into him. 


Monday, October 23, 2017

Pet Door Modification

With the addition of a puppy to the family, we've had to make a modification to our pet door. Normally, the dogs and cats have free access to come and go as they please. Only occasionally do we need to block the door for one reason is another, and it's just a temporary thing. But having an inexperienced puppy around has changed that for the time being. Reason......

Cane toads. 


Above, the normal homemade pet door with a flap to deter flies and mosquitos. 


Above, the slide-in door that shuts access off. 

Cane toads can be highly toxic when disturbed, emitting a toxin that can easily kill a dog who mouths, picks up, or bites the toad. Sadly, I watched my neighbor's dog die after biting a toad, and there was little we could do to save it. From bite to death took about 20 minutes. It was horrible to witness. So it's imperative to keep the puppy out of harm's way until he is well trained to avoid toads. So until then, we needed to come up with a solution to allow the cats to come and go at night while blocking the pup. 


We made a second door with a cat sized hole. Some of the fatter cats have to make an effort to squeeze through, but we'll fix that shortly. As the pup grows we can enlarge the hole for our fatty cats. When this restrictive door is in place, we pin up the rubber flap, otherwise the cats wouldn't be able to use the door. 

Noodles is only 3 1/2 months old, so he's still too young to understand about those toads. But eventually he'll learn and we can go back to normal egress once again. 


Sunday, October 22, 2017

Wash Sink Comments

I was surprised to see that my sink project brought in several comments. Here's a few......

"F" wrote to say, "My Health Department wouldn't approve such an arrangement." 
My response....of course not! The officials from the "governmental departments to make us sad" (not my invention. Paul Wheaton's the inventor of this saying)... often have no common sense. They can only read their black & white regulations and enforce them without expending an iota of mental calories. Thinking is often not on their schedule. This particular sink will be rinsing dirt off of tools and off of my hands. Since my hands are being washed, the water is now termed "waste water" and thus needs to be disposed of via a septic system or approved greywater system. Aaawwww, give me a break! How come it's ok for me to work barehanded in my garden soil for hours every day, but heaven forbid I use water to wash off the dirt and allow it to drain onto the soil. Eh, what's the difference? Oh ok, I use soap to help rinse off the grime. Since when was soap toxic to the environment? If it is deemed so dangerous to the environment that it needs to be diverted to a septic system, then what the heck is it doing to me when it's on my own skin? The government is more concerned about environment safety than my own safety? Guess so. Oh yeah, these same officials don't mind if I make a soap solution to spray on my veggie plants to kill aphids.....so what is their concern? The soap? My shed skin cells? The water? No, all those things appear to fine taken separately, but combining them seems to be the rub. No, I just don't see the sense of their argument. (By the way, my same county government sees no problem with spraying hundreds of gallons of herbacides on the roadsides here 5 days a week, herbacides residues which definitely filter down into the watershed! Where's their concern and  septic system for those chemicals?) 

By the way, the water from this sink is being channeled to a banana tree. Thus the tree will absorb much of the water rather than it filtering down through the watershed system. 

How to handle waste water is a whole other topic that I won't get into right now. The health department and waste water department have their own ideas, but the folks around here who live rural and often in dry areas have different views. Many folks here value water to the utmost and don't waste a drop, especially their greywater. And those folks who must live on very, very small amounts of residential water have home systems that don't even generate black water. Water is too precious to waste on flushing. 

Ok, ok. I'm ready to slip into a rant. Take a deep breathe..practice a little TaiChi or yoga breathing....meditate.....oooommmm. 

"I'm ok now, Dave." 

I tend to be practical. While I wouldn't advocate creating a dangerous situation, I can see no real problem with watering a banana tree with the runoff from this particular sink. 
....................................
Next question: "P" wanted to know how much the system cost me. I'd say around $70. I paid cash for the tank, the faucet set up, and a few screws. Everything else was from my farm boneyard. If one saves enough "junk", one finds things to make out if it. 

Next question: "T" asked, "I bet you don't have much water pressure." True. But I simply put a plug in the sink drain and fill up the bowl. This gives me plenty of water to wash my hands or rinse off tools. But once the water tank is full, the pressure will be much higher and more than adequate. 

Next question: "C" wanted to know what the black things were. They are plastic pallets. I could have used wooden pallets but I had these laying around looking for a project to be used on. I've been told that these plastic ones will hold up better under the weight of the water tank. 

Next question: "B" asked me what color I was going to paint the tool shed. I'm not sure yet. Either some color to blend into the surroundings (greenish, brownish, grayish), or possibly traditional barn red. 

Final question so far: "R" wants to know where I get all my recycled stuff. Mostly it comes from people that know me. I have a reputation of being a scrounger. Plus I'm not above retrieving useable things from the dump. (I even have a t-shirt that says dumpster diving team member!)  I got the pcv pipe, rain gutter, and sink from the dump. The pallets came from a local grocery store looking to have them hauled away. This sink set up may not be pretty, but it's quite serviceable. 

Comment: "S" wrote, "Very snazzy set-up, with the tank and spigot and all!"

Comment: "T" said, "Nice idea, I need one in my own yard." 

Comment: "B" emailed - "I wish I could collect rainwater where I'm living. I tried to once but the HOA made me take it apart. Some day I'm going to move out into the country. There's no freedom living with a HOA." 

Saturday, October 21, 2017

Adam

You're going to start hearing me talk about what Adam is doing around the farm. Adam is a new addition to the homestead. At 25 years of age, he's the young blood around here. He's come to join the homestead as a general property caretaker and farmhand. We're really pleased to have him join us and hope he enjoys staying around for awhile. 

Caretakers and wwoofers are quite common in my area. Caretakers are used to maintain the second homes and future homes of folks living off island. It's fairly common for someone to purchase a home in advance of their retiring here, thus the home needs to be watched over by someone. In other cases, homeowners work off island at times (or go in world traveling trips), leaving their homes for months at a time. Again, a good situation to use a caretaker. Yet in other situations, the property owner simply has more than one property, living on one of them. The other is used for a business of some sort, such as macnut or coffee farming. Thus someone is often given permission to live on such Ag farms as a caretaker-watchdog, so to speak. Hawaii also has a high population of elderly, often in need of assistance. So often the elderly will share their homes with a caretaker-assistant. 

Wwoofers aren't caretakers, but they sometimes function partially as one. Some farms incorporate farm maintenance into their wwoofers' duties. Plus the very presence of wwoofers living on a farm provides a bit of farm security, and a presence in case of an emergency and a deterrent to theft.

Adam is a cross between caretaker and wwoofer. He's a bit of a wwoofer, seeking to learn about growing food and homesteading. Plus he's a bit of a caretaker, providing security, presence, and upkeep for the farm. But the bottom line is that's he's a nice person, a pleasure to have around. We're enjoying him being around and hope that the feeling is mutual. 


One of Adam's early projects is to care for the new dairy goats. His goal is to regraft the two kids back onto their mother, a task that will require lots of patience and time. 


Thursday, October 19, 2017

Mower Breakdown

I'm finding that fixing and maintaining equipment is an ongoing task. (Thank heaven I don't have a tractor or a combine!)  It's not something I enjoy, although by shear stubboness, I can usually figure things out. Today was a prime example. 

Just a little breakdown. The self propelled lawnmower stop being self propelled. Not that it is really all that self propelled, but the assist it gives making mowing far, far easier for me. Ok, the wheels stopped "wheeling". I looked for a grass clog. That sometimes happened when I was mowing tall grass with the previous  mowers. But the grass today was only 6" high, so I suspected some other cause. The wheels themselves looked fine, and they turned when I pushed the mower myself. I figured the next most obvious problem was the drive belt. Either it broke, or it popped off. 

(Propped up so I could access the belt drive.)

The problem was accessing the belt drive. On past lawn mowers, it was simple. In fact, the belt was so exposed that it often got a tangled clog of grass strangling it. But this latest mower had the drive assembly very well protected.....from grass & from my inspection as well. 

Propping up the mower, I tucked under to take a look. How to take this thing apart? Saw 7 bolts. I wasn't sure exactly which would be the best to remove, so without a repair manual, I took my best guess. 

7 bolts later, I got the drive assembly casing loosened but still couldn't see the belt. I could feel it with my fingers and determined that it wasn't broken. So it just popped off the pulley wheel. Guess I had the tension too loose. Contorting my fingers this way and that, I couldn't make any progress. Cursing didn't even help. Dang, dang, dang. Looking more closely, I spied 5 more bolts tucked down deep holes. Now I need to find a socket extension. Of course, one the right size was not to be found in the tool box. Searching various tool sheds, I finally found the right piece about 30 minutes later. Grrrr. 

(Above - At this point I could pull out the belt and determine that it wasn't broken, but I couldn't reach the pulley it should be mounted on.) 

With the right tool, it was a breeze removing the last 5 bolts. Now with a bit of prying, I was able to expose the troublesome belt. Yup, it was off. Thank heavens it wasn't broken! Looking at the exposed innards of the mower, I determined it would be a bear to actually have to replace a broken belt. Hope that doesn't ever happen. 


A bit of finger manipulating and the belt was back where it should be. 5 minutes later, the mower was back together and I was once again mowing. 


In all, this job took an hour. If I had had the tools and knew what I was doing, it should have been a 20 task. Live and learn. But now I'm prepared if this ever happens again. Of course, I wisely tightened up the belt adjustment, removing the excess slack. A bit of prevention can't hurt! 

Purple Romano Beans

I'm a sucker for the unusual. Guess that's why I started growing purple beans in the first place. So a few months ago I spied a purple romano bean in one of the seed catalogs. Most of the romano types don't do well for me --- they seem to be overly attractive to the slugs here. And most have their pods rather low slung on the plant, well within easy slug reach. But I hadn't tried this one yet, and it kept saying, "Buy me, buy me."


Romano Purpiat. A bush bean, deep purple pods. 


I found the plants to be generally sturdy enough not to flop over, which is another problem I've had with romano beans. 


And the flowers are beautiful! 


When the small pods first form, they start out green. At first I was disappointed. They didn't seem very colorful. 


But within a day or two a dark purple streak showed up running down the spine of the pod. 


By the time the pods were ready for picking, they were deep purple. How cool! Yes, they are gorgeous. But for me, the best benefit is that they are easy to see and locate when picking them. With green pods, I'm apt to miss several. 

Since I only started with a small seed packet, I decided to harvest these plants for seeds. I actually got quite a lot of seeds from one small seed pack. 


Now I'll be able to grow a good crop of these beans. But it's now fall and not the greatest time for planting beans. So my plan is to sow 1/3 of the seed now to determine if this is a variety that can sown late in the fall around here. If it does poorly, then I'll wait until early spring before sowing the rest. 

Yes, some bean varieties can be grown year around here and they do well. Others are more sensitive to winter. 


Wednesday, October 18, 2017

Adding a Wash Sink to the Tool Shed

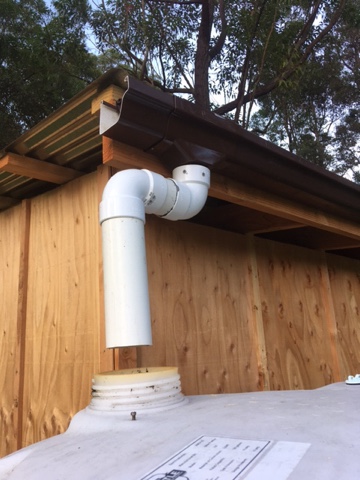
This is a very simplistic set up. The tank collects rainwater off the roof of the small tool shed. 


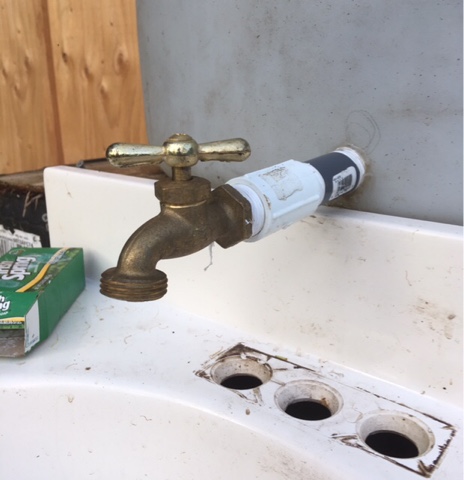
Putting a spigot onto the tank was easy...just picked up the parts at the hardware store and drilled a hole...install. So easy that even someone like me can do it. 


The spigot purposely isn't taking water directly off the bottom of the tank. Over time, debris and silt will build up on the bottom of the tank. So if the water outlet was there, it would have a problem of getting clogged. By mounting the spigot higher up, the clogging problem is avoided and the tank needs to be cleaned far less frequently. 

No pump is needed with this set up. The water gravity drains into the tank, and also gravity drains into the sink. Of course the pressure isn't high, but I'll just be rinsing off tools and my hands. Any dribble will do. 

The sink is just mounted on some wood scraps. Nothing fancy. It's enough to hold the sink in place for a few years before the wood needs replacing. The wood cost me zero $. For now the sink drains into a bucket, which I can empty onto the nearest fruit tree. Eventually I'll pick up a sump pump hose to direct the water directly to a tree so that I can eliminate that bucket. 

Finishing touches on this project will be to paint the shed, install some shelves and hooks for garden tools. Plus put a stocking over the end of the water pipe going into the tank. Why? To catch most of the debris so that it doesn't end up in the tank. See, there's still something I can use that old pantyhose for! I bought dozens of packs of pantyhose over with me when I moved here, not knowing that I'd never again wear it again in my lifetime. They come in handy for filtering rainwater. 

Sunday, October 15, 2017

Growing Jicama

Jicama, also called yam bean, grows well on my farm. Originally from Mexico, this plant likes the long, warm Hawaiian growing season. It's grown for its tubers...NOT the beans, which are poisonous. In fact, the tubers are the only edible part of the plant. It grows as a vine and does well when supported by a fence, trellis, or even a bush or young tree. 

Above, a fairly young vine growing on a fence. 

A close up of a leaf. 

The flowers are a beautiful shade of blue. Under good conditions, the vine gets quite covered in flowers. Very, very pretty. 


Following the flowers are long pods full of beans. The beans contain rotenone, thus I am careful not to grow this over one of my fish ponds nor allow my puppy and livestock near the stuff. 


My current vines are not old enough to harvest the tubers, but I'll show you that when the time comes. 

Saturday, October 14, 2017

Faces of Hope

Last Wednesday was another cat neutering clinic. As always, it affected me profoundly. As a result I've spent the past several days writing, rewriting, and repetitively rewriting this blog entry. None were suitable for publishing. Too much ranting, too emotional. And besides, most of my blog readers already seem to have respect for life. I don't need to preach to the choir. 

So I will just show the faces of hope...the cats who have been lucky enough to get a chance to live their lives with less stress. Wednesday we gave them hope for a life with less fear. Yes, these are a few of the lucky ones this week. 


Thursday, October 12, 2017

First Dairy Goats Arrive

Three new arrivals have joined our homestead farm, making the farm a bit more complete. 

Cali.......the mom. She's mostly Nigerian but not pure. Around here, purebred anything is the oddity, it appears. I'm not sure why people here prefer to mix their breeds of goats, cattle, horses, chickens, dogs....you name it, whatever. But they do. So Cali is mostly Nigerian, but something else was mixed in. She was bred to a mostly Nigerian buck, resulting in 2 kids........

Chipper......
It's a doeling. Cute, playful. Sweet. 

Francis......
A handsome little buckling. Smart and friendly. 

The kids are about 4 days old and doing fine. I plan to let them nurse off of mom during the day, boxing them at night so that I can milk Cali first thing in the morning. We shall see how well this works out. 

Being mostly Nigerian, Cali has small teats. She's a two finger milker, for sure. I've already been working with her and she allows me to milk her with very little problem. Nice goat, considering she's never done this before. I'm taking whatever amount of milk that I want for our breakfast table, then letting the kids rejoin mom. 

Tuesday, October 10, 2017

Why Nigerian Goats?

Why did I choose to go with Nigerians? Fair question. There are plenty of goat breeds that produce a heck of a lot more milk than Nigerians. So little Nigerians are a poor choice for milk production and feed conversation. But have you noticed that they have short legs? I consider that to be a major plus! 

Around here, I use standard 4' high field fencing. I tend to rotate the livestock through the pastures, so I want an economical fencing that will hold in all my livestock. Fencing sold here for sheep is too short for goats. And anything over 4' high gets pricy. So 4' is my best compromise. 

Now....4' isn't high enough to keep in a curious standard sized goat. While I see plenty of goats behind 4' fences, I also hear plenty of tales of owners chasing wayward goats......gardens and prized shrubs getting eaten....goats getting onto the highway and causing accidents. I've had my own incidents of my own goat, Bucky, hopping my fence and eating almost my entire garden by morning! 

Building a goat-only pasture system wasn't appealing. Having to go to the expense of 5' or 6' fencing plus all those extra long t-posts wasn't in my budget. And the thought of having to pound in 8' t-posts sounded way too painful. Remember, I'm doing most everything by human power, not farm machinery. 

Nigerians are also known for having sweet milk. Among my Alpines, while most had decent tasting milk, I often had to cull out those that had a strong goaty flavored milk. And even their best milk had that slight goaty undertone. I thought that off flavored milk was due to having a buck around or by letting them eat strong tasting foods, but that wasn't the case with my does. They all ate the exact same diet and sometimes I'd get a new doe with strong, objectionable milk. So there must be a genetic factor involved. Nigerians supposedly don't have this problem. We shall see. 

Nigerians have nice personalities. Every person I've talked with who has or had Nigerians say that they liked them. That's a plus. I can't say that for some breeds. Even my own Bucky, a Nubian wether, isn't all that pleasant to be around. Some Nubians can be a challenge to handle......and those make nice smoked meat, sausage, dog food.

So I'm on a quest to find a few nice goats that are all or mostly Nigerian. Around here, purebred anything is difficult to find, so I'm willing to consider goats that are high percentage Nigerian. As long as they have short legs and sweet milk! 

Monday, October 9, 2017

Harvesting Turmeric - Step 2

This year I'm growing quite a bit of turmeric. The roots that I got planted early are just getting ready for harvesting, while the later planted stuff is still green and needs a couple more weeks (I'm guessing). And talking with some other gardeners, I've learned that the turmeric growing in lower, warmer elevations is ready for harvesting well before the higher elevations. I'm about mid-way on the elevation, so some folks have been harvesting for a few weeks while others are still waiting. 

Once the plant is turning brown, I can start harvesting....if I'm impatient. Which I am! I'm out of turmeric and am eager for a resupply. But usually I can let the plant die back even more, as long as the weather isn't daily rain. Below, this plant isn't quite ready for harvesting, but what the heck. It's actually a plant I missed harvesting last year, so it matured ahead of the other plants around it. 


In fact, I missed harvesting a number of plants last year and the tops died completely back and disappeared. Last winter I accidentally found a number of them and was able to harvest the roots.  The hidden turmeric roots were perfectly fine. So I discovered that once the plants die back, the roots can be harvested for use at anytime up until they resprout. 

(Above, when I dug up that dry plant I found a large root ball.) 

I'm finding that the larger the piece that I plant, the larger the fan of roots that I can harvest. Of course that assumes fertile soil and adequate water. Example, this plant I just dug up.........

Wow, what a large clump!!!! As I said, it was a plant I missed harvesting last year. Pretty impressive how much I can get from a missed plant. 

Once I harvest the roots, I cure them by putting them in a dry, airy, shaded spot. Then I store some in the frig wrapped in a damp cloth (so that it's handy) for fresh use. Some sliced up and in the freezer for cooking (it gets soft but it's fine for cooking). Some I will dehydrate then powder (I use a coffee grinder). But the bulk gets stored in the ground where it will stay in good condition until I use it or it starts to sprout.