
Showing posts with label Yard Art. Show all posts
Showing posts with label Yard Art. Show all posts
Tuesday, September 3, 2019
Lantern Post -- Update
Finally the street number is up on the post. Looks pretty good, if I do say myself. I still want to cap the ends of the branches, but I haven't found what I'm looking for yet.


Tuesday, August 6, 2019
More Yard Art -- Lantern
I found this really cool decorative lantern-thingy at the dump thrift store. It just begged to go home with me, so of course I obliged. Now, what to do with it? Why not hang it down by the gate? Ah-ha, an opportunity for more yard art!

Now there are lots of different ways one could hang a lantern. But living by the philosophy of having this farm be somewhat self reliant, I looked around for a suitable post......tree, that is. And I found one that could be sacrificed and not more than a dozen feet from easy access. It had to be trimmed a bit more than I liked because of the weight (less tree = less weight). Afterall, David and I had to manhandle it into the truck bed, then from the truck to the hole. Surprisingly, this tree weighed a lot more than it looked.

Happily we were able to dig a hole down two feet before hitting solid rock. Using a bag of quikcrete and lava rocks, the pole got securely anchored outside the gate entrance. On one arm I hung the lantern-thingy. The other arm will eventually hold a plaque with the street number. I was going to hang the old sign that's been sitting on the rock wall, but David thought it needed something classier. So he's making a new sign for me.
One more step to go.....capping the ends of the branches. I plan to pick up some copper to make copper caps. If not copper, then lead. All depends upon what I can find in the stores.
Adding a vase and yellow flowers seemed like a nice touch. Yup, it's sort of like putting lipstick on a pig, but I like the look of this new lantern & post.


Monday, September 24, 2018
Yard Art Mini Pond Retired
Remember the mini pond I had made using a tree stump, placing it upside down and concreting a pond atop it? It has graced my front yard for quite a while now, serving as yard art and mosquito catcher (there were several guppies living in the pond). Well, it's finally reached the end of its life.

The base that was cemented into the ground finally rotted away. It could no longer hold the pond stable. It swayed this way and that. Time to remove it before it totally collapsed. Using an o'o bar, it was fairly simple to pop it out of the ground,
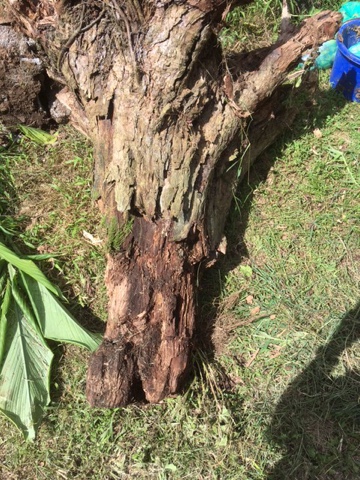
Using a sledgehammer and o'o bar, I removed the concrete.

I still wanted a little pond at this spot, so I recalled I had a plastic pond liner in the "farm graveyard", a spot where stuff gets saved for future use. Checking the little pond liner, it looked still good. Great! Instant pond!

Noodles helped me dig the hole and move some rocks around. Of course it wasn't where I really needed them, but he thinks he's a good team member on this farm.
With some well placed rocks and dirt, I leveled the pond in all directions. Next step : return the pond water, fish, and plants to the new pond (I saved everything in 5 gallon buckets)
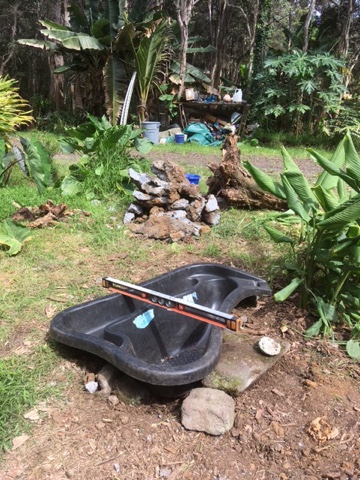
That's as far as I got today. Next I want to gather some rocks to go around the perimeter of the new pond. I'll show you that tomorrow or Wednesday, whichever I get to it.

Friday, September 7, 2018
Finishing touches
While repainting the white under the eaves, two things popped up. 1- One of the window frames was painted the same color as the background wall. 2- The door was missed.


1- Fixing the window trim issue was a quickie. There was still some yellow paint left, so it became to color for the trim.
Before ......
After.....
2- I can't believe that the door got overlooked. I guess I'm just use to seeing a white door, so my mind just blanked it out. But that was easily remedied too, though I am also out of yellow paint.
Before.....
After.....
With the white under the eaves refreshed, the entire exterior of the barn is newly painted. That should last a few years. But don't be surprised if I decide to jazz it up with a mural or some petroglyp stick figures. Then again, I could paint a few flowers around the base, since I really enjoy flowers. We'll see.
Sunday, September 2, 2018
The Barn
The barn, being a larger building than the little shed, looked boring when it was painted identically. So with some artistic license, the walls got mixed up. It think it turned out pretty good.


It's not quite done. I need to make a few minor changes.
One of the neighbor's commented the other day that she liked my idea. She's in the process of repainting her restaurant in town and said she plans to go the bit on the silly route, using bolder colors and mixing things up. Good for her! Life's too short to be drab and boring.
Saturday, September 1, 2018
Little Shed - Having Fun
For several weeks now I've been working on getting a couple of farm buildings painted. Finding a few dry hours has been difficult. But I'm getting there.

Here's the little shed that's been painted.
Yes, I'm having a bit of fun. Hubby came up with the idea, and we went from there. Each side is different. I'm working with three colors : yellow, red, black. So of the three sides, one is black with yellow trim, one is red with black trim, and one us yellow with red trim. The side with the door is just all mixed up.
I wasn't sure how this was going to turn out, but truthfully, I love it! Looking over my right shoulder, I gazed over at the barn. Now what if.......? Yes, let's do the barn!
I'll show you tomorrow how the barn is coming along.
Thursday, December 8, 2016
Flowers Boxes for the Screenhouse
Now that we have a square built screenhouse atop a pentagram shaped deck, we have a triangular "ship's prow" hanging over the edge of the pond below it. Rather than just letting it sit there doing nothing, I've decided have flower boxes and a piece of garden statuary jazz up the deck.

David used several discarded worn out stair treads to cobble together two wind resistant flower boxes for me. While degraded too much to be safely used a steps, the old 2x6's are surely sturdy enough for this task.

He set them up on the point of the prow. Not quite exactly where I plan to place them, but fine for now.

And in order to discourage rot from standing rainwater, he propped them up on thin strips of wood. It's just enough to allow air circulation between the boxes and the decking.
Give me a couple of weeks and I'll have some young flower plants ready to put into these boxes.
Tuesday, August 23, 2016
Yard Art Strikes Again
Sometimes a spot just begs for a sign, like the bifurcation in my driveway. Which way to turn? Left? Right? Guess it depends whether you want to go to Whoville or Far Far Away. Never-Neverland or Solla Sollew.

After looking at this spot for years, I just had to do it......put up a road sign.

The problem was that I thought of more fantasy land signs than I had room for on the sign post. No matter. Just put up another post where the driveway makes a 90° turn to the left, while the right hand path goes to the pastures. Ah-ha, another perfect spot.

Yard art - how fun!
Sunday, June 15, 2014
Yard Art - Recycle Style
Hawaii is full of artists. Even if art is not their life's focus, people here tend to explore art, sometimes in so really funky but cool ways. Yard art is one of them. And yard art using recycled materials tends to be pretty common.

A local orchid grower/coffee cafe spiffs up their place with "flowers" made from recycled plastic spoons. I think these are really neat and I wouldn't mind stealing their idea some day. She has quite a few hanging around....the benefit of running a coffee cafe,

But you don't need spoons to make yard art. How about a leftover log from cutting down a big eucalyptus tree. This is my own creation. The log was too big to move without heavy equipment, so I cut it up into smaller pieces. Tilt them up on end, arrange them along a shelf in the slope.....you got yard art! I plan to put interesting somethings atop each one. There wasn't enough truck pieces to make a Stonehenge replica, but it is fun anyway.

I'm gradually making art art around my homestead. It feels good to let the artist in me out to play, plus it makes the homestead more enjoyable.

Above is a rather large (2' diameter) ball of barbed wire. Yup, yard art! This land owner has numerous ones sitting around as part of various plantings of flowers and interesting foliage plants. The barbed wire came from some old fencing they were replacing. Careful.....this yard art bites!

Using an old wood pallet painted a bright color can also qualify as yard art. Gee, anybody can do this one. Nail some bamboo or tree sapling trunks to a 2x4 frame, and you have a nice visual display for potted plants.

Got some odds and ends in the garage? Cut them, bend them, spray paint them and create "flowers".
Yard art is good for the soul. When made from trash, it's easier to bring oneself to replace it on a regular basis, thus keeping the yard fresh and interesting. But if I had paid $50 for some yard doodad, I'd most likely keep the sucker sitting in the front yard for years.....long after I had lost interest in it.
I have a birthday coming up so I've been thinking about what silly thing I can do to celebrate it. Um. I think I'll create some new yard art. So keep an eye out for the next two weeks because I'll post pictures of some of my creations. Yes, time to let the artist in me out to play!!!
Monday, May 20, 2013
What to do With a Pulled Out Stump
"What do I do with a tree stump in my front yard?", I asked myself. While digging out the slope outside my front door in order to have a small, flat front yard we removed a large ohia tree. The stump came out easily enough after removing the slope, but now what? Without the use of a backhoe, skid steer, or equivalent we weren't going to be able to move the buggah. Oh, did I mention that we removed the slope by hand? No heavy equipment. Just two people, shovels, and o-o bars. Plus determination and a lot of luck that we didn't hit solid lava.
The initial idea was to leave it in place until we could borrow the equipment or con some neighbor into moving it for us. The weeks dragged on. One day while studying the stump, I tried to come up with an idea of how to get it out of the way. Dragging it down the driveway with the truck would ruin the driveway. It took too long to get the driveway in good condition to have it ruined in one hour. So what else? The roots had grown around lava chunks, so using a chainsaw was out. Burning it up in a fire was out. No open fires allowed due to drought. Digging a hole to bury it wasn't even a thought because digging that big of a hole around here is impossible by hand. Too much lava rock and going that deep meant we would most likely hit blue rock (solid, very hard lava).
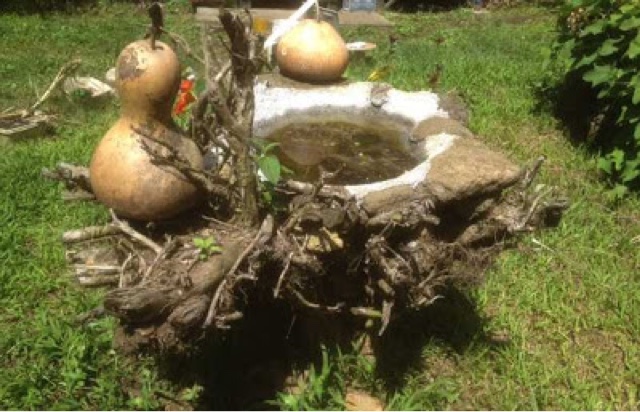
My whimsical heart took over. Ya know, if I propped it up upside down, I could sit a birdbath on it. So with the help of two strong fellas, a base hole was dug and they rolled and wrangled the stump in place, then tipped it up with the trunk skidding into the base hole. A little concrete and rock set it solidly in place. Excess roots were trimmed. Rocks were removed where possible. The stump was left with a concave bowl -- a natural birdbath shape. A little concrete finished off the bowl. When I added water, it proved to be watertight. Wow!
The stump is now yard art. I planted a couple of flowers on it. Added two guppies and some plants making it a mini-pond. Now it helps control mosquitos.
 |
| Tree stump in place. I just planted a couple of flowers and added some gourds temporarily for decoration. |
My whimsical heart took over. Ya know, if I propped it up upside down, I could sit a birdbath on it. So with the help of two strong fellas, a base hole was dug and they rolled and wrangled the stump in place, then tipped it up with the trunk skidding into the base hole. A little concrete and rock set it solidly in place. Excess roots were trimmed. Rocks were removed where possible. The stump was left with a concave bowl -- a natural birdbath shape. A little concrete finished off the bowl. When I added water, it proved to be watertight. Wow!
 |
| Looking down on the little mini-pond, the home of two very fat guppies. |
The stump is now yard art. I planted a couple of flowers on it. Added two guppies and some plants making it a mini-pond. Now it helps control mosquitos.
Subscribe to:
Posts (Atom)