Showing posts with label Pests. Show all posts

Tuesday, November 12, 2019

Hammerhead Worms

Although I don't see very many, I do have hammerhead worms on this farm. This is a flatworm, or also called a planaria. They are a predatory critter that feasts upon earthworms. Yikes!!! Ok, ok, ok. Settle myself down. That's just how Mother Nature works. I just need to keep their numbers down so that they don't wipe out my healthy worm population. 

There are lots of different kinds of hammerhead worms, but I've only seen one type on my farm. It's a long, striped, somewhat gooey looking slimy thing with a blunt-ish head, not the striking hammerhead of other varieties. It's not robust like an earthworm, but instead it's rather fragile, easily broken apart into pieces. But that's not good. No, not at all. Because it's a planaria. And planaria can reproduce from those broken pieces, creating lots of new individuals. So simply chopping them up is making things worse, not better. 

To get rid of these planaria, I need to kill them. So far I've used a bit of salt to do that. Just like with slugs, I can sprinkle them with salt to destroy them. 

I don't actively go hunting these planaria, but sometimes I come upon them. It's always in a moist, dark spot, such as between two wet boards laying on the ground. Or deep inside a pile of wood debris. Or in the case of the photo, between two sheets of old roofing laying in the shade and that had been rained on, so that it was wet. 


So far I'm only finding these worms a few times a year. Their population hasn't been increasing.....so far, so good. 

Thursday, June 13, 2019

New Pest on the Beans

Went out to pick green beans today and discovered some damage. Taking a closer look I came upon these......


Looking even closer, I saw damage on several plants. Geeez, yet another pest to battle. 

What is it?  When I squished them they smelled distinctly of stink bugs. Ok then, I've got a black stink bug of some sort. A couple of years ago these pests were about 5 miles away down the road. So they've finally travelled those 5 miles and have ended up at my place. Drats. 

The first thing I did was locate every black little stink bug and squish them. While that won't really solve my problem, it at least made me feel like I was doing something. For today, there are no stink bugs on the beans. 

Next, I'll need to find something effective against them. There's the old stand by, soap solution. Or soap & vinegar solution. I also have diatomaceous earth and neem on hand. I'll check to see if I can control them by simply knocking them off, or vacuuming them up. I'll try making a bug juice spray, though that means collecting a bunch of stink bugs. So I'll be doing a bit of experimenting to see how to control these pests. 

Will I resort to chemicals? If need be. There are a few organic approved options that I would try first. But if things get serious, then I'd most likely just shift my growing practice and grow beans with a protective row cover over them. Since beans are self pollinating, I would have no fear excluding the bees. I'd still get beans. And crop rotation is another option. Simply move the bean beds around, trying to stay one step ahead of the bugs. 

Thursday, June 28, 2018

Sweet Potato Whitefly

I'm always amazed that every year some new pest or disease finds my farm. So I'm constantly learning new things about how to grow food here in the tropics. Today while going back to harvest from a remote sweet potato patch, I immediately noticed something was wrong. First of all, the patch didn't look lush and happy. The growing tips were small, curled, and bunched. Below is a sample of what the tips looked like.....,,


Normally the growing tips have smooth, flat leaves fanning out, like the variety showed below......


On closer inspection, when I touched the vines, a plethora of small whitish flies jumped or flew this way and that. There were dozens of them flying from one vine tip. So I flipped some leaves over for a closer look. The bottoms were covered in small, light colored insects of varying size. Below, I've circles in yellow some of them for you to see. 
One flying adult happened to land on an adjacent potato patch and I managed to take a photo of it (circled below).........

Back at the house, I pulled up the Internet for a search. Conclusion : sweet potato whitefly. 

Control of this pest didn't sound optimistic. But then, I'm not a big user of chemical pesticides, so I immediately planned to fall back to my usual solution --- remove and destroy the infested plants. Then don't replant a susceptible crop in that area for a while. 

My plan was to harvest this patch anyway, but I did so very carefully so as to not spread the problem to other areas of the farm. None of the plant material went to the compost bins. Instead it went to the dump in order not to perpetuate the problem on the farm. It was carefully bagged, the bags sealed, and placed into the bed of the pickup truck for disposal. I next dumped several bags of fresh compost over the growing bed and immediately tilled it in. I'll then plant a non-suspectible crop. Don't know yet what I'll plant, but I want to get something growing that the whitefly doesn't like so as to starve out any survivors. Oh by the way, I was also careful not to spread the bugs back to other sections of the farm by immediately changing my clothes and showering. While the wind could easily be the culprit for introducing this pest to the farm, there's no need for me to help spread it around by being sloppy.

I also harvested every sweet potato that I found while removing the infested vines, or when rototillering. These went into a bucket, then taken to the chicken cookstove for making into mom's famous slop & glop. Boiling water was used to rinse out the bucket to kill any possible white fly eggs that tagged along. At least the chickens and piglets will benefit from this crop failure.   


Thursday, May 10, 2018

Sphinx Moth Caterpillar

Found this beautiful fella in a sweet potato patch. 


It's quite a handsome one. And big. What did I do about it? Nothing. I left it alone to do its thing. Yes, these guys do eat some of the sweet potato leaves, but the damage isn't great enough to affect the sweet potato vines. I have plenty of sweets, enough to share. I don't believe in killing every living thing that I find in my gardens. As long as we can get along, they can live their lives. My farm supports more than just people.

Tuesday, March 13, 2018

Managing House "Bugs"

"J" recently asked me, "I saw your post a while back about insects. Have you found any permanent solution for managing them, especially centipedes?" I've covered most of this info before, so I'll just update it and post it in one spot. 

What's your definition of a permanent solution for managing them? Do you mean 100% permanent eradication? That pretty much won't happen in the tropics because we don't have winter freezes. And besides,  insects can easily travel from the neighbors properties to your own year around. Since I'm not willing to soak my property with insecticides, I will see insect populations increase at times. Depending upon the insect, I may or may not take action. Why no action? Because I host several natural insect eaters on the farm. In order to keep those around, they need to eat year around. Skinks. Anoles. Chameleons. Tree frogs. Mice. Assorted birds. They all help keep things in balance. 

There are some insects I have little tolerance for having around....
...vinegar flies. I have no objection to them outdoors, but I don't want them in the kitchen. Foremost for control is not to have any unprotected fresh food sitting around, especially fruits. Things get stored in the frig or outside. Outside they need to be protected from rodents and birds. That is all sound advice, but I don't always listen to myself.....thus the reason for the saying "do as I say, not as I do" evolved. Therefore I keep a fly strip in the kitchen near the counter where I tend to sit fruits. I've used other sorts of traps and controls, but for me the old fashion flypaper works best. 
...flies. We have very little problem with flies around the house. Outdoors I keep fly traps, especially in the pasture areas. This helps protect the sheep against flystrike. I have traps by the dog kennel, plus I pick up dog poop as soon as I notice it. This poop is buried to prevent any lain eggs from developing into more flies. The house is protected with screens, letting very few flies into the house. The occasional fly usually gets captured by the flypaper in the kitchen.  
...mosquitoes. I have dozens of mini ponds that are stocked with small fish to eat mosquito larvae. And I use bt ( mosquito dunks or granules) in the rain gutter system where I can't flush out the larvae. That also treats the catchment tank, which I keep covered but is not 100% mosquito proof. 
...ants. They are fine outdoors, though I discourage high populations of them in the garden areas. But I don't want them indoors. Whenever I see them,  I use a boric acid solution to kill them. They drink it up and take it back to their nests, killing the ants. 
...cockroaches. Living in the tropics cockroaches are a given. I use boric acid powder under the frig, freezer, and range. Plus when we closed up the house walls, we sprinkled boric acid powder between the upright 2x4s. I also have a bit of boric acid powder inside the electric receptacle boxes in the kitchen by the range and sink, two very enticing spots for roaches. So far this is controlling most of the cockroaches that get into the house. Occasionally I'll spy one in the bathroom, whereupon I'll dust some boric acid powder into crevices behind the sink and around the toilet. 
...centipedes. Happily I don't have lots of centipedes on the farm. Since we've lived here I've only come across 2 adult red ones and perhaps 6 adult blue ones. All were killed immediately. I think the red ones arrived on equipment. I don't know how the blue ones arrived. All the blue ones were found in the same area -- under items stored in an outdoor storage shed. I set up traps (nice hiding places for them) after finding the first two when I moved some lumber. The traps lured four more. Since those initial ones, I haven't seen any others but I check occasionally. 

Centipedes.......some people will routinely apply a perimeter spray around their homes. I really don't know if this makes any difference, but I don't plan to ever use it. I tend to avoid applying toxins around my house. Some people will apply the pesticide just to their doorways in hopes of deterring centipedes from entering into the house. Some other tricks include...
...(especially during dry spells) leaving a rag soaked in boric acid solution just beside the doorway. This is to entice the thirsty centipede to drink it. Since centipedes are often found in the bathroom, they seem to be attracted to moisture. Pet owners teach their pets to leave the rag alone. 
...keeping bed linens, sofa & chair material up off the floors. Centipedes will climb right up into bed if the bed has a dust ruffle close to ground level.
...storing shoes up off the floor. No fun finding a centipede when you slip you feet into your shoes. My mother had scorpions and centipedes where she lived and would find them in her shoes occasionally. So she took to hanging her shoes on a hook up off the floor. 
...keep dirty laundry and used bath towels off the floor. Centipedes will nestle inside, attracted to the moisture and darkness. 
...keeping a rubber mallet handy to whack the centipede to death. A long handled pancake turner works well too to chop them in half. 
..having a centipede finding dog. My friend had a dog that was a super great centipede hunter, alerting them to any centipede in the house. Just a couple of weeks ago my own dog, Noodles, alerted me to a centipede while I was visiting a friend. He found it in a doorway and was highly interested. I praised his actions and hope he does it again. I'd love to have him alert us to centipedes! Perhaps the next time I'll be prepared to capture the centipede to use it as a training tool for Noodles. 
 
While living with centipedes may sound scary, it's not a big deal. Really. Even in areas where they are common, you don't see them very often. Usually you will come across one if you are out working in your gardens moving rocks. Just don't touch it, for they will quickly bite. If bitten, a quick application of ammonia followed by ice (hold an ice cube to the bite for 10-15 minutes) will take care of most of the discomfort. I have been bitten twice now, on the finger, while working on clearing land down on my seed farm. (I now wear gloves while working there.) I keep an "afterbite" stick in my truck for such occasions. That, plus an ice cube from my cooler (I bring something cold to drink while I'm working there), takes care of the bite. 

Friday, October 6, 2017

Flea Beetles Again

Flea beetle attack! They're back! So I looked up on this blog to see when and where I had flea beetle problems in the past. Turns out it was March 2015 in the exact same area. 

(While these bean plants are mature and aging anyway, the flea beetles caused severe damage to the leaves.) 

Back in 2015 I tried all sorts of things to rid the bed of flea beetles. Frankly, without resorting the big chemical attack or flamethrower, nothing quite worked. The best was the safer soap with pyrethins, but I learned that one needs to start spraying the moment the first flea beetle is seen. Otherwise they've laid eggs and it too late to eliminate them without daily spraying. I'd skip a few days and check....scads of beetles again. In the end I ripped out everything that the little bugs would eat and planted a resistant crop for 9 months. That seemed to get rid of them. But they're back again. Happily I was able to harvest several crops of beans, peas, and potatoes in this spot before the beetles returned. 

(A close up of the damage. The leaves bleach out. A few beetles are on the tops of the leaves but the vast majority are on the undersides.) 

Plan of attack : 
Remove all susceptible plants from the area. 
Till in generous amounts of compost and manure. 
Plant a crop that flea beetles won't attack. 
Wait 6 to 9 months before planting beans, peas, or potatoes again. 

I notice that this type of flea beetle also likes sweet potatoes. So I'll need to watch my sweets in the adjacent growing areas for beetles. 

Above, all those little black spots on the bottom of the leaf are flea beetles. 

Thursday, August 31, 2017

New Caterpillar

Haven't seen this one here before. It may not be rare. It's just that I haven't come across one before. 


I've worked to develop the habit of noticing creeper/crawlies. Since I don't spray my gardens with pesticides, I need to be more observant. Non-chemical control of pests works best when started immediately, not days or weeks after the new pests arrive. 

Is this one a pest? I don't know yet. But I'll let him be for now. 

Wednesday, March 1, 2017

Roaches

Living in the tropics, bugs are a fact of life. Anyone who is bug-phobic shouldn't live here, that's for sure. While I have friends who battle ants, centipedes, and mosquitoes, my main insect pest is the cockroach. We noticed them as soon as we moved to Hawaii. And who wouldn't........those guys are as big as rats! Well, that's an exaggeration, but they are the biggest cockroaches that I've even seen. Real nightmare sized. 

We knew right off that we'd have to do something to control these buggahs. Outdoors, the cats, lizards, and chickens keep their numbers under control. Indoors, my top gun is boric acid powder. When we built the house, we put boric acid powder behind all the walls before we closed them in. In my kitchen, I've dusted it under the frig, freezer, and range. So far, this seems to be working. I see the occasional adult roach in the house, but that's because one of the cats has brought it inside for fun & games. The cats see the living room as a giant arena for playing with roaches. Geez. 

I don't know if it helps, but our house is built up on piers. So it's above the ground. Perhaps it's less easy for the roaches to climb into the house, as compared to being at ground level on a concrete slab. 

But ya know what my main problem is? My truck....it's got roaches. Actually, it's infested! Yup. I transport livestock feed in the truck all the time, thus its & bits spill out from time to time. It makes my truck a roach buffet. I suppose I could be more careful. Or vacuum the truck out daily. But facing facts, that's not happening. So sigh....the truck's got roaches. 

In the past I've put roach traps in the truck. Caught some, but they never really made a dent in the population. Go out at 8 pm and open the truck door and......egads women, the truck is crawling!!! While I'm really adverse to using insecticide bombs, I'd occasionally set one off in order to eliminate the roaches for awhile. As I said, the traps never helped. 

A friend gave me a trap to other day. Oh sure, I thought. I didn't expect much. I was wrong. On the first night it caught scads! Nice job. 

See, I told you the truck was infested. I've had the trap there for one week and it's totally covered (the above photo was from day #1, not day #7.) So I bought a pack at the hardware store and set out a fresh one. 


It caught a few, so I guess the majority of roaches are pau. I'm quite happy with the results. I just went out and checked my truck tonight and not a roach in sight. Wow. I'm impressed. 


Monday, May 9, 2016

Blasting Garden Pests

A while ago a friend sent me a news article about using water to spray bugs off of plants. Since then, I've read a few more news articles relating to this topic. Two of them I thought had bits of interest applicable to my homestead. 
1- In low tech areas, workers will daily walk through a field using a stick or wisp to knock/chase pests from the plants. Sometimes a flock of chickens, ducks, or geese are herded through a field to eat insects and weeds, keeping them moving to avoid them damaging the crop. 
2- In home garden situations, the gardener will wisp the plants twice a day to remove insects. 
3- Gardeners can use a powerful spray from a hose to remove aphids and other pests from plants. (I've done this myself to remove aphids, mealybug, and ants from my mother's hibiscus plants.) 
4- Commercial organic farmers are mounting sprayers on their equipment so that crops can be sprayed to remove pests while their equipment passes through a field doing some other task, such as cultivating. 
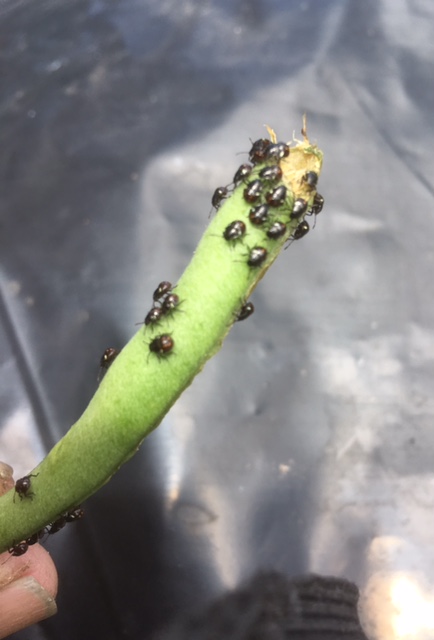
(Above, a critter in going to enjoy blasting! Grasshoppers! The only problem is that they will hop back, of course. But it will still feel so good blasting them. )

I got to thinking how I could use the idea of pest removal via a jet of water in my own situation. Problems :
...I don't have high water pressure via my water hoses. Besides, I normally need to conserve water since I'm not hooked in to municipal water. 
...big commercial sprayers with their big tanks and pumps are expensive, plus require a hydraulic PTO to operate the pump. 
I'm trying to stay low tech, so I started thinking about other solutions. 

First of all, simply wisping my plants twice a day is really low tech. That's appealing. While it wouldn't work for quite a few of the pests in my area, it might help with some. So I'm trying to get into the habit of wisping plants as I walk by them for other reasons. Just a gently wisping to dislodge stinkbugs, grasshoppers, and such. I notice that just running my hand over the bean plants causes some stinkbugs to drop to the ground. So that's a definite plus. The less time they are on the plants, the less time they are feeding, finding mates, causing damage. Plus I squish any that I see drop to the ground. Ah ha, less bugs! 

Second....and this is what I'm experimenting with right now.....finding a way to water blast the bugs off. Since my pathetic hose pressure isn't up to the task, plus the problem that most of my garden areas are not within the reach of a hose, I need another solution. Some sort of sprayer, for sure. 

Some of the issues to consider with a sprayer. 
...Most handheld sprayers don't hold much water. So it would need to be big enough to do an entire bed without having to reload. 
...Hand spritzed ones fatigue my hands really quickly. Therefore I'd want one that could be pumped up for pressure. 
...My gardens are mostly not near an electricity source. A sprayer needing electricity is out. 
...Large sprayers requiring a motorized pump would need to be mounted on a trailer/cart that my ATV could pull. While this is an option, it's not one I'm ready to take yet. Plus many of my garden beds are not ATV accessible. 
...Some sprayers cannot have the spray adjusted to a sharp stream. Thus the nozzle needs to be adjustable. 
...Water is heavy! About 8 lbs per gallon. So weight will be a consideration. Do I plan to hand hold the sprayer? Or tote it with me? Or mount it on wheels? Or use a cart? Things to decide upon. 

I have several small pump-up sprayers already in the farm. The first one I tried is this little, simple one.

 It only holds a quart and a half of water, so it will only be useful where I am close to water for refilling. Adjusting the nozzle to stream and pumping it up to a good pressure, I gave it a try. Yup, it blasted the aphids right off the plants. I didn't have any other pests in the garden I was at to test it on, but it seemed strong enough to blast anything away. One other note -- this sprayer is cheap and easy to use. I could afford several and place them at strategic locations, thus always having one ready and on hand when I needed it. That's an asset. 

I next tried larger sprayes that hold more water.  I found the one gallon sprayer in the barn. Gee, when did I buy that? I haven't a clue! But it is light enough to easily carry. I also have a 2 gallon sprayer. It's a bit heavier when full, but still easy enough to tote around. I tried both, and they did a good job, were easy enough to use, and had enough water to spray several garden beds. 

I also have a well used Solo backpack sprayer. It holds two gallons, but being a backpack unit, it's easier to haul around. Being able to walk around plants and jump from aisle to aisle is better than dragging a two gallon sprayer behind me. So this backpack sprayer suits me pretty well. Perhaps this may become my favorite sprayer. Time will tell. 

Larger sprayers, which I don't currently own, are an option. But the negatives would be expense to but them & difficulty hauling them around. I have to ask, do I really need to haul that large a volume of water? I don't think so. 

So for right now I'm going to stick with these little pump sprayers and the backpack sprayer. I plan to start using them regularly and see what comes of it. Will they really make a difference with the bug control? Will I tend to use one type sprayer more so than another? Give me a couple of weeks to toy with them and I'll report back. 

Sunday, March 6, 2016

Aphids on Onions

The garden's latest pest-du-jour actively competing for my moans & groans along with the cutworm is the black aphid attacking my onions. They've been at the garden for about two months now, going from one chive bed, then to the leeks, and next to the onions, then back again. 

(Not a great or well focused photo, but it shows how thick the black aphids are.)

At first I only saw an aphid here and there. I made a big mistake by not aggressively killing them when I first saw them. Within a couple of weeks there where massive armies of black aphids covering the plants. I find hundreds of them on one plant lined up all along the leaves. Bad news. Real bad news. 

Since this is the first time I've had to deal with these, I really wasn't sure what would work. So I brought out the safer soap spray to see if that would work. Pumping up the sprayer with a lot of pressure, the spray actually blew most of the aphids right off the plants. What still clung to the plants were dead by the next morning. But over the next few days, fresh aphids arrived. Because I had neglected to kill off the aphids when they first showed up, I had newly hatching aphids to deal with. Multiple generations of aphids.

By now I've been fighting these aphids for a couple weeks and their numbers are down to just a few new ones each day. But I'm learning......don't stop now. I will continue to check the onions, leeks, and chives every day for the coming month, and spot spray any aphids I find.

I'm happy that soap spray is successful against these aphids. Although I started out using safer soap during the worst of the outbreak, regular ol' soapy solution is successfully taking care of them now. A simple, easy, and cheap solution.....just time consuming. 

Saturday, March 5, 2016

Cutworm Attack Once Again

It's been a while since cutworms were a problem for me, but after a wet season last year that resulted in rampant grass growth, the cutworms are back. For some reason, I see lots of cutworms where grasses have invaded the garden beds.

Recently the community garden volunteers transplanted several dozen little broccoli plants into the garden, only to have 2/3 of them destroyed by cutworms. That rate of damage isn't acceptable, so war needed to be declared upon the cutworms. I'm not one to throw lots of toxic chemicals into the food gardens, so I opt for making cutworm protective collars. Their easy to make and are quite effective. 


Last time I posted about cutworms, people asked, "How do you make them?" So here's how......
I take cheap plastic drinking cups (in this case they were free because I got them from a person throwing them away). I use a sharp utility knife to slice off the bottoms. I discovered that this was easier to do if I had cups stacked inside each other because an individual cup will tend to flex and crack. 


If the blade is sharp, the bottom slices off quite nicely. 


I'll slip this bottomless cup over a seedling, twisting the cup about an inch or more into the soil. The majority of the cup is above the surface, creating a barrier that the cutworms cannot scale. Surprisingly, mice too don't bother to look over the cup most of the time, thus saving the tasty seedlings from being devoured by them. 


The garden might look a tad strange with its rows of cups, but the method is fairly effective. Once the seedlings are larger, the cups can be removed as long as I do it before they are too large to gently pull the cup off. If I miss the opportunity, then I could leave the cups in place or else cut them off. The cups are thus sacrificed and go into the trash. Normally I retrieve the cups in time and can get 2-4 uses out of them before they crack due to sun damage. 


Thursday, November 12, 2015

Coffee Bean Borer

There are a couple of pests that attack coffee, with the new kid on the block being the coffee bean borer. It's an incredibly tiny, itsy-bitsy black beetle that totally ruins the coffee bean that it bores into. Bad news. 

Up until last year I was not aware of any borer problems with my trees. But last year's harvest was affected and I suddenly became keenly aware of this pest. 

I don't have any photos to show you of the little beetle itself because I aggressively go after any infested immature cherries. Plus I diligently keep any dropped cherry picked up. Picked cherry is rigorously screened for borer and any infested cherries are totally destroyed. Thus I don't happen to have adult beetles walking around. I do indeed have traps for the female beetles, but currently they're aren't any in them to show you. If you're curious you'll just have to look it up on google. 

But I can show you infested green cherries. I went out searching for them today. Green immature cherries get bored into when they are the size of a jelly bean. The hole is always on the blossom scar end, sometimes dead center in the scar, sometimes slightly off to the side. Like the beetle itself, the hole is real tiny. 

Any cherry that I find with a hole is picked and destroyed so that no beetles can escape. If I cut through one of these green cherries, this is what it looks like inside. Either half, or the entire cherry is black and in the process of being destroyed. In the photo below, those three green cherries all have tiny holes visible. If I cut them open, they would be black inside too. 

Right now I'm checking my trees every two weeks. That seems to be enough. I'm not finding much damage. But I know that I'll never be able to eliminate the coffee bean borer from my farm. Why? One of my near neighbors has hundreds of feral, unattended coffee trees and has no interest in treating them for the borers. Plus she doesn't want anyone else to be messing on her property. Sigh. So I'm stuck with dealing with the borer. The best I can do is to prevent more beetles from propagating and trap as many females as I can before they find my trees. In the future, should the damage I am seeing becomes significant, then I plan to invest in fungi treatment to kill the remake beetles. Right now I am losing too little coffee to justify the expense and time to do this more aggressive treatment. Let's hope it stays that way for awhile. 

Here's a green cherry still on the tree with a beetle hole. 

This is what I want to see, heathy green cherries. No holes. 


Monday, September 28, 2015

Cane Toadlets

With all the rain we've been having here, there has been a sudden population explosion of cane toads. We have been finding adult toads in the farm ponds and as quick as we remove them, others appear a few days later. I didn't realize just how many adult cane toads were in this area. 

If it weren't that we have patrolling farm dogs, I would let the cane toads have free run on our acres. They are great at eating various garden beetles, and perhaps more. But a curious dog can easily be killed if they grab or bite one of those toads. I witnessed my neighbor's dog dying after having harassed a cane toad (it must have grabbed or bitten it though we didn't witness that event, but we did see her snooping around the toad). It was horrible to watch and nothing could be done to save the small dog. 

Even with our diligence of eliminating adult toads, we have been finding tadpoles in the main pond. The koi fish apparently have been eating a lot of them, but far too many have been surviving and avoiding the fish. Or perhaps the fish have eaten their daily fill and there have simply been too many tadpoles. I attempt to net any tadpole that comes near the pond edges, but that has left too many the have been developing into toadlets. 

Now what? Toadlets escaping the pond! 


Ducks and chickens to the rescue. I've been encouraging the birds to forage over by the pond. The ducks have been nosing down in the weeds a lot recently but I'm not sure if they are actually eating toadlets. So I devised a scheme to bring the chickens to the pond. 


I enticed the hens to follow me to the pond area, but they started to get nervous and head back to their pen. So next I laid a thin trail of cracked corn over to the pond. Greedy hens followed the trail. I felt like I was some sort of pied piper! 

Next I needed to get the birds to cross the pond bridge and discover the toadlets. Again, cracked corn did the trick. 

Little piles of cracked corn led the hens across the bridge. As soon as one hen discovered the toadlets on the far side, it became a free for all. Everybody started scratching about, stirring up toadlets and gobbling them down. 

Using the chickens as biological toad control sits well with me. No poisons. Free protein for the chickens. As long as I encourage the hens over to the pond once a day, they seem to be eliminating all the developing toadlets. 


Sunday, September 20, 2015

Chinese Rose Beetle

I recently had the "pleasure" of being visited by some Chinese rose beetles. Well not me personally since I'm neither green enough nor sit still long enough, but my poor apple trees. One week I happened to give the young apple saplings a glance and was dismayed to see their foliage peppered with holes. With not any leaves extra to spare, I felt that I had to do something ASAP to rectify the situation. 

Plan of attack :

...Go out one hour after sunset armed with a flashlight. Inspect each leaf, especially the bottom, for Chinese rose beetles. Pick off each one and squish it. (For the squeamish, the beetle could be drooped into a jar of soapy water.) 
...After eliminating beetles for three nights and still seeing no reduction in their numbers, mix up a spray bottle of Sevin. Spray tops and bottoms of all leaves. Make a tripod to hold an umbrella over each sapling so that the rain does not wash the Sevin off. 
...Three days later, with the beetle population still high, bring out the big guns....Bayers insecticide, the controversial imidacloprid. Spray the bottoms of all leaves. 


Once the beetles were pretty much gone, I backed off to spraying the undersides of the leaves once a week with Sevin. Within a couple weeks new leaves were emerging. Success! 


Most likely I could have stuck with just the Sevin and done ok. I seldom resort to Bayers insecticide.....but frankly I don't apologize for using it at times. In my entire lifetime I will be using less total than one commercial farmer uses in just five minutes. Plus I do not spray it near flowers that attract bees. So if you have a bee in your bonnet about pesticide use go talk to Green Giant, DelMonte, ConAgra, etc. 

Now that I know that apples are a preferred target of the Chinese rose beetle, I plan to do something more benign to control them. I've been told that they are repelled by bright light. That really won't help me for two reasons.....one, the apples are located a good distance from my home and thus the electrical source, and two, being on a small solar system I am not willing to run light bulbs all night long. Running a generator beside the apple trees is not acceptable to either me nor my neighbors. Besides, it's been raining here every night so any electrical set up would have to be sheltered from the wet, be it wiring, generator, battery, etc. So this option is out. 

Next, these beetles are attracted to low light, such as one of those solar lights people stick along their driveways or walking paths. Thus I could fashion a trap where the beetles are attracted to the light, hit it and are knocked into a bowl of soapy water below the light. This is one idea I plan to pursue. 

Next, I could get in the habit of checking for and killing any beetles I see on the apple leaves right after dusk. That way I could nip the problem in the bud before the beetles get well established. And if needed, could spray an insecticide if the soap bowl doesn't work well enough. 

I will be monitoring my Chinese rose beetle problem and keep you informed how things develop. 

Tuesday, September 8, 2015

Turkeys

Feral turkeys. Not truely wild ones in Hawaii, but feral. They came from domestic stock, not wild populations. How'd they get to an island in the middle of the pacific? Well...a long, long time ago in a land far, far away......stop. Wrong beginning. Reboot...........

Many years ago domestic turkeys were imported for releasing here. Reason....to provide a food source for locals and as a game bird for hunting businesses. Importation occurred numerous times, starting in the late 1800's, with the most recent large release being in the 1940's (I'm told, but  I wasn't around then) Additional intentional releases took place up until 1960's.  Rio Grandes are the predominate type currently thriving. Those that set up life on Big Island were highly successful. But there were several other turkey breeds introduced over the decades. I would guess the various strains interbred, but what is now running around my area of the islands is of the Rio Grande ilk. They all have the buffy-tan band on their tail feathers, a decidedly Rio Grande trait. 


Regardless of which breed or strain of turkey I have running around here, they are a pain in the neck for gardeners. And while I admire their slug eating capabilities, I wish that they'd leave the veggies alone. Come on guys, why are onion leaves so appealing? And carrot tops? Geez. Did you know that a turkey can peck out each individual pea from a pod whole leaving the pod intact on the plant? When turkeys invade a garden, I don't get even one pea, not one! 

But there's a  plus side to turkeys......good eating. Yes, older birds are tough and stringy. They need to be used to make stock, or else ground up and pressure cooked. But get them young and they can be just as tasty and tender as store bought, but much more flavorful. 

Right now I have five turkeys wanting to set up house keeping in the main garden areas. Two momma hens and three youngsters. 

This morning the group greeted me as I stepped out my front door. Geez Louise, they are begging for grain right along with the young chickens! The word is out that there's a free buffet up at the house. 

Sunday, August 23, 2015

Fly Control in the House

These past couple of weeks the house has become the residence to a large number of flies and vinegar flies. Not my idea of nice house cohabitants. Because I didn't have the time to go fly stalking, I hit upon the thought of the old fashioned flypaper. To tell you the truth, I didn't even know if it was for sale around here. So I dropped into my town's hardware store and asked. Surprise! Not only is the stuff still manufactured, but the store had a pack of them. I instantly snarfed it up even though it wasn't senior discount day. And don't tell them, but I would have been willing to pay twice the price because those flies were driving me batty. 


I was one focused mad woman when I arrived back home. Ignoring a lamb hollering for a bottle, the kittens begging to be fed, and two donkeys braying for attention, I carried my treasure directly to the livingroom. Grabbing the step stool out of the kitchen, I aimed to hang my first fly strip. Oooo, I forgot just how careful one needs to be around this sticky stuff. But with a thumb and finger now as sticky as the paper, I did manage to get one flypaper hanging from the beam in the center of the room. 

2 minutes later I got my first fly! Deep satisfaction. Shamelessly I was reveling in murder. But pity soon overcame me and I killed the hapless fly. 

So how well does flypaper work? Pretty good. Just overnight it caught all the flies and hundreds of vinegar flies. 

Way back when I was a youngster, flypaper plus a handheld flyswatter were the common armaments one used to combat flies around the house. But somewhere along the line as time went by, they were cast aside. Toxic chemicals became preferred. Sprays, aerosol misters, and fume emitting bug strips took their place. And now here I sit, totally thrilled about the effectiveness of old fashioned flypaper. So here's my choices:
1- invisible toxic bug killers & repellents, or 
2- non-toxic, effective flypaper hanging in the room plus an equally effective flyswatter that fails the "Better Homes and Garden" esthetic test. 

I'm choosing #2. 

As far as my homestead project is concerned, #2 is far more sustainable, self reliant, and frugal. And of course less toxic and damaging. 

By the way, I'm dumping out the vinegar jar in the kitchen and replacing it with a piece of flypaper. I want to see if it is more effective. 

Saturday, June 27, 2015

Vinegar Fly Trap

Vinegar flies are what I use to know as fruit flies back in NJ. But here in Hawaii, fruit flies mean something totally different. So those little annoying gnat-like flies one finds buzzing foods in the kitchen are called vinegar flies in Hawaii. 

Vinegar flies show up if I leave food sitting in the kitchen, especially fruit. First I'll see one or two. Not a big deal. But before long there are dozens. Now it's annoying! Totally eliminating vinegar flies in this environment is impossible because of year around rotting fruits out in the woods and people's yards. So my goal has always been just to control the ones who end up in my kitchen. And by the way, there are many critters out there that rely upon vinegar flies as a food source. Thus eliminating vinegar flies would cause a shift in the ecology, one that might be detrimental. Therefore vinegar flies can exist in my book, just not in my kitchen. 

The easiest and simplest way I've found to control them is to make a jar trap. This is only one type of homemade trap. There are many variations. But I found that this one works well for me, plus the cats and dogs have no interest in the jar. And I don't notice any unpleasant odor from it. 

I'll use a stable, squat jar, one that is not easily knocked over. 

I prefer a small jar that can be tucked in a corner of the food preparation area. That way if some flies arrive while I'm working with food, they'll be trapped after clean-up. Since they're already in the area, the jar will draw them in. 

So I take the jar......pour in an inch or two of apple cider vinegar, take a bit of waste plastic or plastic wrap to cover the top, and secure the plastic with a rubberband. 
To neaten things up, I'll trim off any excess plastic.  Next I'll cut a small hole in the center of the plastic covering so that the flies can enter.
 Done. Set it into place by the window and forget about it for awhile. I find that the sun coming through the window warms the vinegar, which seems to lure the flies better than when the jar is in the shade. But I suspect that the trap works either way. The flies enter the trap and can't find their way out. Eventually they drown. 

A little note......I notice that the flies inside the trap will walk around the top rim of the jar trying to find a way out through the plastic covering. But they don't seem to walk to the center where the entrance hole is. So the trick is not to make the hole anywhere near the rim. 

Friday, April 17, 2015

Cutworms

Cutworms aren't worms.  How's that for a start? If they aren't worms, then what are they? They are caterpillars. 

So what's that name all about? No problem for me to figure that one out. These caterpillars hide in the top inch of soil during the day, then come out at night to feed. They eat whatever parts of the plant they encounter, which happens to be the stem, usually of a tender seedling. As they munch, they cut the stem right off at the ground. Thus CUTworm. 

The bugger about this pest is that they are so incredibly wasteful. It pisses me off to see that they eat only a small section of stem before moving on. I've had them munch down a two foot row of seedlings in one night. I'll come out in the morning to find the little plants lying wilted on their sides. A total loss. 

All cutworms aren't necessarily the same species. There are a number of moths whose caterpillars exhibit cutworm behavior. I don't know which moths are responsible for the cutworms I find here in Hawaii, but that doesn't really matter. Attacking all moths just to eliminate cutworm damage seems to me to be a bit irresponsible considering that there are plenty of animals that rely upon moths as food. I don't wish to jeopardize those animals, thus I choose to take steps to reduce cutworm populations in a way that won't effect all moths. 

So what do my cut worms look like? They are chubby caterpillars about 1" long. Grey/brown in color. When disturbed they curl up in a ring. 

(Photo from www.extention.umn.edu)

I can find them by stirring up the top inch or two of soil. When I find cutworm damage, I'll go looking for the critter. It's almost usually just one, so it's not like there are dozens around any particular garden spot. Once I find the offender, I'll just simply squish it, adding it to the soil. 

I've had other gardeners tell me that they used moistened, sweetened bran mash (a horse feed) that they added BT to. This is then sprinkled on the ground around newly transplanted seedlings that they wish to protect. I've never tried this, but I suppose it might work, assuming the cutworms will dine on the mash. 

(Above photo from www.gardening.cornell.edu)

Another strategy for protecting seedlings is to put protective collars around the seedlings. I've done that and still resort to this when cutworms are bad. Once open a time I used discarded computer punch cards. They were perfect. Stiff enough to hold up, didn't disintegrate in the rain, easily stapled into position, no need to remove, and they were free. I've seen people now use stiff paper or cut up cereal boxes , plastic cups with bottom cut off, and metal cans with both ends cut off. I would think that aluminum foil crinkled around the stem should work too, though I haven't tried it yet. The idea is to create a barrier so that the cutworms can't reach the stem. Collars work to prevent damage but don't eliminate the worm itself. 


Wednesday, April 1, 2015

Grasshoppers

Every year I learn about some other new pest or disease that I haven't seen before. This past winter it was grasshoppers. I started seeing holes chewed in the leaves of several crops. Initially I thought it was my old nemesis the slug. But even with uping the slug bait, I was seeing more and more holes. Eventually I figured out it had to be the grasshoppers. Then I caught one in the act! 

I snagged this fellow just as it was eating on the leaf. Positive proof that at least some of the damage was due to grasshoppers. So I went looking. Egads....there were lots of hoppers, both big and little. 

How did I control the grasshoppers? You're not going to get much useful wisdom from me on this one. I started a search & destroy mission on hoppers but within a week or two they disappeared. Well most of them did. There were still a few small ones here and there. But the vast majority were gone. Vanished. I can only assume that some natural malady knock the population down. What it was I haven't a clue, but both young and old were affected. 

While I haven't learned how to control grasshoppers, at least now I can recognize the type of damage they do. So I'll be able to identify the problem earlier next time. 

Sunday, March 1, 2015

Flea Beetles

Well, I'm experiencing my first run in with flea beetles. I wonder what took them so long to find me? It's been years. 

At first I wasn't aware that the problem I was seeing in my bean plants was due I flea beetles. Heck, I've never seen flea beetles before, so I didn't recognize them for what they were. I had planted a short row of green beans in a never-before-planted area. So I knew the soil was poor. Thus I wasn't expecting much out of the beans. The plants started out ok, then their leaves started looking bleached. The plants were small and stunty. I assumed the soil was the problem. The pH was a bit low, so I watered in a tad of wood ash and bone dust. I also gave the plants a shot of liquid fertilizer. They got worse. The leaves started looking really bad with some curling up and dying. 
The plants were flowering now and setting pods. The worse affected plants started dropping their leaves. I needed to look harder at them to determine the problem. I was still suspecting the soil. 

Searching the Internet photos, I saw bean leaves that looked somewhat like mine. Spider mite was the diagnosis. So I went out a looked under the leaves of my plants. Even took sticky tape to try to capture some mites in order to identify them. Nothing. No mites. But I did notice that some annoying little black things, like dog fleas kept hopping around, tickling my arms. Hummm. Could they be a pest? 

Searching the Internet again, I came up with pictures of flea beetles. So I went back to the garden to look closer. Now that I knew what I was looking for I was stunned to find a whole city, I mean a giant city network like NYC of flea beetles! Those holes on the beet leaves --- flea beetles. 

The stunted chard --- flea beetles. 

This is what unaffected young chard looked like.....

The dying beans --- flea beetles. 

The dang beetles had started moving out to the suburbs and were now taking up residence on the potatoes and sweet potatoes. Wow. All I could think was, "Good thing I spread my gardens around so that everything on the farm isn't infested." 

Ok, back to the Internet. What can I do about ridding the garden of flea beetles. I don't have a minor problem, I have a pan epidemic. I found all sorts of advice, from knocking the beetles off the plants to spraying with permethrin. I figured I'd try the non-chemical approach first. I'd knock the bugs off and capture them.

 So I devised a trap board. I took a piece of cardboard and coated it with something that would be sticky enough to capture the beetles when they jumped onto it. Cooking oil seemed like a good idea. 
So I marched out to the bean plants with cardboard trap in hand. I slipped the cardboard under a plant, gave the plant a good rap, then checked my trap. Wow, coated with bugs! 

I definitely had more beetles than hand plucking was going to handle. So I broke out the insecticidal soap spray and doused the plants, top and bottom. Okay-dokey, looks good. 

Next morning I made another cardboard oil trap to check my progress. Oh my, hundreds of new beetles. An hour later I checked again. Hundreds of beetles. At lunchtime I once again checked using my oil trap. Once again, hundreds of beetles. They were hatching out.....or moving into the neighborhood....faster than I could deal with. Or another possibility, the soap wasn't affecting them. Back to the drawing board. 

I decided that I'd use the beans, potatoes, and sweets just for seed. Thus I would bring out the big guns and spray with Sevin. That surely would kill the beetles, letting me determine if I was dealing with adults the liked to bathe in soap or newly hatched beetles. For two days in arow I applied Sevin. Checking one hour after spraying I saw zero beetles. But the next morning the plants were again coated. So I sprayed. By day three the beetles were just as bad. Ok then. I'm dealing with new hatchlings. The ground is infested. 

Out come all the plants. Yup. Yanked the entire crop. Stuffed everything into plastic trash bags, sealed them shut, threw them into the back of the truck for the dump. I don't often resort to this but I have to get rid of these bugs. Once the surface of the beds were clean, no plants, no dead or dying leaves, I flipped the soil. 

Next on the agenda will be to determine which crops I can plant here that are not affected by flea beetles. I'll grow them for a cycle or two before trying beans again.