Showing posts with label Repairs. Show all posts

Tuesday, January 28, 2020

Equipment Shed

Life has been busy lately. One of my emergency projects was fixing the equipment shed.

First a little background. Fifteen years ago we cobbled together a simple open shed for temporary use. We needed a place to stash stuff out of the weather. We had cut down a bunch of ohia trees in order to open up an area for the solar panels, so we had all those poles and opted to use them for the roughly built shelter. We figured on using this shed for 2, perhaps 3 years at most, therefore we used the poles green (freshly cut) and didn't bother to debark them. Nor did we set them on a foundation of any sort. They sat right on the ground. 

Then life happened, and we never did anything about making a proper open shed. We continued to use this one. It's absolutely amazing that it lasted 15 years! 

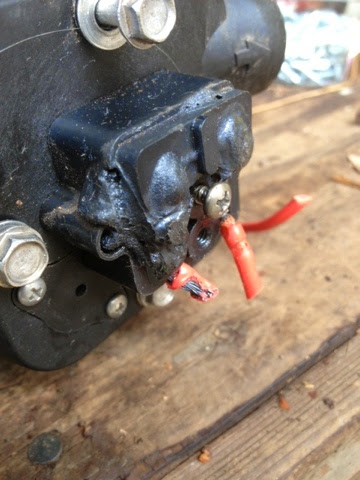
In the last storm which dumped 7 inches of rain and blew some serious windy gusts, several of the upright support poles gave up the ghost and snapped. They were so dry rotted that I'm puzzled that they hadn't broken earlier. Not just little sections here and there, but the entire lower half of all the poles were dry rotted right through. Sitting right in the ground had allowed both moisture and fungus to creep up the poles. 

I took a before photo of the damage in order to show you, but I accidently deleted it. But things looked bad. Just imagine 5 of the poles in the front were snapped off at various heights, plus one in the back corner. The roof never fully collapsed but it sure was a wavy, wonky mess. When I came out one morning and saw the damage, my immediate task was to get the dogs out from under the collapsing roof. They have a 10' x 30' kennel pen there. Next was to remove the equipment that I could. 

Hubby was all for pulling out the remaining poles and bringing the whole mess down. David took a look, checked all the horizontal poles and found them to be sound. He suggested replacing all the upright poles with 4"x4"s, thus saving the structure. I gave him the go ahead to try. 

First task was to brace things so that it didn't totally collapse. Next was to acquire a bunch of 4"x4"s. Then by using two hydraulic jacks, David coaxed the roof up one spot at a time, replacing the upright poles, this time making sure that they rested atop concrete.

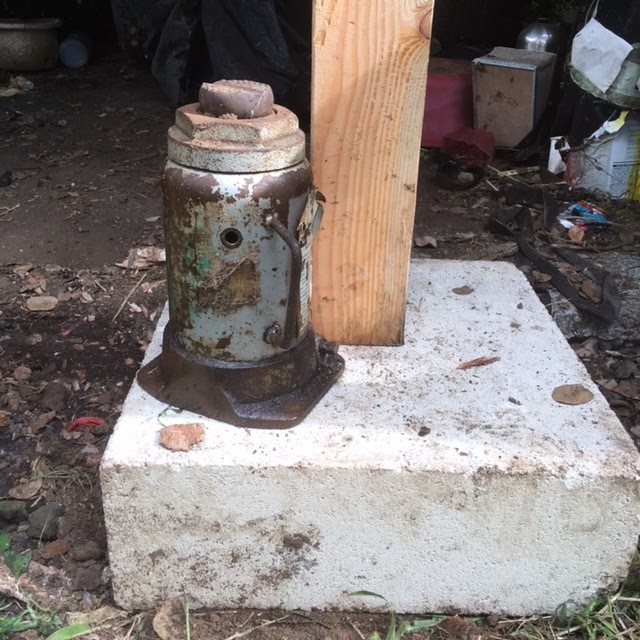
Using just two of these jacks, David was able to jack up and support the roof while replacing each upright pole. 

Amazing. He made it look easy and simple. 

So after a day and a half, we now have a repaired open shed which should have many years of life left in it.

With the broken poles replaced, the roof is back in position. 

Tuesday, May 14, 2019

Storm Repairs

5 tasks down, one more to go.

Done....
...picking up all the fallen tree branches and twigs
...cutting up the downed trees
...removing the double tree stump
...repairing the damaged fence and gate
...repair the large greenhouses

Fencing in the gap after the tree stump was removed. 

The new pass through gate between Matt's and our farm. 
Final task -- repair the mini greenhouses. A few of the greenhouse tops blew off. Not surprising. These were my prototype mini greenhouses done on the cheap. In fact, done the cheapest way possible. So nothing is substantial about them except for the pcv pipe. In fact, I'm surprised that they've held up so well. But this windstorm lifted the loosening hoops, pulling some of them off. I plan to make cheap repairs rather than rebuilding them. A few long screws should do the trick. Don't know if I'll get to this today, but surely it will be done by the end of the week. Why am I so sure? I want to use them. It's time for sowing seeds. Im eager to get things growing. 

Friday, May 10, 2019

Tree Stump Gone

My neighbor to the rescue!


As I mentioned yesterday, we had a large upended double tree stump on the fenceline between our farm and Matt's. When the wind blew the trees down, it lifted their stumps, pulling not only the soil with it but also the fence and gate. While we had no difficulty dealing with the tree limbs and trunk, we were totally stymied by the stumps. Thus the call for help.....to a neighbor across the street. 

Today "R" arrived with is Bobcat Whatchmacallit with a bucket attachment. Believe me, it's one little nifty piece of machinery. "R" went to work on the stumps and lifted them, shook them around a bit getting most of the soil off, and hoisted them off to the woods. Matt was so impressed with how easily it got done that he asked if a medium sized ironwood tree along the fenceline could also be removed. Amaziningly, "R" used that little Bobcat to knock the tree right over then picked it up and carried it back to the woods. Then he kindly flattened out a bit of a rise on the far end of Matt's garden, a rise that had been troubling. Wow. In less than 30 minutes the job was done!!!!!!

Stumps gone. Now we just need to level the soil and till in compost, 
I am very appreciative of all that "R" did for us. 

Wednesday, May 8, 2019

Windstorm Clean Up

It's been quite a while since we had blustery winds. With these sort of windstorms, it's not uncommon for branches to break off from trees, and whole trees to topple. Happily this storm wasn't a bad one. But we had 3 small trees tip over and two dead ones go down. All were simple to get to and remove. My neighbor, Matt, wasn't as fortunate. He had one big tree come down, but it was along our shared fence line, so it took out the fence and gate too. Bummer.


Heading over to Matt's with a chainsaw, It only took an hour to delimb the trunk and cut up the trunk, leaving 6' attached to the stump. But it will take Matt a lot longer to get rid of all that debris. He plans to find a spot in the woods to drag it to. 


Now for the stump. This one is beyond me, David, and Matt. So I called out for help. My neighbor, Rick, lives across the street and stopped by today to see if this is something he and his machinery & expertise can handle. He seemed confident that this tree wouldn't be impossible to deal with. 

Between now and Friday afternoon when Rick is due to return, Matt, Adam, and I plan to prepare. We have taro plants to salvage, banana keiki to remove, and twisted fencing and bent t-posts to eliminate. Plus the pile of cut tree limbs and trunk. I'm confident that we will be ready. I'm really interested to see how Rick manages to fix this mess. He's far more experienced than I with this sort of thing.  

Tuesday, December 4, 2018

Driveway Gate Maintenance

Another of those tasks I tackled during this dry spell was the main driveway gate. It's been needing painting for months now, but where could I assure two days of no rain? Fat chance of finding that! Anyway, it's finally happened. Two days ago I made my move. 

Day 1.....
...remove the "keep stray dogs out/keep my own animals in" fencing off of the gate 
...sand away any rust. Luckily there wasn't much except for the lower corner where it rubs the ground, snagging lava along the way. For some reason I can open and close the gate without it dragging on the ground, but nobody else can. Nobody = hubby, Adam, & my next door neighbor. Is it because they're not the ones who will have to fix a broken gate? Or shall I be sexist and say it's a "man thing". Ha! 
...wash off any rust and mold. Lightly sand. Apply os-pho to any rust spots and specks. 
Day 2.....
...paint the gate ........bright yellow. Bright screaming yellow gates are fun! And it makes it easy to give directions. 
Day 3....
...attach mesh to the gate for critter control. The last time I used some 3"x2" welded wire fencing, but it proved not to be the best choice because it snagged in the ground, plus it rusted. This time I'm trying plastic chicken wire. We'll see how well that holds up. Attaching it was simple. I used zip ties. Since it's not the primary fence, the zip ties work just fine. 


Done. Another long awaited task done. 

Thursday, November 8, 2018

New Tires for the Utility Cart

I have a utility cart that I pull behind the atv. It's something I use every day, often multiple times a day. I recent noticed that the tires were badly worn. I think I got my money's worth out of the cart tires.......


I actually wore a hole right through the rubber. What surprised me when I discovered this is that the inner tube was still intact. That's right. The tire wasn't flat. Amazingly good luck. 

Since the other tire was worn, but not as badly, I opted to buy two new tires. They arrived yesterday, so I immediately set to getting them mounted onto the utility cart so that I'd be back in business hauling things around the farm again. 

I had greased the axels with lithium grease when I mounted the last set of tires, but even so, it took some persuasion to get the old tires off. A hammer and a block of wood came in handy. Once off, I set about cleaning up the axels. Normally I'd use sandpaper but alas, I had none. Rather than dropping everything and heading for the Ace, I improvised. A rasp and steel wool did a decent job of cleaning the axels. 


Before mounting the new tire, I applied lithium grease to the axel. A rubber mallet gently got the tire in place. 


Last step......install the cotter pins to hold the wheel in place. But the old cotter pins were corroded beyond use. Since I didn't want to leave to go buy new ones right away, I made temporary fasteners out of electric fencing wire. 


Back to work! 


Saturday, October 6, 2018

Fixing the Big Lawnmower

One of the big lawnmowers, the Cub Cadet owned by a friend of mine, stopped in its tracks. The engine was running fine, but it just wouldn't go. Dead. I was quite surprised to learn that my friend managed to push it back to the house. Egads, she'd 76 years old! And not even a farm girl. I'm impressed. 

I was asked to take a look-see to determine what needed to be done. Removing the mower deck and  propping up the tractor in order to look under, it didn't take long to see the partially shredded drive belt. 

 
It was exactly the problem that my friend thought it would be. 


Above, most of the old belt was still in place on the pulleys, but back by the rear transmission, shreds were hanging down. Ok, go buy a replacement belt and get to work. 

I've never replaced the drive belt on a lawn tractor before, so I first read the owner's manual. It was clear as mud. The place where we bought the belt gave us a diagram of how the belt should run. That didn't help either since there were no instructions on how to do it. So what to do? Google it! Thank heavens for YouTube. After watching several YouTube videos, I was ready to tackle the job. It didn't look all that difficult. HA!!! Little did I know! 


Not knowing what I was doing, I first reached under and used my impact wrench to remove the clutch guard and clutch, thus freeing the belt from the engine. But I soon realized that unlike some of the YouTube videos, I needed more working space. So I pushed the tractor up onto the ramps. Settling on my back, I proceeded to follow the various steps. That's when I discovered that the belt had shredded into multiple fine strands and braided themselves around the transmission shaft, out of sight and out of reach except by finger tips. ....... Back to google. 

Not finding clear instructions on how to expose the transmission shaft and get everything back together again correctly, I decided not to go that route. So I ended up laying on my back for for close to 3 hours with my arms over head, gradually teasing piece by piece of that dastardly belt out of the rats nest it had made down inside a hole around the shaft. Eeeerrrggg. I think I deserve an "A" for patience and persistence. 

3 1/2 hours from the start, my arms were pau. They trembled and I couldn't hold them over my head anymore, time to call it a day. 

Day #2, arms sore but now functioning, I quickly finished the job. Old belt removed, new belt installed, all the pieces back together. 


The last step was to reinstall the mower deck. Sounds simple, no? Well that didn't go easy either. I followed the owner manual instructions, and I couldn't do it. Again, back to a Google search. Found someone complaining about the exact problem I was having, and lo and behold, the instructions were wrong! Instead of using a ratchet handle and pushing to the right, things only worked if pushed to the left. How about that. Once I learned that, the deck got into place fairly quickly. 

My friend took it for a short test drive and it seemed to work ok. Success, for now. 

Thursday, October 19, 2017

Mower Breakdown

I'm finding that fixing and maintaining equipment is an ongoing task. (Thank heaven I don't have a tractor or a combine!)  It's not something I enjoy, although by shear stubboness, I can usually figure things out. Today was a prime example. 

Just a little breakdown. The self propelled lawnmower stop being self propelled. Not that it is really all that self propelled, but the assist it gives making mowing far, far easier for me. Ok, the wheels stopped "wheeling". I looked for a grass clog. That sometimes happened when I was mowing tall grass with the previous  mowers. But the grass today was only 6" high, so I suspected some other cause. The wheels themselves looked fine, and they turned when I pushed the mower myself. I figured the next most obvious problem was the drive belt. Either it broke, or it popped off. 

(Propped up so I could access the belt drive.)

The problem was accessing the belt drive. On past lawn mowers, it was simple. In fact, the belt was so exposed that it often got a tangled clog of grass strangling it. But this latest mower had the drive assembly very well protected.....from grass & from my inspection as well. 

Propping up the mower, I tucked under to take a look. How to take this thing apart? Saw 7 bolts. I wasn't sure exactly which would be the best to remove, so without a repair manual, I took my best guess. 

7 bolts later, I got the drive assembly casing loosened but still couldn't see the belt. I could feel it with my fingers and determined that it wasn't broken. So it just popped off the pulley wheel. Guess I had the tension too loose. Contorting my fingers this way and that, I couldn't make any progress. Cursing didn't even help. Dang, dang, dang. Looking more closely, I spied 5 more bolts tucked down deep holes. Now I need to find a socket extension. Of course, one the right size was not to be found in the tool box. Searching various tool sheds, I finally found the right piece about 30 minutes later. Grrrr. 

(Above - At this point I could pull out the belt and determine that it wasn't broken, but I couldn't reach the pulley it should be mounted on.) 

With the right tool, it was a breeze removing the last 5 bolts. Now with a bit of prying, I was able to expose the troublesome belt. Yup, it was off. Thank heavens it wasn't broken! Looking at the exposed innards of the mower, I determined it would be a bear to actually have to replace a broken belt. Hope that doesn't ever happen. 


A bit of finger manipulating and the belt was back where it should be. 5 minutes later, the mower was back together and I was once again mowing. 


In all, this job took an hour. If I had had the tools and knew what I was doing, it should have been a 20 task. Live and learn. But now I'm prepared if this ever happens again. Of course, I wisely tightened up the belt adjustment, removing the excess slack. A bit of prevention can't hurt! 

Monday, July 25, 2016

DIY Engine Repair

Strum, sputter, utt-putt, strum, sputter. Dang, that sounds horrible. Looks like the generator is trying to die on us. With all the clouds and overcast lately, we rely upon that generator to keep our solar system functioning. Sunshine has been in short supply lately. So a dead generator would be a serious problem. 

Getting out the owners manual, which of course we've never read, I give it a quick scan looking for info and read the entire, though very short, troubleshooting section. You talk about not being helpful. That troubleshooting page basically sad that if the generator isn't out of gas and something it wrong with it, take it to an authorize service center. What? Hey buddy, I'm out in the middle of the sticks! And besides, most authorized service centers for just about anything are located on Oahu, not here. 

Has anyone else noticed that nowadays owners manuals for most equipment are next to useless for repairs? They seem to be pages full of warnings and disclaimers now, just something to protect the manufacturer from lawsuits and stupid people from maiming themselves. 

Anyway, back to the ailing generator engine. Internet to the rescue. Hubby searched using the engine's symptoms and came up with the most likely causes and fixes. The problem ended up being the air filter. 
Looks ok, right?

Take it off the engine and flip it over, and egads! Looks like it smokes two packs of Camels a day!

New filter in place, and the engine purred like a happy kitten. We were in fact surprised to see the air filter fail so rapidly since the generator is practically new, but it goes to show that there has been a lot of volcanic activity lately. The poor air filter was almost totally clogged. Looks like this is something to put into our monthly checked list while the volcano is so active ...... clean the various air filters. 

Thursday, March 26, 2015

ATV Repair

Equipment breaks. That's a fact of life. If I'm going to have farm equipment, i just have to accept that. Since my ATV gets used on the farm every day...yes every day.., it was bound to eventually break. But this little Honda Recon is one tough buggah. It's seldom out of action. 

So what happened? I was zipping down to the front field with a load of chicken feed when the gear shift pedal didn't seem to work right. It moved but nothing happened. Didn't change gears. The pedal seemed to be hitching, then it would again move a bit. Next try it completely slipped, then disengaged from the gear shift shaft. Dang. 

Getting off to take a closer look, I saw that I could physically get the shifting pedal back onto the shaft and shift gears as long as I physically held it in place. So the bolt holding it on must be loose, I thought. Getting the right socket wrench, I tried to tighten the bolt, but it didn't seem to want to grip. Possibly something  striped? Fearing that I'd ruin the gear shifter, which I know would be a major repair, I opted to take the ATV to the dealer. 
(Above, the offending gear shift pedal)

I'm usually a DIY kind of gal. But I've learned from the school of "you've really messed it up this time, sister" that when I'm over my head it may be wiser to seek somebody with more expertise. It turned out that I was indeed wise to take my own advice this time. A mechanic's inspection revealed not only a striped bolt but also damage to the teeth on the pedal. Luckily the gear shifting shaft did not also need replacing. 
(Close up shows the teeth inside the pedal connection to be worn away)

All told, it was a trip to Kona. Since it's a long drive, after dropping off the ATV I took the opportunity to stock up on supplies. To my surprise the ATV was fixed within the hour. Wow. That was service! I had planned on leaving it and returning in 2 weeks to retrieve it. But the people there know that I come a long way and were really super considerate, trying to get it done while I shopped. I couldn't be happier with the place. By the way, they deserve a plug......Kaiser Motorcycles, Kona, Hawaii. 

Fixed! New pedal is in place and works smoothly. 

Saturday, July 19, 2014

Riding Mower Repair

.....Mower deck belt replacement.....

When I was looking to buy a riding mower, several people told me that I had better learn to fix things myself or else plan on spending a lot of money at a repair shop. I took their first suggestion. I've only owned the mower one year but I've already replaced a spindle, mandrel pulley, changed oil and filters, repaired a tire, and generally kept things aligned and clean. Now the mower deck belt broke, so it's my next repair job. 

I had thought myself clever by buying a belt in advance when I had purchased the spindle. But alas, I was ignorant of the mower parts. What I purchased was the engine drive belt. I discovered my mistake when trying to install it on the mower deck. Drats, too short.,....something's wrong. An investigation quickly revealed my error. But hey, I might need that belt anyway and it's good to keep one on hand. So on my trip to Hilo I stopped at Sears and bought two mower deck belts, one for now and a reserve. Since I wasn't 100% sure of the part number, I opted to buy them at Sears. The price actually wasn't bad because I got to use my Sears points I had acquired when I originally bought the mower. 
(The right belt this time!)

Now to do the task....install the new belt. First of all, how does the belt go? No problem. Didn't even have to look at a manual. The diagram was right on the mower deck. I guess that's there for mower owners like me who haven't a clue.
 Looking back and forth between the diagram and the actual mower, it was really easy to figure it out. I didn't even have to drop the deck to get the belt into place. Just loop it around the various pulleys and belt keepers. The hardest part was getting up off the ground afterward. 
(Not a great photo but the space is really tight.) 
I opted not to go to the hassle of dropping the mower deck off of the tractor. Even though the space was right, I didn't have much of a problem treading the new belt into the appropriate spots. 

With the mower back in business I took the opportunity to get a bit of mowing done. The grass has been growing like crazy with all the rain lately, so the mowing had to go slowly. I actually went over the areas three times, bringing the deck a notch lower with each pass. Within two hours I had accumulated 4 jumbo piles of grass clippings. Quite a haul! Then it began raining. Sigh. 

The mower is back in the barn again awaiting another morning of no rain. And that might be days from now. I've got a couple more hours of mowing ahead of me just to catch up with the grass. But this will give me plenty of clippings for mulching, just what I desperately need down at the seed farm. 

Saturday, May 31, 2014

No Water!

The water pump choose to fry itself today. Such are the risks of pumping your own water. Sometime things break, and sometimes it's catastrophic. I'm still not sure exactly what happened inside the pump, as I've yet to take it apart. But the bottom line is that it fried. No water. Luckily we were home at the time and heard the pump constantly running. We ran to the pump house, saw water running across the floor, looked at the pump and saw water running out the end. Quick, shut off the power. 

A glance at the pump revealed that this was not going to be an easy, quick fix. The plastic connections at the pump end were melted. Bummer. We needed a new pump ASAP. 
Of course this happens to be Saturday after twelve noon. Only one store around here sells dc water pumps. A quick phone call and we find out that they're open for another hour. Great! Of course we hop into the car immediately and high tail it up to Oceanview, and buy us a pump. $250, ouch. But when you need water, today, like now, one doesn't quibble. Whip out a credit card and try to figure it out later how to justify it in the budget. 

So the gods of mischief messed up. According the Murphy's Law, the store should have been closed...or out of pumps in stock. Ha, beat those gods for once. It's nice to win a hand every once in a while.       :)

With new pump in hand, hubby suggested that we stop at the Ace Hardware and pick up replacement hose and hose clamps. Might as well replace the old, since otherwise they'd be the next thing to fail. 
$25 more and we're on our way back home. 

Installing the new pump turned out to be fairly simple. Disconnect hoses and electricity. Reconnect using the new hoses and hose clamps. Attach the electric wires. Flick the electric switch and watch the pump self-prime and build the water pressure back up in the tank. Wallah....water! Check for leaks....none....good to go. Hubby, being a neat freak, electrical taped all the wiring and water protected it all, screwed the pump down, made sure everything was lined up properly before declaring the job complete. 

Tomorrow I plan to take apart the fried pump to see if it's repairable. If it is and we can get the parts, the pump would come in handy for other applications.....or to keep as a back up. 

Sunday, May 25, 2014

ATV Flat Tire

Gotta flat! Actually, it's the second one since I've owned the ATV. Same tire. There's a lot of old bits of barbed wire on this land and tires seem to find them. Most of the that the tires pick up a piece of barbed wire, the barbs haven't penetrated far enough to cause a puncture. 
I used a little soapy water to find the leak. By inflating the tire then wetting it with soapy water, you can find the leak by looking for the bubbles. I thought at first that the old repair site might be leaking but it didn't take long to find the new leak. The bubbles were just churning out one after the other. Close inspection showed a tiny piece of metal, most likely a broken off barb tip from barbed wire. I couldn't grasp it to pull it out, so I pushed it through. Next I retrieved the tire repair kit from the workshop. 
This kit is easy to use. It must be since even I can do it successfully! Thread a patch onto the tool, push it through the hole (the  most difficult part of the job), rapidly jerk out the tool, and wallah.....fixed! 
In this photo, the patch is the brown spot between the two tire knobs. I ran the ATV around the driveway once to seat the patch and make sure it wasn't leaking. Then I trimmed off the excess after I took this photo. 

Learning to make basic repairs to equipment is important to a small homestead. By doing it myself, the equipment isn't out of service for very long. In this case, just 10 minutes. It also didn't cost me much. The kit was less than $5 and is good for three repairs.