Showing posts with label General Homestead. Show all posts

Sunday, November 19, 2017

Wood Rot

If one doesn't want to deal with wood rot, then don't live in the tropics! Even the so-called treated exterior wood rots here, especially if it gets wet repeatedly. It just does it a bit slower. 


Today I noticed some fungus "blooming" on the step outside the bedroom exterior door. A sure sign of trouble. The step was made from recycled wood, so I'm not complaining. In fact, I think this was the third project I used that particular piece of wood. But it's finally reached its end. 


But ya know, this fungus is really pretty. Tiny, but pretty. Destructive, but pretty. Hey, it's just doing what fungus is suppose to do.....eat wood. 

Just wanted to show you what I watch out for around here. Any fungus growing on the wood means that I need to inspect it closely, then either treat the fungus or replace the wood. 

Wednesday, January 11, 2017

Tree Branch Railings

I liked the woodsy effect that the crooked tree branches made at the back entrance of the house, so it wasn't  long before my mind started thinking of other spots to use the idea. Well, I think I've gone overboard, but I can always remove some if that proves to be the case. 

This is the back steps......

The stairs going down the hillside seemed the perfect spot to add tree branches.....

And more.....

And more.....

And why not jazz up the bridge going over the fish pond? I need to get two more tiki torches to finish it off. I bet it's going to look really nice when we go down to eat dinner in the screenhouse. 

Finding crooked tree branches is easy on my place. There are lots of overcrowded ohia saplings in the pastures. Taking out the misshapened little trees to use for these railings will actually help the pastures and give more room for the other trees to grow. A win-win situation. 


Tuesday, January 10, 2017

Concrete Pathways Finished!

It's been a long haul, but the concrete pathway project is complete! The path now circumnavigates the house, has a branch off going to the driveway, one to the solar system shed, and one to the hillside stairs. Pretty cool, if I do say so myself. 

This is the final section. 


So no more slippery spots when walking around the house. By the way, Crusty and the cats really like the new path. They prefer it over walking on the dirt. Ha-ha, so do I! 


Saturday, December 17, 2016

Concrete Path - Nearing Completion

Things have been busy this past week on the farm.....
...unexpectedly caught a swarm of bees and had to quickly get a hive ready for them. So I now have a hive down at the seed farm. 
...acquired 40 new adult hens and integrated them into my current flock. 
...picked up 3 pickup loads of sand
...expanded the gardening space and planted potatoes and beans 
...started 15 trays of vegetable seeds and transplanted the flats of bok choy, basil, cabbage, cauliflower, and beets into individual pots for growing on
...acquired 5 good pallets for making slug-proof (we'll see if that turns out to be true) tables for growing lettuce in containers
...caught up on filling the hugelpit that I'm working on
...added 4 new trees to the fruit orchard
...harvested the last of the coffee

And TA-DA.....big sections of the concrete pathway were completed. In fact, the path is just about done. Only about 8 more feet to go. 

Finding the right sized rocks to imbed in the concrete is now a problem. Once upon a time they were plentiful around here. It seemed that there were small piles of them everywhere. No longer the case. Now bigger rocks need to be broken in order to come up with the right sized smaller rocks. Big rocks are still plentiful. Even if I converted an acre into concrete I don't think I'd make a dent in the big rocks laying around here. 


Last week I was looking at the path going from the new concrete down to the wooden hillside stairs. Because of the recent rains, the cindery mud there was slick. Looked like a good spot to take a nasty fall someday. So I opted to extend the concrete path. Because the ground slopes away, it was easier making steps rather than a slope. In the above photo, I haven't quite finished the area. I still need to finish the transition from the pathway to the steps and wash off the wood, but things are essentially done. 

Now I'm looking forward to cleaning up and landscaping the pathway. Time to beautify around the house. 🙂


Sunday, December 11, 2016

Concrete Path Update

I'm within 20' of being done!!!!!! Here's an update.....

Since my last photos, several more sections are done. The little patio area is done and the path now continues around the back. 

Here's how the patio turned out. Large enough for a small outdoor table and a couple of chairs. Becca, the cat, approves......

Looking from the other end, showing the bump out which is the little patio.....

I've purposely made everything rather freeform. No strict straight lines, no abrupt angles. I don't even try to keep the path the exact same width. I like it better this way. 


Wednesday, November 30, 2016

Concrete Pathway Is Growing

The concrete pathway around the house is growing. To date, it's encircling the house  3/4s  of the way. What you're seeing in these pictures is the path wrapping around the back. The steps and railing are coming from the side of the house near the rear. The white pipe running under the concrete path right now does nothing, but in the future will carry the greywater from the kitchen to a banana patch. (I'm actually thinking agead! Time to run the pipe is now rather than later.) 


The pathway balloons out into a patio. The idea is to have a small table and chairs here. Right now you can see the seams from the individual concrete pours, but I know from prior experience those seams will disappear from view as the concrete develops a darkened patina. 


Here's a view looking from the other side. The white pipe in the foreground, like the other pipe, presently does nothing. But in the future may handle the greywater from the bathroom, again going to a banana patch downhill. 


Friday, November 18, 2016

Walking Path Around the House -Update

What started out months ago as a path to go from the car parking area to the front door in order to avoid wet slippery spots (think = falls) has now morphed into a huge project. Not so much a difficult one, but every time I think to myself that I'm close to finishing, we decide to extend the pathway a bit more. Initially I has thought the path would just go around in places where I frequently walked. That's no longer the case. 

In the photo below, just about where the black cat (a.k.a Dik Dik) is standing is where I last reported on the progress. As you can see, a lot more pathway has been created. Note the two white pioes going under the concrete. One goes from the rain gutters to the water catchment tank. The other is just a short empty piece of pipe. That's so there will be an easy underpass in case we decide in the future to run a hose, pipe, or something else from that point of the house and out into the yard for some reason. Far easier to install the underpass now than to try to dig it later, especially considering that the ground has lots of lava chunks and boulders. It would be a nightmare to dig! 

Below, the path is now going around the house and heading for the next corner. Dik Dik is helping by leading the way. Sorry about the junk.....coolers and trashcans. Just moved them aside so that the wheelbarrow could get through easily. They're normally stored along the house on this side. 


The pathway is now competed up to the far corner. Are we going to keep going? Gosh, it's got this far so why not. The game plan now is to circumnavigate the house. As I said, the project surely has changed from its initial purpose. But that happens to me a lot. I'm use to it by now. 


Sunday, September 4, 2016

Walking Path Around House Update

Progress is slowly moving along in spite of the rain. Only one small section at a time is getting built, little bit by little bit, the path is coming into existence. 

Above, pre-path. The clump of bananas have just been removed and gee, I forgot to take a before photo. So just image 6 medium sized banana trees just outside the sliding door. Those trees got cut up with a sawsall and used as fill for a pallet grow box. 

Next to go, those palms. That clump started out as one small plant and has expanded into quite a clump. Quite honestly, they're not my preferred style plant. Yes, pretty when well maintained, but I don't have the time to keep it cleaned up. Not that it takes long, but it's not on my to-do list, which already is too long. Thus I opted to remove it. (I gave the clumps away to various people who were glad to take them.) 


Now I had the room to run the walking path. I'm bringing the path close to the house so that it can take any spill from the rain gutters and direct it away from the foundation. Spill is not normally a problem but we have had major deluges in the past where water overflowed the gutters. 


Sunday, August 28, 2016

Food Waste

The topic of food waste has been hitting the news quite a bit. And I recently read in the National Geographic Magazine that 21% of food at the consumer level gets wasted. I've read other reports that claim percentages closer to 50%. Egads. That means, for most people, lots of food gets thrown away in the trash. Wow. I would have thought that restaurants were a bigger waster, but it turns out that people in their own homes are the major throw-away'ers. 

One thing about most homestead farms is that there is no such thing as food waste. Uneaten and spoiled food doesn't go into a trash can. There's always something else on a farm to do with it. 

First of all, homesteaders tend to eat food that I've seen city friends discard -- kale leaves with holes in them, green beans that some bug ate the tip off of, an ear of corn with a corn worm in it, that sort of thing. Homesteaders just cut off the damage and eat the rest, while I've seen my city friends ditch the whole item into their trashcan.

Homesteaders tend to make their own broths and stock, so they use the bits of veggie scraps in the stock pot that many city cooks deem to be garbage. Things like celery leaves, onion ends, broccoli stems, radish leaves, etc. (I thought about making myself a t-shirt that says "I Eat Garbage & Drink Out Of Gutters" but most people wouldn't get the joke.) 

On a homestead, items not eaten by humans usually goes some place other than the trash. Depending upon the item it gets fed to the dogs, cats, worms, soldier flies, rabbits, pigeons, ducks, geese, chickens, sheep, goats, pigs, cows, or horses. What the livestock won't eat heads to the garden either via compost, nutrient teas, or dug directly into the soil. On my farm there is a LOT of competition for the "garbage". 

Where wastage goes on my homestead.....
Sour milk -- dogs, chickens, pigs
Molded bread -- chickens, pig
Molded cheese -- chickens, pigs
Wilted, spoiled veggies/fruits -- chickens, pigs
Stale bread and crackers -- sheep, goat, horse, dogs
Unwanted leftovers -- dogs, chickens, pigs
"Off" meat -- chickens
Uneaten seafood -- cats, dogs, chickens (in reality it usually doesn't get past the cats) 
Excess and trimmings from the garden -- rabbits, dogs, chickens, pigs
Certain non-edible items -- compost (onion skins, eggplant caps, grapefruit rinds, and such)

Zero goes into my trashcan! And I do indeed mean zero

Thursday, August 4, 2016

Blocking Crusty

Crusty, the farm dog, has a habit I wish to modify. Up until now he'd take a shortcut under the house in order to get to the other side in a hurry. And up until now, it was never a problem. But recently I've been making flower beds around the house. 


Crusty doesn't understand why I'm objecting to his cutting through the flowerbeds, tromping on plants in his path. "No problem, mom. You're plants aren't a problem. I can still get under the house." Well Crusty-man, it IS a problem. Mom wants flowers. 


I needed a barrier effective to block Crusty, but not the cats. You see, at the first sign of danger, the cats bolt for the safety of under the house. I'd like to keep it that way, for their own safety in case a strange dog comes by. So I gave it some thought, looked around the place, and came up with a simple barrier. I have plenty of small ohia poles from thinning out the "junk" trees in the secret garden and livestock pastures. Cut into appropriate lengths, fastened together with a few nails, they turned into barriers fitting for a house in the woods. And once the taro grows up, they will be hardly noticed. 

So what does Crusty think about them? He checked all the holes and concluded that it was easier to pick a different spot. He's taking the change in stride and getting on with life. 


Thursday, July 28, 2016

Gardens Around the House

Now that the walking path is getting done, I'm cleaning up the area between the path and the house in order to make pretty gardens. Oh, nothing stunning enough to cause a photographer from Better Homes & Gardens to stop by, but pleasing none the less. I've always liked flowers and am ready for some color around the house. 

This is not my first attempt to have flower beds around the base of the house. Let's see....I think I've had 4, possibly 5, attempts so far and while not complete failures, the end results that were definitely lacking in one major aspect --  soil retention. The soil kept getting dragged under the house by the various dogs taking shortcuts under the house and by heavy rain water washing it away. I never made any kind of significant soil blockage system because there was always the idea of some day working under the house for one reason or another, thus we'd need easy access. But I now say, enough is enough. After over ten years of waiting to use that "easy access", I've decided to make the flower beds. But I am compromising. No cement or rock soil barrier. I'm going to use plastic edging. And before I'm done I'll make a guava stick lattice work to block the dogs' access.

The 6" plastic edging is easy to work with once it's sits in the sun for a few hours. Once warmed, it's far easier to unroll and manipulate. I tried doing it when it was cold and forget it. What a struggle! Unroll it....it curls back. Try to bend it, it fights you. Errrrg. But after sitting in the sun, it gets a tad easier, I didn't say "easy", but it was an improvement. 
Above, a piece of the edging, so you know what I talking about.

I finally found a use for these plastic stakes I picked up at a yard sale. They're one of those purchases where they were a real bargain, even if I didn't have the foggiest idea what I would use them for later. For this job, they were the perfect item. Glad I had them handy. 

The first thing that needed to be done was clear out the work area. 
(Above, I'm in the prices of removing all the taro and the mamaki tree....along with the weeds.) 

(Above, the papaya trees out and the pumpkin vine severely trimmed back.)

(Above, most of the plants removed and the soil dug up to loosen it. The black wavy line is the plastic bedliner in its approximate final position. I still need to adjust it and stake it down.) 
(A closer view)

Out goes the papaya trees and mamaki tree (they were getting too big for the space anyway), the numerous taros, the assorted old flowers. Next I raked back some of the good soil that had been pushed or washed under the edge of the house. Next, laid out the plastic edging and staked it into place. Easier said than done. In actuality it's a case of struggle with a long twisting black flat snake and wrestle it into position, hoping to get a stake driven in past the numerous lava chunks in order to subdue the self-minded "snake". After many a failed attempt, I resorted to using large lava chunks to hold the "snake" in an approximate position while I attempted to fine tune it's location and drive a stake in. After an hour, I won-snake lost, though the snake didn't quite end up where I envisioned it would be. Oh, good enough. 

Once the edging was in place, I mixed in compost. In a few spots I've already started planting and topping the newly made flower bed with mulch. I'll need plenty more flowering plants. So I need to make starts and sow seeds. 
Above-- a few things planted. It's a start.

Friday, July 22, 2016

Walking Path Update

With all the recent rain, there hasn't been much opportunity to work with cement. But happily, there has been a few sunny mornings lately. So here's what's gotten done so far that is new since that last report ......


Above, two mornings we got this part done. And later we got more two good mornings to work and completed another stretch.........


I'm tickled with how well it's turning out. 

As you can see, the path is being built right atop the ground. But the ground is very little soil and actually is already mostly well compacted lava chunks. I'm not bothering to use rebar because the path won't see much weight. And if it does crack in an earthquake, it should be simple to just patch it. As this path weathers, it will darken and any patching would not be noticed over time. Perhaps in the future  I will regret not using rebar but I'm betting that I won't. Besides, we don't see freezing weather here that would cause expansion and contraction issues. 

One thing that I'm pleased with so far is that we've done a fairly good job at not creating low spots that would collect rainwater. I'm getting plenty of rain, so the path has been tested daily! So far, so good. 

Photo taken at a different angle........

Ah, the path looks rather inviting. 

Sunday, July 3, 2016

Safer Walking Paths

What's it like to deal with daily rain? Well, it affects lots of things. One is the walking paths around the house. After a while the grass dies along the paths, then mud forms. Then after that, moss grows on the mud. Life becomes a dangerous situation of slip sliding away. After taking several half slips and a few full falls, I've decided it's time to make serious changes. Consulting with David (my part time muscle), the decision was reached to make concrete paths with surface rocks to give the best traction.......besides looking better than just plain concrete. 


Three scoops of sand and three bags of cement later, we're making progress. 


Oh, I failed to mention that we needed to first mark out the paths, cut strips and pegs to create the forms. While David started things, I spray painted the general outline the paths would follow and  weedwacked the grass short. Then I was off to gather bucket after bucket full of rocks. 


The paths will connect to the small concrete pads that already exist at the base of entryway steps. And they will go around the house and head in the direction of frequently visited areas.....meaning the driveway and the shed housing the solar equipment and generator. We still have quite a bit to do, but it's a start. I'll post photos of the finished product in a week or two. 


Friday, May 20, 2016

On The Level

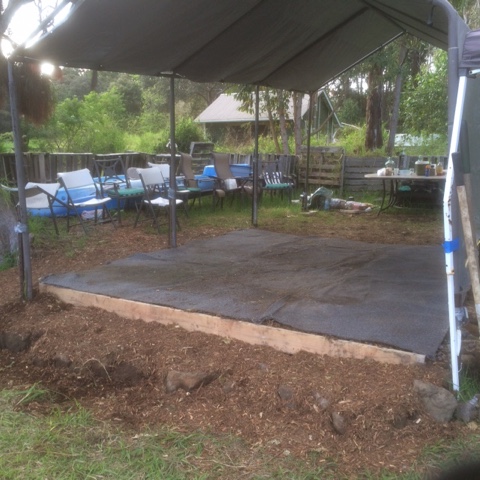
Down by the community garden site, we erected a shade tarp arrangement to use as a lunch area for the garden volunteers. Nice shade. Decent windbreak. Keeps the rain off. The only problem was that the ground sloped badly, and it was the most level spot available outside of the garden itself. No place else to put it. For months we've been putting up with sitting on a slant and holding into your plate of food so that it didn't roll of the table. After much procrastination I finally did something about it. 


Regretfully I didn't take before photos. Nope, one afternoon I just dived into working on it, totally forgetting about the camera. Oh well. So you'll have to use your imagination and see the lunch area under the tarp tent and envision the salt shaker rolling of the edge of the table. 

I started out by using some recycled 2x6 boards to frame out the area that needed leveling. The back 6 foot or so was level enough, so I dig the 2x6s into the ground where it started to slope and leveled them from that point on. Once I got them fairly level, I then started filling in the low area with fill. Chunks of sod that I ripped up while getting the rocks. Rocks. Lots of rocks. I had no problem finding rocks, for sure, but getting them there took time. Trip after trip with the wheelbarrow, moving rocks. 


Crusty, the farm dog, started out being my faithful companion escorting me on each wheelbarrow trip. But after the first dozen trips each day, he got bored. He decided he could best supervise by finding a comfy spot under the tent to lay down and watch. He's lucky I didn't throw a harness in him and make him pull the cart. Lucky for him I had no harness! 


Back to the job..... For the first layers of rock I dragged over all the biggest rocks I could find. That actually filed the hole in pretty fast although it was a lot of work to haul some of those big babies over. Ah, good exercise. 


After the majority of the fill was in I switched to using smaller rocks, then smaller still. When I started adding the smallest rocks I laid a board across the width of the space, resting it atop the 2x6s. That way I could level out the surface without having big dips or stones sticking up too high. The photo above shows that the area with the smaller stones (towards Crusty) is getting nicely filed in and level, while the front area is still quite coarse and needs lots of small fill (photo below). 


It took many hours over the course of several days to fill it all in. Hauling and placing rocks was not only work and tiring, it was something far worse.... it was boring. I'd rather be exhausted every day than bored one. 


Once I got a section level, I tamped it down using a metal tamper. It really helped settle the rocks into place and pointed out any rocks that weren't stable. Once well pounded, I used lots of tree chipping to cover the whole area. Oh yeah, I forgot to mention. I also filed in with rocks to slope the sides.  In the next photos, in almost done. I still have the front slope to fill in and a bit of the sides.


Once I finishedvwith the tree chippings, I replaced the carpeting. 


I think out turned out just fine, if I do say so myself. Once the garden volunteers arrive, the tables, chairs, and storage cabinets will go back in. Things will be ready for lunch once again! Then over the next few days I'll finish sloping the sides. 

Now before everyone tells me so, yes it could have been so much faster by pouring a concrete slab. Or by building a framework and covering it with plywood. Or hiring somebody to do it for me. But that's not what my homestead is all about. It's about using resources supplied by the farm, and doing it myself when I can. The rocks and dirt were here. The tree chippings were here. The carpeting was already here (and it was donated rather than getting thrown away into the dump.) My labor was here, and heaven knows, I might have lost a pound out two in the process (I can only hope). My cash outlay was zero. That's cheaper than paying for concrete, lumber, or labor. So there's a lot of things I can get without spending cash by just being hardheaded, stubborn, and willing to put the time and labor into it. 


Saturday, May 14, 2016

Farm Layout

Curious people have been asking me what my farm layout looks like. 

This is a rough drawing. It's 20 acres, more or less. And it's a simple rectangle. As you can see, it's far longer than it is wide. The residential area is nicely off the road, giving us a bit of privacy. The house sits not quite centrally located in the front 2/3 of the farm where most of the actual farming work goes on. The back 1/3 is heavily wooded. 

The amount of land devoted to residential use is 1/4 to 1/2 acre. I've never measured it exactly. That leaves 19 1/2+ acres for farm use. Most of that is pasture of one type or another. The back 1/3 that is wooded gets used for light grazing, but it's quite poor quality pasture. It's an area I haven't done any improvement on yet. 

The land has some interesting features. It's not entirely flat. The front section (major garden area, orchard, etc) is a flat pahoehoe lava field topped with soil. To go from this area to the residential area and secret garden, the driveway climbs up an a-a lava flow. The house is perched on the edge of the a-a flow overlooking the dry riverbed and pahoehoe lava field below. These lava flows are old enough that everything is topped with soil and are well treed. Everything is green. Going back the property from the house, the land gently undulates until you get to the woods on the back 1/3. There you find a pretty ravine cutting to the center of those woods. It would be a neat location for a second house. Imagine sitting on your lanai overlooking a tropical ravine full of lush growth with blooming gingers, fern trees, bananas, and red ohia trees. Is that a dinosaur I see poking it's head up behind that fern tree? It's so lovely and tropical back there that I could easily imagine being in another era. 

So that's it. 


Wednesday, March 2, 2016

Time

Well, I've obviously filled up all my available time allotted for working each day. Filled it up so completely that I no longer have time to blog. Not good. Changes will have to be made. The time has come to incorporate some equipment, tools, and new systems that my mother so proudly loved and called "time savers". Part of being successful in life, as far as she as concerned, was having the latest and greatest time savers in her home. 

I've been looking over my daily routine and seeing where I could make some adjustments, perhaps adding a timesaver or two. One task, making Mom's Famous Slop & Glop, has some promise. One solution -- I could cut out making my own livestock food altogether and switch to strictly commercial feed. That would free up a significant chunk of time. That's one option, but not one that is appealing to me at this time. Another is to somehow quicken the process. The bottle neck in the process seems to be grinding the feedstock. Currently I'm using a blender, which of course only holds a small portion at a time. I think switching to using an old kitchen garbage disposal for grinding could cut a major chunk of time off the process. I know where I can get one real cheap, in fact I'll can trade a few buckets of vegetables for it. So this is going to be a project I'll focus on this coming week. 

Another task where I can see I could save time is in watering the various gardens. Right now I hand fill large jugs with water from the irrigation catchment tank, transport them to the gardens via the ATV, then hand water the garden beds. This method worked well when I only had a few gardens but I've been constantly expanding. Now I'm too big for the hand method. But I'm not productive nor big enough to justify installing a large pump (remember, I'm on limited solar power) along with an extensive irrigation system. Going with a gasoline powered pump doesn't make sense to me at this point. Nor is buying a portable generator economically sensible. Plus my growing beds are scattered, incorporated into the landscaping and terrain. There is no central garden. Hoses or pipes would have to go every direction. But I do have the capability of transporting a half ton of water in my pickup truck. So I'm thinking along the lines of transporting a large volume of water then using a DC transfer pump to water the various gardens. I could drive all the the water I need directly to the gardens, then run the pump off a couple of deep cycle batteries. I already have the batteries available, and a used transfer pump that I rebuilt and now works fine. So I plan to give this idea a trial run and see how much time it saves me. 

Another area where I believe I'm using too much time is my greywater use. Presently the kitchen sink and clothes washer drain into trashcans, whereupon I bucket the water out and water banana trees, flower beds, fruit trees. This system is another big time user. I need to design a simple system for the kitchen sink so that the water can be self delivering to either the banana trees or the orchard trees. The sink doesn't generate a lot of waste water, so it shouldn't overburden the trees if all the water goes directly to the them. The clothes washer generates a lot of greywater, more than I want to be going directly to trees and flower beds all the time. So a simple storage arrangement needs to be set up and delivery system needs to be made. I already have an assortment of supplies for making such a system, but I'll need some hose connectors, values, and perhaps another hose or two. If I'm successful in creating a greywater irrigation system for the wash machine, it will save me a good chunk of time. 

So the plan is to focus on setting up time saving projects and see how that helps my problem of not enough time. 

Saturday, August 29, 2015

Hurricane Preperations

This year Hawaii has seen a number of hurricanes heading it's way. So far, they have just brought rain, plenty of it. Areas have been flooded and roadways closed here in Ka'u. And it looks like more big storms heading our way may possibly past over or near at least some of the islands. This many storms have made my mainland friends nervous....for me! Being prepared makes sense and takes some of the danger out of the storms. One giant prep issue is not living on the coast. As much as I love the coast, living there is a tad insane since floods, storms, and significant tsunamis are historically normal for here. 

Having the homestead ready for a hurricane is of course important to us. Not that we can protect everything and not that we go overly crazy about it but we do indeed take steps. Some of what would be storm prep for others is simply routine homestead life for me ........back up water & food supplies for humans and livestock, dry firewood, tools in working order, etc. 

Certain preparation jobs are things that I do routinely anyway. They are part of living on a homestead and living at a location that is about two hours away from major supply sources....in Kona and Hilo. They include : 

1- Water. I'll top off our normal day-to-day drinking water containers. We also always store 25 gallons of emergency drinking water. This I'll freshen up with new water, if it hasn't already been done recently. While I'm thinking about water, I'll check that the tarps covering the catchment tanks are well lashed down. Plus I'll divert the rain from the roof to drain away from the house rather than flow into the catchment tanks. But this is something that we do anytime the tanks are full. 

2- People food. A bad storm could destroy some, if all, of the gardens. So I keep a supply of emergency food on hand that doesn't require lots of prep : peanut butter, jelly, crackers, canned tuna, mayo, assorted canned veggies & fruits & soups, quinoa (hubby will eat this but not rice). 

3- Livestock food. Finding grazing for the livestock after a big storm shouldn't be all that of a problem in my location. And since I already keep a couple of sacks of various feed ahead of my needs (basically cob and brown rice for mom's famous slop & glop, plus a bag of hay cubes for the rabbits so that I don't have to be out in a storm cutting fodder), I don't need to bring in extra. And I routinely keep a few bags of dog and cat food on hand. 

4- Medical. I keep well stocked with medical supplies anyway, so no need to do extra. And since we a distance from our pharmacy, we already never let hubby's prescription meds run low. 

5- Fuel. I'll make sure that the extra propane tanks (for the range and paloma) are full. We will fill the gas tanks on the vehicles and fill all the gas cans. And I'll check the tarp over the firewood shed to see that it is in good condition and well lashed down. I could always heat water and cook food on my woodstoves if need be. 

Other prep jobs are outside of my normal weekly routines. They include:

1- Remove or batten down items that could be blown away. Move outdoor chairs into the barn. Take down the shade tents. Stack the water hauling trashcans and then tie them to the fence. 

2- Check the roofing for vulnerable spots. While the house roofing is very secure, those over livestock pens are less so. And iffy spots are reinforced with another screw or two. 

3- Harvest any banana bunches that look ready. Those banana trees take a beating in a storm. 

4- Make sure we have enough small tarps in the tool shed plus nails, screws, or rope to secure them in case a tree limb takes out a window or two. 

5- Park the vehicles in a spot that hopefully will be safe. Boy, that's a whopping big guess. 

6- Move the hoofed livestock, except the pigs, into the most secure inner pasture just in case a fallen tree takes out some fencing. Move the pigs to a spot that doesn't flood. 

Maybe I'm missing somethings, but this seems to be it. We've had heavy, twisting winds here before......errr, like last January. So trees coming down is nothing new. And we've had heavy rains...2 inches an hour....13 inches overnight. 

As for electricity, we're already off grid. So I don't need to worry about losing to grid. 

Sunday, July 12, 2015

Homestead Medical Kit

I'm a big advocate of having a good selection  of medical supplies on hand. I guess that comes from having had a career in a medical field. Around a homestead farm, there are always situations happening that need some sort of medical attention. Sometimes it's the livestock or pets, sometimes it's the people. And how come emergencies often happen at night, on weekends, or holidays? At least with human medical needs, there is always the emergency room to resort to...though it will cost a bundle. But with animals, at least in my area, you're in your own. Any emergency veterinary care is two hours away, that is IF you can convince the vet to be available. Plus it will cost you a bundle. 

I'm finding that most homesteader types learn how to take care of many of their medical problems themselves. They read books, research the internet, watch YouTube, consult with others, attend training classes when they are available, and learn from other people. But regardless of how one learns, one needs the medical supplies to be on hand. At least here where we live fairly remotely, you just cannot run down the block and buy what you need any time of the day. 

So what to keep on hand? Everybody seems to have a different idea of what to keep in their medical kit. But here's what I do, or suggest..........

Tools
...sharp scissors (good for cutting tissue, that means skin, muscle, and such)
...blunt tipped scissor (for cutting clothing, bandages, tape, suture material) 
...scalpel blades (or clean, new single edge razor blades will do)
...surgical needles (or sharp, new, strong sewing needles will do)
...suture material (or clean lightweight fishing line will do. Clean heavy duty polypropylene sewing thread is another good substitute.)
...hand tools for clamping blood vessels, holding sewing needles, holding blades, holding tissue. I have an assortment of actual surgical instruments, but I've seen acceptable clamps, hemostats, and pick up forceps sold at hardware and automotive stores. 
...stethoscope, while not a high priority, it comes in handy
...glucometer and blood pressure machine come in handy. Again, not a high priority. 
...otoscope. Drugstores sell a cheap plastic model that is very useful. 
...a small basin. I also have a quart sized mason glass jar that I use to hold a sterilizing solution (benzalkonium chloride) for needles, suture material, and to soak instruments that I want sterilized.) 
...small powerful flashlight
...rectal thermometer. Oral will do, but the shape of a rectal is safer. 
...safety pins
...needle nose pliers
...wirecutter
...magnifying glass

Medical Supplies
...disposable gloves
...a wide assortment of bandaids, big, small, butterfly, odd shapes
...splints. Some material that could be cut and shaped is handier than keeping a large selection of different shapes and sizes. I've seen moldable material sold in craft stores that would be good for splints. I also keep a couple of finger splints in the kit. 
...adhesive tape (blue painters tape could be a substitute but the cloth tape works so much better.) Plus a roll of duct tape is a good idea.
...stretchy bandage tape/elastic wrap, or at least an ace bandage. A product called vetrap is really handy and easy to buy at feed stores. And I found this (below) at Walmart.....
...gauze sponges, preferably 3x3 or 4x4
...rolled gauze bandaging 
...non-stick sterile bandage pads
...a very large bandage or sterile towel for large or gaping wounds. Or at minimum, a clean new hand towel that is stored in a plastic bag for cleanliness. 
...a tourniquet or at minimum a lightweight rope suitable for use as a tourniquet. 
...alcohol, peroxide, witch hazel, vinegar, honey 
...q-tips or swabs
...tissue glue ("liquid bandage") or at least superglue
...blood clotting solution or powder
...antiseptic, preferably benzalkonium wipes (Clorox disinfecting wipes). At minimum, a bottle of hand sanitizer. 
...betadine soap and solution
...a space blanket or other type of blanket
...instant cold compresses.....

...IV fluids and IV tubing with needle
...salt 
...bottle of white Karo (a glucose source)
...syringes with needles. One large syringe for irrigation use-- or a turkey baster. 
...lubricant jelly

Medicines
...topicals. I have an assortment of prescription topicals, but there are things that can be purchased in a store that are good for a medical kit. Bacitracin. Neosporin. Hydrocortisone. Benadryl. Capacin. Afterbite. Lanicaine. Noxema cream. Tinactin. It doesn't hurt to have other assorted topicals on hand, including lip balm. 
...oral medications-- aspirin, advil, benadryl, imodium, pepto bismol, antacid. Cough medications (expectorants, suppressors, throat lozenges).  I also have several other different prescription medications but they can't be obtained without a doctor's permission. Some could be obtained via large animal supply businesses, such as Jeffers, Valley Vet, Fosters and Smith, etc. 
...eyewash and eye soothing solutions. Eye anesthetic. 
..."toothache oil" 
...epinephrine 
...reserved for livestock use: oxytocin, tranquilizer, sedative

As you may have noticed I didn't include homeopathic items in my own kit. I have not seen good results with most while treating animals. Thus I only include what experience has worked for me in the past. 

Depending upon what livestock I keep, I will keep a few other things on hand. When I had goats I kept certain vitamin injectables and antibiotics on hand. Right now I always keep a bottle of injectable penicillin in the refrigerator. And for the equines, I keep things for treating colic. For the sheep I keep frozen colostrum always available and a tub of lamb milk replacer (with fresh lamb nipples for bottle feeding). A human male urinary catheter makes a handy stomach tube to feeding a weak newborn lamb in an emergency. No....don't shove it up THAT end. It goes down the throat.