Showing posts with label Roof. Show all posts

Friday, July 12, 2013

Replacing a Simple Metal Roof -- Day 4

Hubby changing the wiring on the solar panels.
We finally got the rest of the solar panels with their racks down off the roof, plus the one rack that was on the mini-shed next door. Next  step -- rewire the panels from 24 volts to 48 volts. The reason? The higher the voltage, the further the distance one can drive the power. When the panels were up on the roof they were closer to the inverter. So 24 volts was fine. But now they will be about twice the distance away, so hubby felt that going with 48 volts was the better idea. Our inverter can handle 48 volts just fine. And since the way our panels are already set up, it was a case of simple rewiring. It took some time to do all 16 panels, but it wasn't all that complicated.

While hubby worked on the wiring, I cleaned the back the back of the panels. The surface was developing pepper-like pits that were showing some rust. Even though protected from the run, the surface was obviously reacting to the acidic moisture in the air. Once clean, the entire surface was treated with phosphoric acid, a product called Ospho. Works well. I will have to keep an eye on the panels in the future. 

It was now time to set the panels onto the ground fame. We had removed all the rack except for the two rails holding the four panels together as a group. Thankfully the four panels linked together in this fashion were not too heavy. With not too much grunting and hyperventilation, these two old foogies managed to flip them over and position them onto the ground frame. Good job done, if I say so myself! 

Now with everything off the top of the shed, it was easy to finish up the original job. Gosh, that was what started this whole mess! Time to finish that simple metal roof! The last pieces on needed to be cut. So ask, how does one cut metal roofing on a small at-home job? Buying or renting a hugh sheet metal cutter wouldn't make sense. And the roofing is too thick for metal snips. A sawsall would work but you would need to make a frame to hold the sheeting firmly in place. But there is a trick that works far better and doesn't require expense. Our friend David came by and showed us how. Take an old worn out circular saw blade. Put it onto the saw BACKWARDS. Now go ahead and cut the metal. Worked like a charm. Smooth. Easy. Much like cutting wood. Incredible! 

Finally, finally, finally, the simple metal roof has gotten done! 
Cutting the metal roofing. Yes, using a circular saw!

So here we sat with one fine, simple metal roof but no functioning power system. Back to work! Snuffling around the shed contents, we found the electrical box that we knew that we had somewhere, but alas it turned out to be an indoor box. We needed an exterior box to act as a combiner box for the solar panels. Then measuring the distances we needed for wiring, we discovered we were short by a few feet. Of course! What next? So it looks like we will have to make do until we can make a trip to Kona to pick up an outdoor box and exterior wire. 

Thursday, July 11, 2013

Replacing a Simple Metal Roof - Day 3

Ground frame completed and painted. You can see the tarp Costco shed to the right that
we had moved in order to make room for this ground frame. By the shadow you can see
that the sun is overhead and slightly past the zenith because it is now past June 21st.
This day was July 8th.
With the basic ground frame completed, hubby had to give some thought as to how to effectively mount the solar panels. This time around he wanted to set them up so that their position to the sun could be shifted between winter and summer. Being that we are living below the Tropic of Cancer, the angle of the sun crosses over the zenith, making fixed mountings for the solar panels rather inefficient. The fact that most of our sunshine occurs before noon each day also complicates the issue.

When we went to start moving and adjusting the position of the new rack, we quickly realized the it needed to be braced better. So with the aid of a square and level, we got the rack squared and plumb then added bracing. Now the sucker was solid! During this process we set the legs upon the concrete footings, positioning the rack in it's final resting place.

Now came a coat of paint. Luckily we still had almost a full gallon of the house foundation paint that had been leftover. And in no time we had most of the paint on the rack, and not too much of it on my hands, legs, and clothes. A painter I am not! Well I'll correct that.....I can paint, but just about everything gets painted! Paintbrush handle, the ground, me, and eventually whatever it is that I'm intending to paint. Good thing I never had my heart set on being a house painter, ay?

In the midst of this endeavor, the dogs broke lose from their pen (three of them need to be confined when not being actively watched because they will eat chickens, lambs, and cats. Yes, they are throwaway dogs with criminal histories that we adopted because no one else wanted them. For the life of me I don't know why we did, but it must have been in a moment of insanity plus a flash of kind heartedness.) We dropped everything, ran around like idiots catching them. Repaired the spot where they had pulled the fencing, then went back to painting. An hour later, here they come again, running amuck, scaring the daylights out of the cats. Quickly rounded up, hole in fence repaired. Ten minutes later, déjà vu all over again!!! Rounded them up one more time. They thought this was a grand game. Yes, we know that the vog has been killing the fencing and it needs to be replaced, but why today? So out came a roll of 2x4 fencing and hubby lined the kennel pen with it. That's just a security patch, but it will gives time to buy new chainlink and do the job right.

The dog escape interlude gave the paint a chance to dry, so now we started moving the solar panels to the new ground rack. Since I have a task that needs to be done in town, hubby got to finish up. Tomorrow morning we will move the rest of the panels and start reconnecting the solar system. At least, that's how we have it planned.

And we still need to finish the second half of that simple metal roof job!

Wednesday, July 10, 2013

Replacing a Simple Metal Roof -Day 2

Laying out the concrete pads for the legs of the rack. Crusty, one of the
farm dogs is supervising the job. 
What's the firsts job of day #2? --- purchase the new lumber to make the frame that we will  be mounting the solar panel racks on. So right after breakfast and routine farm chores, we headed to Ace Hardware (the only store within a 2 hour drive that sells lumber). Three 8' 4x4s, either 10' 2x4s, eleven 8' 2x4s, nails, and some concrete stepping stones and we were heading back home. 


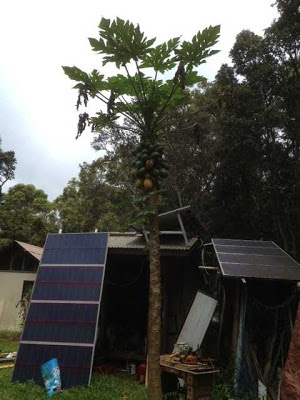
Next job, remove the two papaya trees that were in the way. Normally I'd feel bad taking down fruit producing trees, but these trees only produce fruit suitable for chicken feed. Not sweet or good tasting. So I was willing to sacrifice them. The chainsaw made quick work of the task. Soon both trees were down and in pieces. I gathered up all the green fruits and young leaves to use for chicken feed. The rest of the trees went into a hole destined to become my next flower bed.

Smaller of the two papaya trees that had to come down. 
The larger papaya tree down and ready to chop up
into smaller pieces. 
I was surprised to discover that papaya trunks are hollow. 
Trunks were solid down by the base. They oozed
a very slippery sap for several minutes. 
About 2 foot above ground, the trunk
became hollow. 


While I finished cleaning up after the tree removal, hubby started laying out the materials for the ground rack. This time we were building it out of treated lumber, which the vog won't destroy.  And after a bit of contemplation, checking the angles of the sun, and determining where tree shadows will fall, hubby settled on a plan of attack.


The frame almost completed. The rest of
the bracing needs to be made. 
After a brief lunch break, we started building in ernest. The sunshine had disappeared and rain threatened. Geez, what else? But we plowed onward. To our surprise, we lucked out. Although it spritzed a time or two, the rain held off. And after much sawing, drilling, hammering, and squaring up, a ground frame started taking shape. By the end of the day, the basic frame was complete.

Yes, we're not the fastest carpenters around, but we work for free. Wow, I can't ask for more!

Tuesday, July 9, 2013

Replacing a Simple Metal Roof -Day 1


Old rusted roofing that we removed. 
Brand new roofing to be installed. 
Our electrical shed (it houses the solar system controls and some of the panels are mounted on its roof) has an elderly metal roof. The previous property owner built it out of salvaged materials, and although the building itself is holding up quite well, the metal roof has succumbed to the vog. Over the past few years we have been patching spots as they appear, but the acid rain has been eating away at the channels. Last week one of the cats was up on the roof and it's weight punched numerous new holes. Oh my, time to replace the roof.

If we didn't have the solar panels mounted on the roof, changing the metal would have been a fairly straight forward job. But alas, things don't go all that simple for us. We made the poor choice (in hindsight) of putting the panels on the roof, something that everyone and everybody said to do. Now I'm wondering why? Why do they have to be on the roof? Now that the roof needs replacing, we have to remove the panels. A simple afternoon job is now going to take days plus disrupt our electricity. Hmmm, we have to think about this.

New roofing on the right. Solar panels and rack on the left
still need to be removed so that we can get at the old roof.
We initially thought we could simply disconnect the solar rack, move it over a couple feet out of the way while we removed the old roof panel a slid the new one in place. Wrong! The stainless steel screws used to make the rack were all very badly corroded. Not simply corroded, some were crumbling. The entire rack was in danger of coming apart. Next, many of the screws holding to roof panels in place were impossible to back out. They too were in bad shape. This was looking more and more like a big job.

Well, the solar panels and rack simply needed to be dismantled and totally removed from the roof. So we ended up spending half the day getting that done, being very careful not to damage the solar panels themselves. We salvaged all the aluminum angle so that we could use it again. Of course, the electrical wiring needed to be disconnected. All the stainless steel screws were beyond reusing. So on day #1 we took care of one solar rack and we have to look forward to repeating this process tomorrow with rack #2. Gee...so much fun.

Next we removed half the old roof, having to use a sawsall to cut off the roofing screws. Once the old roof was off, it was simple to lay on the new panels and screw them into place. This took no time at all, so it seemed.

With the shed roof now half done, and our arms too tired to tackle the second rack, we turned our thoughts to a ground rack for the solar panels. Looking around, the most logical spot to put it would be right where our Costco storage "shed" was located. Ok then, empty the shed, disconnect it from the lumber foundation, pick it up and move it over 15 feet. Since it was only the two of us, picking it up wasn't exactly what we did. We sort of walked it to its new location, moving each of its six vertical posts (we called them legs) a few inches at time. But in no time it shuffled over 15 feet. Once pegged down in place, all the stuff we emptyed out had to go back in. Boy, it was a long afternoon!