Showing posts with label Coffee. Show all posts

Monday, October 28, 2019

Coffee Season Has Started

I'm picking my first coffee cherries now. This year the trees are producing heavily. I guess it's because we've been having a lot of rain, with it happening almost every day. Sun in the mornings, overcast in the afternoon, rain by evening.


Most of the trees are heavily loaded. Since the cherries ripen slowly over time, it looks like I'll be picking coffee for many weeks to come. 


The sad thing about our coffee crop this year is that hubby and I won't be the ones drinking it. Hubby has changed to decaf because of heart issues. I've cut out coffee due to reflex disease. So it looks like our coffee will be used for Christmas presents this year....or be used as a trade item. If I can find people willing to trade in green bean, rather than roasted, I'll continue to grow coffee. If not, I'll phase this crop out. I really don't want to be roasting coffee when I can't drink it myself. It's too much of a tease. 

Saturday, August 17, 2019

Coffee Trees Today

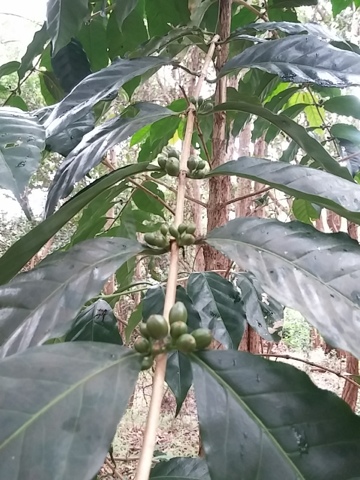
Checked on my trees and found most of the green beans in good shape. But many individual branches are blooming, full of flowers. Generally the branches heavy with green bean have zero flowers. Branches with little or no beans are in full bloom. A strange sight. I did find one branch that was a mix -- rather sparse on beans and blooms.

A good crop of beans. It will be beautiful when the turn red. 

White coffee flowers. From a distance it looks like snow on the branches.

A mix of flowers and green beans. 

Tuesday, February 6, 2018

Coffee Threesome

Crazy climate? I suspect the coffee trees think it is. How about this.........


Flowers, green unripe cherries, plus red cherries ready to pick....all on the same branch. 

This is happening to the trees growing in the full morning sun, shade after 1 pm. Last year they flowered in the beginning of April. As a comparison, the full shade trees are not yet flowering. 

Saturday, November 18, 2017

Drying the Coffee Beans

A pause in the action. It takes a week to initially dry the beans, but I need to wait a bit longer for them to dry enough for the next step. As soon as they are ready, I'll post what gets done next -- removing the parchment layer to get to the green beans ready for roasting. The parchment needs to be really dry and brittle. 

Stay tuned. 

Friday, November 17, 2017

Processing Coffee Cherries At Home

The red berry on coffee trees is called coffee cherry. Yup, it looks like a cherry. But it's not juicy and fleshy as a eating cherry. It's rather firm to the touch with not much flesh at all. 


That beautiful red color is only skin deep. Beneath the tough skin, a thin layer of slippery flesh adheres to the bean. Separating the cherry skin from the bean is rather simple. For small amounts, one can use their fingers. I'll use my thumbnail to make a nick in the skin, then it's just a case of squeezing the beans out. Pop! Gotta be careful because they can fly beyond the bowl if I squeeze them too hard. There will be some beans that are adhered to the skin. I discard these because there us usually something wrong with them one way or the other. 


Most cherries contain two beans, but one or three isn't all that uncommon. Beans that are solo are shaped roundish and are held in high esteem. These are called peaberry. Many coffee drinkers swear that peaberry tastes different and better, but honestly I can't tell the difference. But coffee lovers will pay extra for peaberry. About 5%-10% of my crop is peaberry. 

Removing the beans from the cherry is called "pulping". I'll pulp my cherries by hand for small quantities, but if I get a full basket while harvesting, I'll switch to using a hand cranked cherry pitter. It does a faster job of it. But of course, there's that clean up time at the end that deters me from using it for tiny batches. 

(Above, the top bowl has the pulped coffee beans....that is, the red skin has been removed. Bottom bowl cintains the removed skins.) 

If I had a larger orchard of coffee, I'd need to go with something bigger. They make pulpers for just about any size operation, from handcranked models to larger machine pulpers that combine multiple processing steps. I don't foresee me ever getting past the handcranked cherry pitter. 

Once I've got the beans freed, I need to wash them well in water. I simply place them in a bowl or other container, add water, and use my hands to rub the beans well. This releases bits of cherry skin and flesh, which I flush away with repeated rinsings. Inferior beans often float, so they're easy to remove. Once cleaned, I'll look over the beans for signs of coffee borer damage. Anyone that shows dark areas are sorted out. 

(Above, these beans contain coffee borers. The dark spots indicate the damaged areas.) 

Side note: the discarded cherry skins get added to the cook pot of the chicken slop & glob. The borer damaged beans get dumped into boiling water (to kill the beetles) then disposed of by tossing them into a garden area. With the internal beetles and eggs killed, they pose no danger. I don't feed the beans to the chickens because they are like stones.....to chickens can't digest them.) 

 Next step.....remove the fleshy slime on the beans. The easiest way I've found is to soak the beans overnight in water. By morning the flesh is starting to ferment. I'll now use my hands to repeatedly and vigorously rub the beans together, scraping off the loosened flesh. With lots of water flushes and rubbing, I can feel the difference. The beans start to feel rough rather than slippery. It doesn't take long to clean them, just 3-4 minutes. By then the rinse water is clear and clean. 

Next step....dry the wet beans. I sun dry the beans over a period of a week. Leaving them spread out on a tray on the truck's dashboard works just fine. I just have to remember to park the truck at the right angle to capture the sun. Most of my neighbors simply spread them out on a screen or fine mesh in a sunny, airy location. But they have to protect them from the rain, which this year is a problem. It becomes a race to get them dry before they begin molding. Because I don't have too much coffee, the truck method works fine. 

Once dried for a week, I can then store the beans is a mason jar to await roasting. But I could also simply store them in a burlap bag in a dry, airy location. Problem is, I don't have one in my farm. It's been too wet this year. In the past I have used a clean five gallon bucket with a tight lid. That worked ok with larger quanties of beans. 

Commercial operations test the moisture content of their beans. They want them dry enough not to mold, but retain a tad of moisture in order to roast properly. Back when I use to deal with hundreds of pounds of coffee beans, I did that too. But now I'm working with only a small amount of coffee, so I just give it my best guess based upon my prior experience with processing coffee. Home brew doesn't have to be so precise. And I still can fairly well tell the moisture content by listening to the sound the beans make when dropping into a metal bowl. 

How much coffee do I get from my trees? Last year I got just under 60 lbs of ready to roast green beans, enough for home consumption and a little to give away as gifts. This year I'll get be getting more since some of the younger trees are producing more cherries. 

Tuesday, November 14, 2017

Coffee Harvest Time

This year's crop is coming in about one week earlier than last year. Yes, having this blog has allowed me to keep track of such things. I'm not good at keeping a garden notebook, so this blog is coming in handy. 


Some of the trees have a heavy crop, considering that they are full-shade grown. Others are a bit lighter, but still as abundant as last year. 


Looks like I'll be picking coffee cherry for the next few weeks. The biggest picking looks like it will be now. With a smaller picking in 10 days. And a final, smaller picking 7-10 days later. After that it will be just cleaning up the stragglers. But if time permits, I prefer to pick every 3-5 days because processing smaller batches of coffee cherries us easier. 


I promised some readers that I would show you how I process my coffee from start to finish. So picking the ripe red coffee cherries is step #1. 

Stay tuned, same channel, I'll show you the next step. 

Wednesday, April 12, 2017

Coffee Flowering Time

Once again the coffee is in full bloom. Checking back on my blog, I see that the trees are doing their thing about 3 weeks earlier than last year.


This year the coffee is acting normal again, at least so far. No sporadic odds & end blooms at weird times. No blooms and cherries at the same time. And the young trees that are blooming for their first time are right in sync with everyone else. 

Most of the trees have lots of flowers on each branch. So it looks like they are primed for a very good year. 

Saturday, November 19, 2016

Coffee Pickin' Time

Just a quick note....it's coffee time again. For some reason, the coffee cherries are ripening more evenly on certain trees, but not others. Not sure why. In the past the harvest period was more spread out.


But it surely looks pretty seeing the whole branch loaded with almost all bright red cherries. 


Above is one of the trees located in full, deep shade. As a result the tree growth is very open, sprawling, and leggy. But it still produces quite a bit of cherries, and as you can see. Almost all are ready to pick at the same time. This surely makes harvesting easy this time around. 

A while ago someone asked me why I planted so many coffee trees in the deep shade rather than a spot with more sun, since after all the sun-planted trees would produce twice a much coffee. My reason is twofold. First, I prefer the flavor of shade coffee. Second, it's a way to utilize the shady locations on my farm. There's a limited selection of crops that will grow in the shade, and coffee is one of them. 


Thursday, May 19, 2016

Coffee Flowering - A Farm Journal Entry

For the past two weeks my coffee trees have been coming into bloom. That's not unexpected because I've been getting quite a bit of rain these past few weeks. I'm seeing plenty of blooms on the trees, making them look like they have a narrow line of snow down their stems. Very pretty. The individual flowers are only an inch across, but they come in clusters, making nice clumps of white. 


On the first trees that started blooming 2-3 weeks ago I'm already seeing teeny baby coffee cherries... Itsy bitsy green bumps smaller than a pea. 


Before I know it I'll be picking coffee again! 

I'm starting to keep records on some of my crops, thus the reason for this post. I'm not much on record keeping. Gee, I keep losing those little notes that I make for myself about the farm. I tried keeping a farm journal but I never could remember to make timely entries. Then I'd misplace the journal, never to be seen again for weeks. So I'm resorting to using the blog for some of the record keeping. Hope you don't mind. ..........I guess it's just tough luck if you do. :) 

So here I am... coffee trees in bloom. The earliest trees started two weeks ago. The slower trees are in bloom now. 

Sunday, April 17, 2016

Using Coffee Grounds

I'm surely not the person who thought up using coffee grounds in the garden. As a young child I watched my grandmother dig all her kitchen waste, including coffee grounds, into the garden soil. So to me, this was a normal thing to do. I've been using them for years on the homestead, but it's only been lately that I am noticing the differences that coffee grounds make to soil and plants. 

Every week I get about a five gallon bucket full of spent coffee grounds from various friends and neighbors. That may sound like a lot, but when it's spread across 21 1/2 acres, it's not all that much. But I'm glad to get those grounds and I'm not complaining. 

Initially I added the grounds to the compost bins. And truthfully, I feel that is excellent way to use them. But I've also done a bit of experimenting just to see what would happen.....
1) Sprinkle grounds over the soil prior to tilling as one part of the numerous soil amendments to be tilled in between crops. I can't say that this makes the plants grow better or worse, because any difference is too small to notice. But I've noticed one huge difference. The tilth of the repeated coffee grounds treated garden beds is far better than the beds that haven't gotten the multiple applications of coffee grounds. The coffee ground treated soil is more crumblier (is that a word?), has a nicer feel to it. The change didn't happen quickly, but rather, over the years. But it's a noticeable change. 
2) Till in a one inch thick layer of coffee grounds. This was an experiment just to see if coffee grounds made any change in the crop. I think that the bean plants were a tad less productive, but it could have been due to some other factors. Since I wasn't sure, I opted for the next experiment. 
3) Till in a 3 inch thick layer of coffee grounds. They were tilled in for around 6"-8" deep. Now this time the difference in the plants was noticeable. The bean plants were smaller, had less leaves, looked to be a bit nitrogen deficient, and produced a smaller crop. Well, that was no big surprise. The grounds were fresh, not composted. Therefore as they decomposed in the soil, they robbed nitrogen in the process. That resulted in less nitrogen available for the bean plants. So I made note of the results but wasn't astonished. But one other side note -- since then, that garden bed soil has had significantly improved tilth. 
(Above- the standard amount I spread over a garden bed prior to planting.)

Here are my observations and conclusions.....which very well might be off base since I'm no ag research biologist. Using coffee grounds via the compost piles works just fine. They don't seem detrimental to the crops and are another source of organic material for decomposing into plant nutrients. Tilling a light layer into the soil between crops seems to work fine too. But tilling in thick layers of non-composted coffee grounds results in nitrogen binding, just what would happen if I tilled in a lot of sawdust, dry grass clippings, tree leaves. So I conclude it's best to use non-composted grounds sparingly or compost them before using. One observation that took me by surprise was the effect on soil tilth. The grounds definitely improved my soil, making it feel lighter in my hands and more crumbly to the touch.  I actually liked the effect, and therefore will continue to add coffee grounds for now on. 
(Above- that some bed right after I used the hand pick to roughly mix in the grounds. I next added some coral sand and rabbit manure, chopped it in lightly, then seeded beans.) 

Just a few more words for other gardeners who might start using coffee grounds. 
1- I see that dried grounds tend to shed water. So I don't allow the grounds to stay on the soil surface where they would dry out, becoming hydrophobic. After a light rain they form a surface crust, shedding water even more so. 
2- I take care not to over do the amount of grounds added to the soil at any one time. 1/2" seems fine from what I've observed. Adding a bit of some other nitrogen source along with the grounds may be a good idea. I routinely add a bit of rabbit or composted chicken manure to most of my garden beds between crops anyway as part of my bed preparation routine. 
3- The coffee grounds I'm using are slightly acidic, but not overly so. Not a problem for me. When I use them in the compost piles, they do not change the pH of the finished compost. But then again, the grounds make up less than 10% of my compost mix. Plus I don't see them making a significant effect on the soil pH in the garden beds. 

Sunday, April 3, 2016

Producing Baby Coffee Trees

3 months ago I planted dozens of freshly harvested coffee beans with the hopes that they would germinate. Success! They are starting to sprout. At the time I didn't have any flats/containers to plant the beans into, so I simply poked them in among the green bean seed that I planted for seed saving purposes. I figured that those green beans would be harvested just around 90 days, so the timing turned out to be perfect. When I removing the old green beans, I saw that coffee was beginning to show itself. 

This is the first time I've tried intentionally to grow coffee, so it's time to experiment a little. I know that coffee seedlings transplant really easily, but at what stage in their development? So I'm pulling some just as they sprout while others I'm waiting until the colyledons erupt from the seed case and flair open. I'm transplanting them into containers where they can grow until they start producing leaves. Why? Because I don't have spots quite ready for them yet. 
(Above the little seedlings I've gently dug up. Now they'll be just as gently replanted.) 

So what have I discovered so far? It seems to be best to wait until the colyledons open before transplanting them. Those that were still confined in the seed hull were slow to unfurl, and some never did unfurl. 
(Above, the cotyledons haven't erupted yet. You can still see the bean hull.)

All seedlings with the already opened codyledons transplanted ok and are doing just fine. Now, this is just opposite to what I've read on the Internet. Ag sites recommend transplanting the seedlings before the codyledons emerge. But this is the fun of experimenting. I find out what works for me, my technique, my location. But of course I have to keep in mind that my method might result in other negatives. Perhaps the seedlings won't thrive. Perhaps won't develop strong roots. Only time will tell. 

I plan to plant about 100 more trees onto the farm. They are a crop that I use for the shade areas, since I get few crops from the shade areas. The extra seedlings will be planted into pots and offered for sale as part of my farm income project. 


I want to show you what I found with some of the little seedlings which prompted me to discard them.......
They had bent primary roots. Coffee growers call these "J roots". I have read and been told that these seedlings do not produce strong, thriving mature trees. So I didn't bother transplanting these seedlings. They were just chucked aside to become part of the mulch. 


Thursday, December 10, 2015

Harvesting Coffee

It's time! Cherries are starting to turn red. Ah, this is such a satisfying time. Harvesting is my reward for all the other work that went into the crop. 

I hand pick my coffee. Hand picking is the way that most farms harvest their coffee crops around here. I pick the individual dark red cherries, one by one. If an entire cluster is ready, then I might be able to get away with striping that cluster off the branch in one quick scoop, but usually it's just one or two cherries at a time. The cherries don't ripen at the same time. They don't easily fall off the branch, thus requiring a conscious effort to pluck or twist them off. Yes, coffee picking takes a tic of time. Thankfully I can do it standing up most of the time rather than bending over the entire way down a row, as with bush beans. 

(Above, coffee cherries on the tree ready for picking.) 

My trees stand 6 to 7 feet tall. And the coffee is produced on branches just about all the way up. So in order to reach the top branches, I need to bend the trees down a bit. The trucks are flexible enough to do that without snapping them off most of the time. I use a hook on the end of a rope, that is hooked to a makeshift pelvic harness. Flick the hook around the truck, step back to bend the trunk towards me, then use my free hands to pluck cherries. I drop the cherries Into a basket that hangs in front of my chest, again freeing my hands.

(Above, fresh coffee cherries.) 

Once I've harvested the cherries, I need to separate the beans from the skins/pulp. There is machinery to process large volumes of cherry, but my small amount can be hand done. I don't even get enough to justify the purchase of a modified cherry pitter. I simply squeeze the cherry between thumb and fingers until the beans pop out. A few require me to use my thumb nail to score the skin, but not too many to be annoying enough to purchase a cherry pitter. 

(Above left, the cherry husks. Right, the fresh coffee beans. In the smaller white bowl are the damaged beans that contain coffee borers. I will destroy those by dropping into boiling water.) 

Once the beans are collected, I rinse them in water a few times to remove bits of pulp. And I'll also discard any beans that float. When I'm satisfied, the beans are then put into a mason jar and covered with water. They are then allowed to sit overnight so that slime covering the beans will ferment a little, thus slip off easier. In the morning I'll repeatedly vigorously shake and rinse the beans until the water runs clear. I'll add a half a cup of coral sand to the jar so that it will act as an abrasive when I shake it, with the sand quickly scrubbing the beans clean. When I rinse the beans in a colinder, the sand washes right through the holes, leaving just clean coffee beans behind. 

Now it's time to spread the washed beans out onto a flat tray to dry someplace warm and airy. I don't want them to mold. The first 24 hours I usually put the trays onto the dashboard of my truck, parked in the sun with the windows mostly up. If there is no sun or if I'm firing up the woodstove in the house, I'll put the trays above the woodstove where the rising heat will quickly dry the beans. After that I'll usually move the trays to some place more convenient where it's airy and warm. It takes about a week for the beans to dry down adequately. Once dried, the beans can be stored for a long period of time until I wish to roast them. Since I have burlap bags, I store my beans in such a bag down in my barn, where it stays reasonably dry. 

Coffee beans can be processed further and roasted at anytime once they are dried. I normally allow my beans to be stored for a year or more before roasting because it smooths out the taste. For the holiday season I keep special beans that have been aged two years. They make a really nice roast for special Christmas gifts. But beans do not need aging. They can simply be roasted once dried. 

Prior to roasting, the skin surrounding the actual bean (the skin is called the parchment) needs to be removed. Commercially there are machines to do that. But for home processing, rubbing the beans on a piece of hardware cloth does the trick. The parchment pieces mostly fall through the hardware cloth, leaving fairly clean beans behind. 

Now the beans are ready for roasting. At this stage, it is called green coffee. 

Thursday, November 12, 2015

Coffee Bean Borer

There are a couple of pests that attack coffee, with the new kid on the block being the coffee bean borer. It's an incredibly tiny, itsy-bitsy black beetle that totally ruins the coffee bean that it bores into. Bad news. 

Up until last year I was not aware of any borer problems with my trees. But last year's harvest was affected and I suddenly became keenly aware of this pest. 

I don't have any photos to show you of the little beetle itself because I aggressively go after any infested immature cherries. Plus I diligently keep any dropped cherry picked up. Picked cherry is rigorously screened for borer and any infested cherries are totally destroyed. Thus I don't happen to have adult beetles walking around. I do indeed have traps for the female beetles, but currently they're aren't any in them to show you. If you're curious you'll just have to look it up on google. 

But I can show you infested green cherries. I went out searching for them today. Green immature cherries get bored into when they are the size of a jelly bean. The hole is always on the blossom scar end, sometimes dead center in the scar, sometimes slightly off to the side. Like the beetle itself, the hole is real tiny. 

Any cherry that I find with a hole is picked and destroyed so that no beetles can escape. If I cut through one of these green cherries, this is what it looks like inside. Either half, or the entire cherry is black and in the process of being destroyed. In the photo below, those three green cherries all have tiny holes visible. If I cut them open, they would be black inside too. 

Right now I'm checking my trees every two weeks. That seems to be enough. I'm not finding much damage. But I know that I'll never be able to eliminate the coffee bean borer from my farm. Why? One of my near neighbors has hundreds of feral, unattended coffee trees and has no interest in treating them for the borers. Plus she doesn't want anyone else to be messing on her property. Sigh. So I'm stuck with dealing with the borer. The best I can do is to prevent more beetles from propagating and trap as many females as I can before they find my trees. In the future, should the damage I am seeing becomes significant, then I plan to invest in fungi treatment to kill the remake beetles. Right now I am losing too little coffee to justify the expense and time to do this more aggressive treatment. Let's hope it stays that way for awhile. 

Here's a green cherry still on the tree with a beetle hole. 

This is what I want to see, heathy green cherries. No holes. 


Monday, June 22, 2015

Coffee and Rain

The weather has been really unusual for the past many months in that it has rained a bit almost every single day at the homestead farm. Luckily it has been much drier at the seed farm, so my seed production has been ok. That five miles makes a big difference, 

I have been surprised to see how much the coffee is liking the rain. The trees are starting to bloom for the third time this year. I've never had them do this before. 


I have trees that have ripe cherries that I've just picked, green cherries of various stages of development, and new flower buds being produced. Often this is all on the same branch, especially with the trees that are getting a lot of sunshine. The deep shade trees are tending to produce flowers on just the branches without the immature cherries. 

Now that many of my trees are old enough to be producing, I've been watching them closer. So I'm learning a bit more about their habits. The sun trees are well branched & compact, shorter, heavy producers, but require more water and fertilizer. The deep shade trees are open & lanky, taller, lighter producers, but don't require as much water and fertilizer to look good. 

So far I haven't seen the coffee bean beetle, but I know that's only a matter of time. I'm sure the little beetle will eventually find these isolated trees. I've put out monitoring traps, but as of yet, I've caught none. Once they show up, I'll show you what I will be doing to control them. 

Tuesday, June 9, 2015

Making More Coffee Trees

Currently I have several dozen (perhaps I'm really up into the hundreds by now) coffee trees on the farm, and I'm always adding a few more as I open space for them. So I have to make new trees. I've started some from seed, but others I've pulled up from under existing trees. Either way, it works fine for creating new baby trees. 

These are coffee beans from one of my trees. 

I'll plant these about 1/2" below the soil surface. They will sprout in anywhere from several weeks to a few months. I've had some take 6 months to germinate. I suppose temperature has a significant bearing on the germination speed. And I have discovered that fresh seeds germinate faster than older seeds.  But all in all, one needs patience when trying to germinate coffee beans. 

These are young trees I pulled up from beneath existing coffee trees. 
They are surprisingly tough plants. I just yank them up and plant them into potting soil. I let them get a bit bigger and establish a root ball before they get planted out to their permanent location. 

This seedling is ready for planting. It's established a nice rootball. I carefully move the seedling into the hole so that I don't lose the soil ball nor break the young roots. 

I've learned that there are all sorts of theories on how best to plant young coffee trees into the ground. Upright. On a slant. On their side. I really don't know if any of it makes any difference. I've always planted my coffee trees like any other tree seedling. They do just fine. 
Above -- planting on a slant. I've seen this done, but I don't do it. Mine go in upright and straight. 

Some of my coffee is in deep shade, some in semi shade, others in sun. The sun trees are the most compact and best bloomers, but the others also survive and produce. It's a good crop for utilizing shady ground that isn't being used. Not much edible likes to grow in shade. Coffee will grow in semi or full shade, although the trees will be stretchy and not compact, nor as productive as sun grown trees. But since I'm not looking for efficient production, that's just fine with me.
Above are flowers on my deep shade coffee. It's just starting to bloom again for the second time this year. 

The coffee from plants grown in deep shade tastes different from sun grown. People tell me that the shade town has more caffeine, but I don't know if that's true. Personally I think that the semi-shade trees produce the nicest coffee, but again, that may be just a mental perception that isn't true. Who knows.